Record a narrated presentation video in three moves
- Enable the Recording tab(File > Options > Customize Ribbon > Recording), then confirm your microphone and camera sources inside the recording workspace. Native recording needs the desktop app. It is not available in PowerPoint for the Web.
- Record slide by slidewith the red Record button (or
R), leaving a one-second buffer of silence before and after every slide change, because PowerPoint does not capture audio during slide transitions. - Export to videovia File > Export > Create a Video (or Record > Export to Video), choose Full HD (1080p) for most use cases, then distribute the MP4 by link rather than as an email attachment.
Who needs this workflow, and why the details matter
If you run model risk reporting, an internal audit walkthrough, or a quarterly control update, the narrated deck is not a nice-to-have. It is the record. Somebody will watch it three months later and ask which deck version the voice was describing. That question is easier to answer when narration, slide timings, and webcam footage sit inside the presentation file itself, attached to a specific slide.
Converting a static deck into an asynchronous video requires controlled workflows for audio fidelity, webcam placement, and export validation. Microsoft PowerPoint offers native recording features that capture voice narration, digital inking, and video presence directly on presentation slides. Choosing between built-in tools and external utilities depends on your compliance standards, operational scope, and editing needs.
The business case for doing this well is simple. A narrated deck recorded per slide can be corrected per slide. That single property turns a 30-minute board-level risk briefing from a full re-record into a 45-second patch.
Choose a tool to record PowerPoint with audio and video
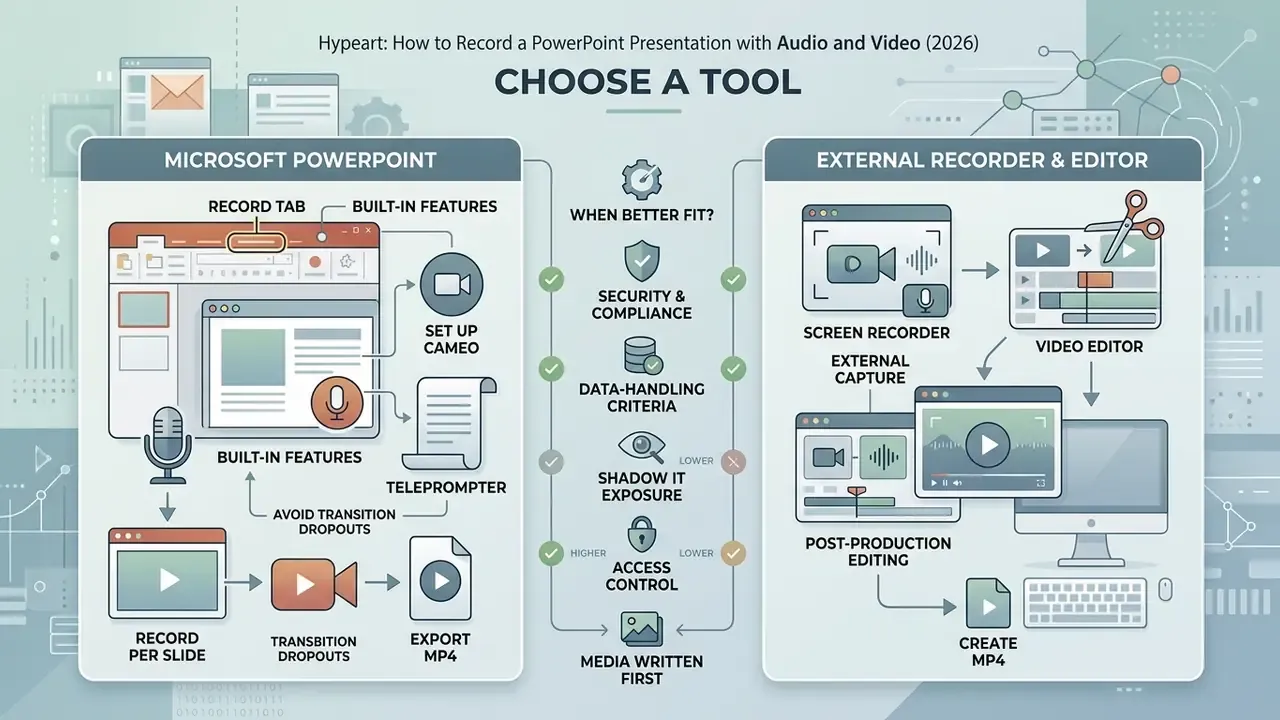
You can record a PowerPoint presentation with audio and video using Microsoft PowerPoint's built-in recording features, or with an external screen recorder plus a video editor. The native approach embeds narrations and slide timings into the file per slide. External tools record the entire screen as one continuous stream. Decide which you need before you launch the session, not halfway through take four.
Recording within PowerPoint keeps slide data structured and editable. External tools become necessary when you have to capture other software windows, apply multi-track timeline editing, or feed an institutional video management system.
Comparison: recording within Microsoft PowerPoint vs. an external screen recorder for creating presentation videos with audio and webcam
| Capability | Recording within Microsoft PowerPoint | External screen recorder + video editor |
|---|---|---|
| Record PowerPoint slides | Native per-slide recording with narration, video, inking, and slide timings via the Recording tab and Record Slide Show | Records slides as part of full-screen or window capture during the slide show; narrations are not stored per slide |
| Data storage structure | Media objects live inside the .pptx container, attached to individual slides; each slide holds its own audio/video asset and timing value | One continuous media file (MP4/MKV) on disk; no link between slide index and media timecode |
| Record webcam video | Integrated video narration in PowerPoint 2019, 2021, and Microsoft 365; the Cameo object overlays presenter video with shape, border, and shadow formatting | Webcam is usually a separate input; picture-in-picture overlays and flexible layout positioning |
| Record audio narration | Per-slide audio narration through the microphone; can be re-recorded slide by slide and exported with timings | Continuous audio track captured alongside screen and webcam, editable later on a timeline |
| Editing capabilities | Basic editing: re-record individual slides, clear narration and timings, trim embedded clips, add inking, adjust playback options | Richer post-production: trimming segments, cutting mistakes, overlays, multi-track audio balancing |
| Export as video file | Export to Video from the Recording tab, or File > Export > Create a Video, producing MP4 (H.264/AAC) or WMV at the chosen resolution | Exports MP4 or other formats directly; integrates with external hosting systems |
| Data residency | Media never leaves the presentation file; capture and render happen locally on the workstation | Varies by vendor: some recorders upload automatically to a vendor-hosted cloud library before the operator reviews the file |
When to use recording within Microsoft PowerPoint
Native recording within Microsoft PowerPoint suits slide-centric decks that need per-slide narration, slide timings, and direct video export without third-party software. The Recording tab lets presenters capture clean audio and webcam overlays while the core deck stays fully editable.
"The Record tab gives centralised access to audio and video narration, digital ink, shapes, and MP4 export, all in one place."
When a screen recorder and video editor are a better fit
An external screen recorder and video editor work better when your presentation jumps between applications, demonstrates live web software, or has to capture the entire screen. These tools bring advanced post-production: multi-track audio adjustment, precise trimming, and custom camera layout compositing.
OBS Studio-style workflows add a second reason to go external. The PowerPoint window becomes one source and the webcam becomes another, so the presenter can arrange layers freely before a single frame is recorded. Camtasia and Kaltura sit in the same category when the deliverable needs cut-aways, zoom-and-pan emphasis, or a branded intro bumper.
Organisations often pick dedicated capture software when they integrate with enterprise media platforms. Teams that need deeper post-processing than PowerPoint offers can compare dedicated applications in our overview of free video editing tools, or shortlist mobile-first options among good video editing apps before committing to a paid capture suite. If a static chart has to become motion for an executive summary, the image to video category covers that narrow job. And if narration must be generated rather than spoken, for example to standardise pronunciation of product names across a localisation set, check licensing terms first; for side-by-side feature reading, see our AI Media Versus Comparisons.
Security, compliance, and data-handling criteria
For regulated environments (model risk reporting, audit walkthroughs, supervisory submissions) tool choice is a control decision, not a preference. Three criteria usually decide it.
Third-party recorder vendors that sell to enterprise and public-sector buyers publish accessibility conformance and privacy reports covering items such as private listening and preservation of accessibility metadata. Request those documents during evaluation and store them with the tool approval record. If licence cost sits inside the same decision, open the hub for current tiers, and check commercial use terms before a recording reaches a client-facing channel.
Prepare slides, microphone, webcam, and recording environment
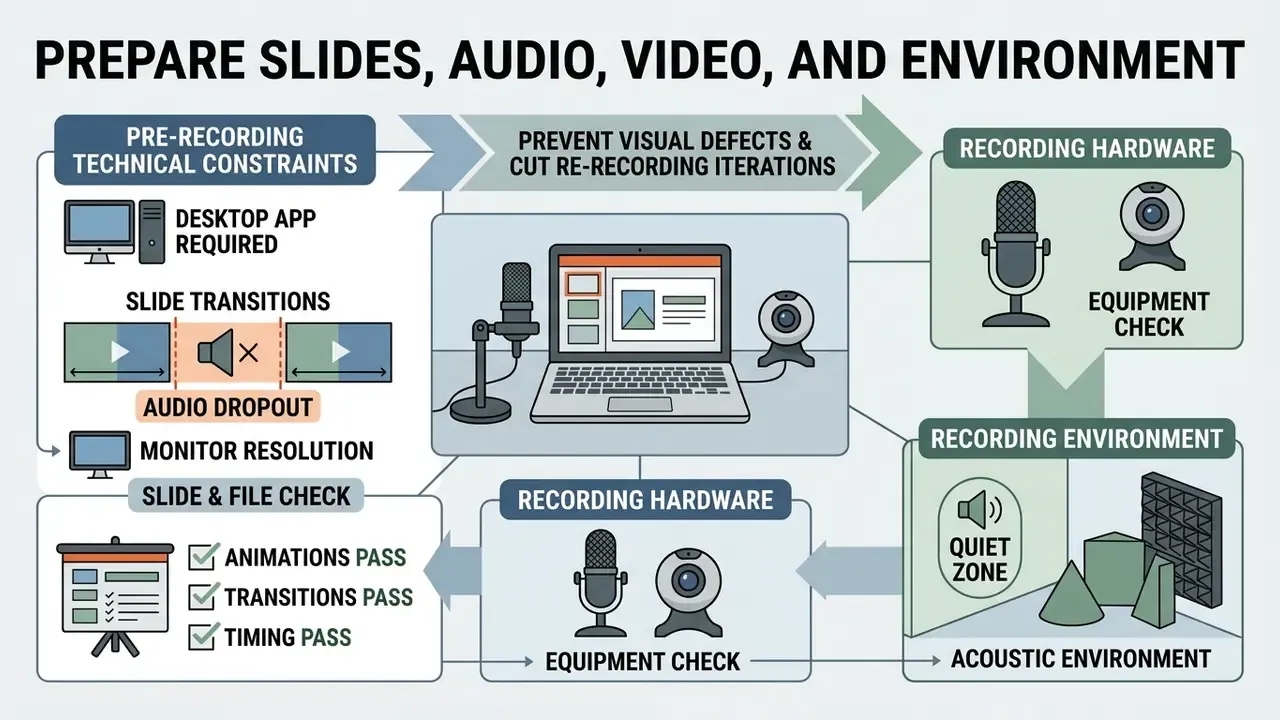
Careful preparation of the deck, the recording hardware, and the acoustic environment prevents visual defects and cuts re-recording iterations. Verifying your slide assets and recording settings before you press the record button is what makes a session feel seamless rather than lucky.
A standard setup protocol keeps technical issues away from delivery. Room acoustics and hardware placement, handled before recording, protect presentation video quality more than any post-production filter.
Critical technical constraints before recording
Check the PowerPoint file and every slide before recording
Inspect the PowerPoint file slide by slide to confirm layout formatting, transition triggers, and animation sequences before the recording session. Verifying that the current slide and the slides after it are final prevents structural disruptions mid-take.
Run the pre-flight in three passes.
- Animations pass. Animations apply to a single element on a slide. Select each animated object, open the Animations tab, check Effect Options, and preview in Slide Show so nothing fires on the wrong click.
- Transitions pass. Transitions apply to the whole slide. Open the Transitions tab, use Apply To All only when the same effect is genuinely wanted deck-wide, and preview in Slide Show.
- Timing pass. Use Rehearse Timings to sanity-check slide advance pacing before the take that counts.
Keep every text element in high contrast against its background, and confirm that embedded media clips launch correctly. Every slide should also carry text in its title placeholder. That is what screen readers announce and what makes the exported asset defensible in an accessibility review. Auditing every slide in advance removes the need to stop recording because of a typo on slide nine.
Set up audio and video recording equipment
Good sound depends on a quality microphone: an external microphone or USB headset placed close to the speaker, paired with a webcam at eye level, lens at or just below the eye line, never above the hairline. Minimising background noise and controlling room reflection creates a recording environment fit for enterprise communication.
"High-quality audio is the most important element of a lecture recording; most external microphones significantly outperform built-in laptop microphones."
How to record a PowerPoint presentation with audio and video
To record a PowerPoint presentation with audio and video, enable the Recording tab, configure your microphone and camera sources, and select the record button to launch slide show capture. You then move through the PowerPoint slides in real time while managing inputs from the recording toolbar.
Learning how to record your PowerPoint presentation with audio and video is mostly interface literacy plus discipline. Following a structured step guide prevents the usual operational errors during live capture.
Roughly forty views per recorded session. That ratio is the argument for treating recording as a repeatable production process rather than a one-off chore, because the asset gets consumed far more often than it gets created. For measured comparisons of capture and render performance, browse the hub.
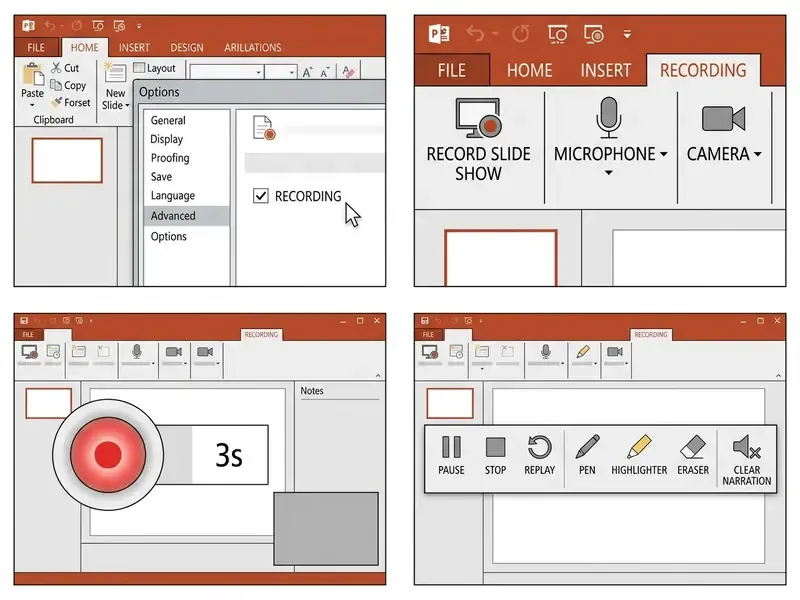
Open the Recording tab and enable audio and webcam
Activate the tab through File > Options > Customize Ribbon, check Recording in the right-hand list, then tab select OK. Once it appears, open the tab and verify your hardware inputs under Settings in the recording workspace.
"All recording tools are in the Record tab; if it is hidden, enable it via File > Options > Customize Ribbon."
Make sure the microphone and camera toggles are on in the lower-right control cluster of the recording window, and switch on the camera preview. A live webcam preview will appear on screen, which lets you fix framing and check input levels before capture. Record five seconds of test narration, stop, and play it back. That single step catches the two most common failures: a muted input device and a clipping gain level.
From the Recording tab you can choose From Beginning or From Current Slide. The second option is also how you re-record one slide later.
Configure Cameo video placement and Teleprompter view
Before you hit record, format the presenter video feed on the slide surface using the Cameo engine.
- Go to Record > Cameo to insert a live camera feed object on the current slide. A placeholder circle appears so you can preview overlay placement.
- Select the camera object and use the Camera Format tab to adjust shape (circle, rounded rectangle), borders, drop shadows, and styles. Grant camera and microphone permissions and pick the mic and camera source if this is the first use.
- Click Record > From Beginning to launch the recorder workspace.
- Switch the view mode at the top of the screen to Teleprompter. It displays slide notes directly above the active webcam position, so you keep line-of-sight eye contact while reading your script. The other views place notes beside or below the slide, which pulls your gaze off camera.
Because the Cameo object lives on the slide, its position and shape stay editable after recording. You can move the presenter frame off a chart it was covering without touching the narration. Small thing. Saves a whole retake.
Start, pause, resume, and stop the slide show recording
Click the red record button or press R to start a three-second countdown, and wait for the countdown to finish, otherwise the first words get clipped. As you present the slide show, use the recording toolbar to pause, resume, or annotate content in real time.
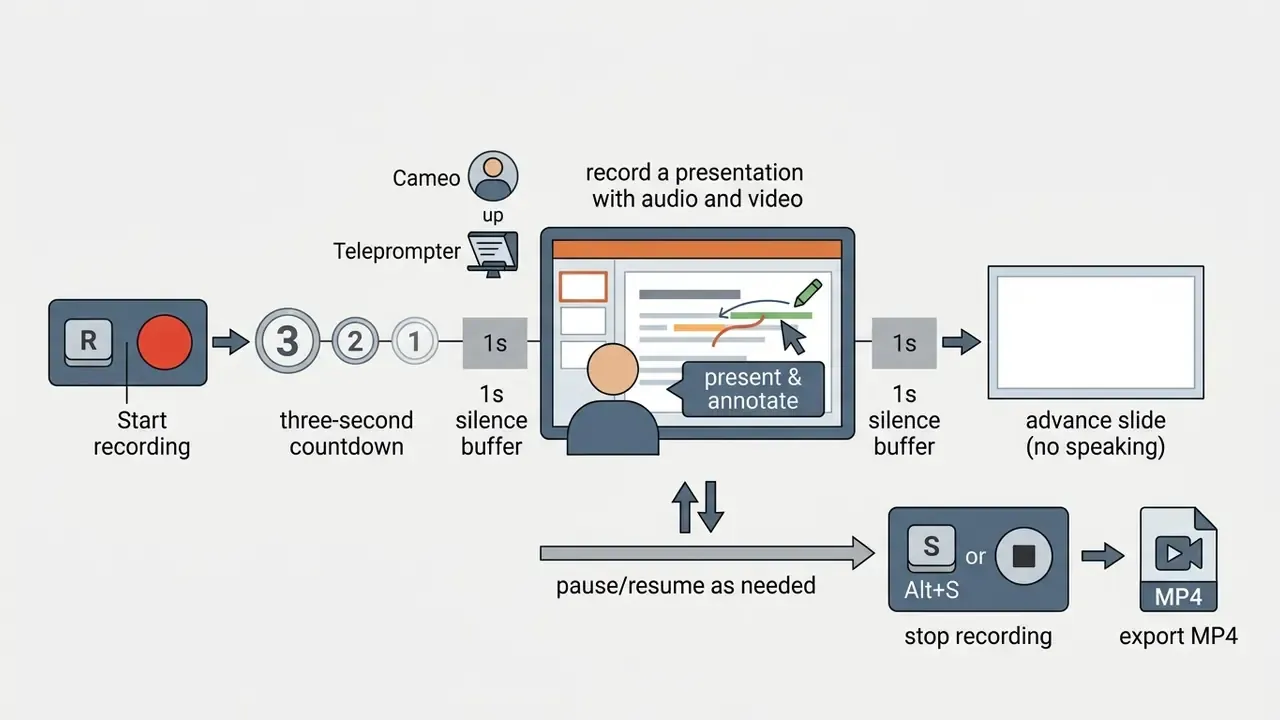
To stop recording, select the stop button or press S (or Alt+S). PowerPoint attaches the recorded webcam video, the audio track, and slide timings to the current slide, or across every slide in the deck. When capture ends, a small thumbnail appears in the lower-right corner of each recorded slide: an audio icon, or a still frame from the webcam if the camera was active. Start, stop, replay. That is the whole loop.
Keyboard reference for live capture
| Action | Shortcut |
|---|---|
| Start recording | R |
| Stop recording | S or Alt+S |
| Pen tool (digital ink) | Ctrl + P |
| Laser pointer | Ctrl + L |
| Highlighter | Ctrl + I |
| Eraser | Ctrl + E |
Ink, highlighter, eraser, and laser-pointer gestures are recorded with the narration and preserved in the exported video.
Troubleshooting and audio dropouts
| Symptom | Likely cause | Fix |
|---|---|---|
| First one or two words missing on every slide | Speaking during the transition, or before the second countdown ends | Add a one-second silence buffer; remove slide transitions |
| No Recording tab visible | Tab disabled in the ribbon, or the file is open in PowerPoint for the Web | Enable via File > Options > Customize Ribbon; reopen in the desktop app |
| Camera preview black | Another application holds the camera, or OS privacy permission is denied | Close conferencing apps; allow camera access in system privacy settings |
| Narration recorded but silent on export | "Use Recorded Timings and Narrations" disabled in the export dialog | Reopen Create a Video and enable the option |
| Stutter or dropped frames in the render | Recording to a cloud-synced folder, or 4K on constrained hardware | Record to a local SSD; export Full HD instead of 4K |
| Faint mechanical hum under the voice | Laptop cooling fan picked up by an internal microphone | Switch to an external microphone placed off the chassis |
| Webcam footage too dark on one slide only | Cameo object formatting changed mid-deck | Match brightness and contrast settings across Cameo objects, then re-render |
Review and edit the PowerPoint recording before export
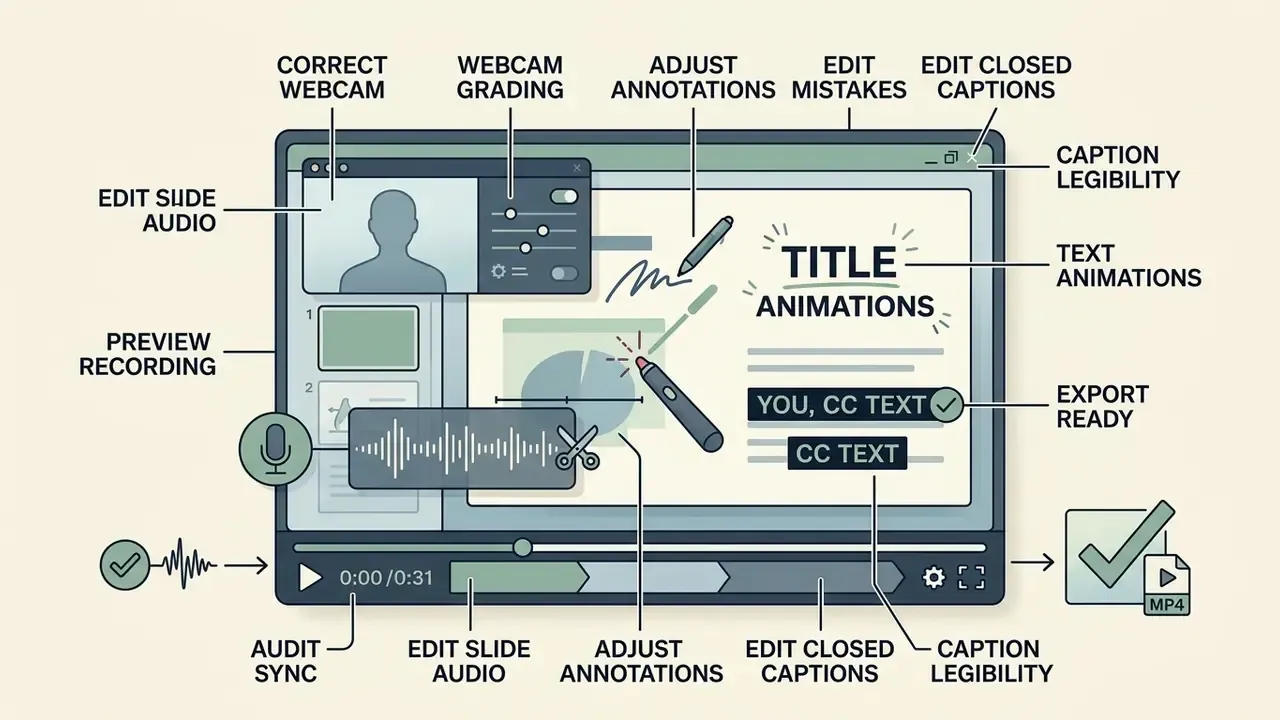
Reviewing a finished recording lets you verify narration alignment, clear spoken errors, and adjust annotations before you create the final video. PowerPoint supports per-slide media replacement directly in the workspace, which is the whole point of recording there.
If you need real timeline surgery or advanced multi-track overlays, export first and refine the presentation video in external editing software.
Preview recordings and replace audio or video on a slide
Preview your presentation recording by running the slide show from the beginning, by using the triangular Play control near the top-left of the recording window, or by selecting the audio icon on a slide in Normal view and pressing Play. If narration on a specific slide contains mistakes, use Record Slide Show > Clear > Clear Narration on Current Slide, then Record from Current Slide to overwrite only that segment. The rest of the PowerPoint recording stays untouched.
"Recorded narration is stored per slide, so replacing one slide's recording does not require re-recording the whole deck."
During an executive model governance presentation, an operator spotted a calculation error on slide 14 after finishing a 30-minute deck recording. Instead of starting over, the operator cleared narration on slide 14 only and recorded a replacement segment of well under a minute. By the team's own production estimate, slide-level replacement avoided about three hours of re-recording and review while keeping slide timings elsewhere exact. Those figures are an internal production estimate, not a published measurement, and they will vary with deck length.
Edit mistakes, annotations, captions, and webcam footage
Once you have a finished recording, you can start editing: trim embedded video clips, modify digital ink, or apply closed captions. Embedded video is trimmed in PowerPoint's Trim dialog using Play, Pause, Next Frame, and Previous Frame. Subtitles arrive as WebVTT caption tracks attached to the embedded media object.
"High-quality audio is the foundation of accurate captions: speech intelligibility directly determines automatic transcription quality."
To improve accessible viewing for hard-of-hearing users and silent playback environments:
- Digital inking and laser pointer. During active recording, press
Ctrl + Pfor the Pen orCtrl + Lfor the virtual laser pointer to add annotation on the fly. Marks drawn live are baked into the video stream timecode, so they cannot be removed later from the MP4, only re-recorded at slide level. - Closed caption injection. Link a sidecar
.vttfile to the per-slide media object under Playback > Insert Captions, keeping the asset aligned with the Web Content Accessibility Guidelines (WCAG). - Caption legibility limits. Keep caption lines short. Practical captioning guidance converges on roughly 32 to 40 characters per line, a maximum of two lines, a minimum on-screen duration near two seconds, and placement that never covers charts or the presenter frame.
- Webcam grading. If the presenter feed looks flat, adjust your webcam footage on the Cameo object (brightness, contrast, saturation) or in post-production, instead of re-lighting and re-recording the whole deck.
- Text animations. Add build-in text animations sparingly; every extra build is another synchronisation point to verify against narration.
To trim away mistakes in third-party software, export the presentation as an MP4 and open it in a video editor that supports frame-accurate cuts and multi-track audio. Looking for something lighter than a full suite? The mobile and desktop options in our good video editing roundup cover most narration fixes.
Audit-readiness check for captions and animation sync
Before a narrated deck reaches an auditor, reviewer, or external regulator, verify four synchronisation points on the exported file, not on the .pptx.
- Captions appear within 0.5 seconds of the matching spoken phrase on at least the first, middle, and final slides.
- Every build animation completes before the narration references the revealed element.
- Slide timings in the export match the rehearsed timings, with no slide advancing mid-sentence.
- Ink annotations stay legible at the export resolution, including at 50 % scale on a laptop screen.
Export the presentation recording as a video file and share it
| Check item | Validation requirement | Status |
|---|---|---|
| Full deck playback | Run the slide show start to finish to confirm media synchronisation | [ ] Verified |
| Per-slide audio audit | Ensure no slide is unintentionally silent or muted | [ ] Verified |
| Transition buffer check | Confirm no words are clipped at the start or end of any slide | [ ] Verified |
| Acoustic quality check | Confirm speech is clear and free from noticeable background noise, including cooling-fan hum | [ ] Verified |
| Webcam alignment | Verify presenter video framing, lighting, and line of sight | [ ] Verified |
| Caption track | Confirm the .vtt file is attached and timed to the narration | [ ] Verified |
| Export settings | Select Full HD (1080p) or 4K with recorded timings and narrations enabled | [ ] Verified |
Save the PowerPoint recording as a video file
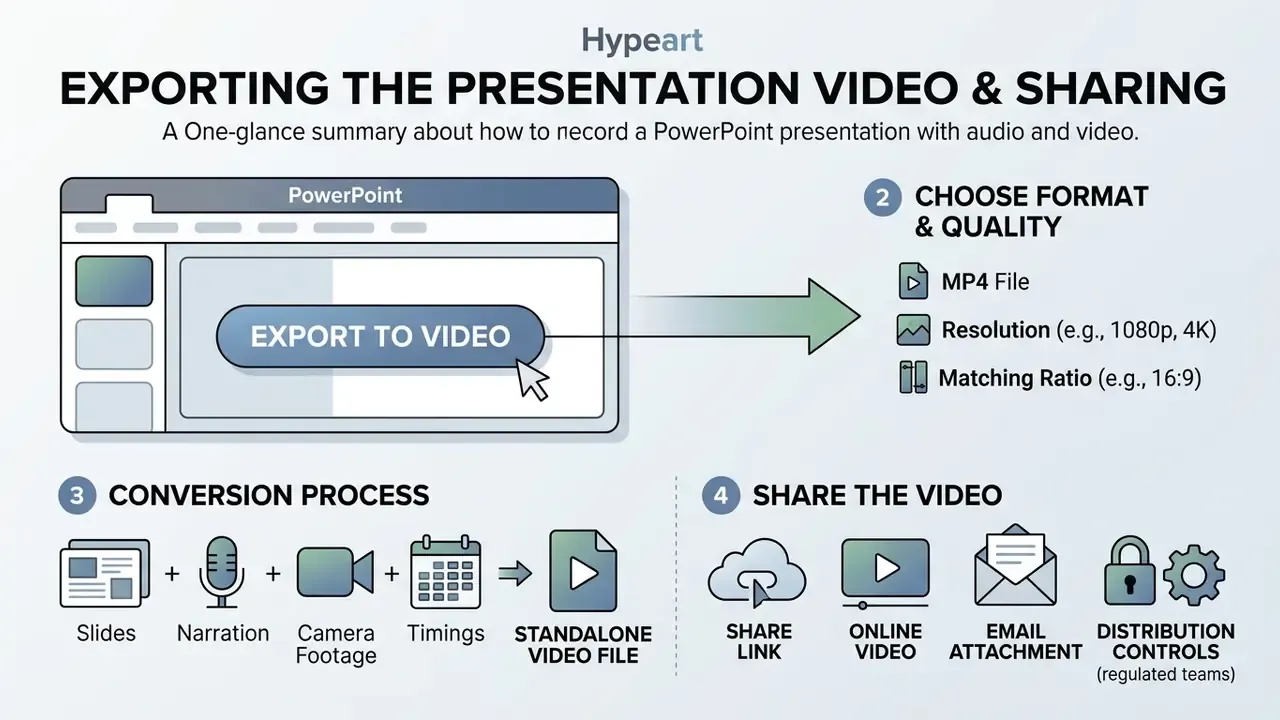
To save the recording, go to File > Export > Create a Video (or Record > Export to Video). Select your output quality, confirm that Use Recorded Timings and Narrations is enabled, and click Create Video.
Quality presets map to fixed resolutions: Ultra HD (4K) 3840 × 2160, Full HD (1080p) 1920 × 1080, HD (720p) 1280 × 720, Standard (480p) 852 × 480. The 4K option needs Windows 10 or later. PowerPoint exports MP4 (H.264 video with AAC audio) or Windows Media Video (WMV) on Windows; on macOS the dialog offers MP4 and MOV, including an HEVC variant. Once you are satisfied with the quality settings, pick the destination folder and let the render finish. Higher quality means a proportionally larger file, so check the number before you upload.
Planning to script or voice this pipeline at scale? For programmatic rendering options, see the overview.
Matching video resolution and aspect ratio to distribution channels
Set slide dimensions (Design > Slide Size) before recording so you do not inherit black letterbox bars.
| Platform / destination | Recommended slide size | Aspect ratio | Target export resolution |
|---|---|---|---|
| Enterprise / YouTube / LMS | Widescreen (16:9) | 16:9 | Full HD (1080p) or 4K Ultra HD |
| Mobile learning / Shorts / TikTok | Custom (1080 × 1920 px) | 9:16 vertical | 1080p (1080 × 1920) via external editor |
| Social feeds (LinkedIn / Instagram) | Square (1080 × 1080 px) | 1:1 square | 1080p square video |
If one recording must serve several channels, record once at 16:9 and re-frame in an editor using aspect-ratio presets with fit and fill controls, rather than re-recording narration for each format.
Version and platform differences, please note
This guide is informational and describes product behaviour observed in Microsoft 365, PowerPoint 2021, and PowerPoint 2019 as documented by Microsoft Support at the time of the last update. Interface labels and available controls differ between release channels. PowerPoint for the Web does not support narration or webcam recording at all. PowerPoint for macOS offers a different export format set (MP4/MOV/HEVC) and a reduced Cameo and Teleprompter feature set compared with the Windows desktop app. Older perpetual versions may lack video narration entirely. Compliance, records-retention, and data-protection points here are general practice notes, not legal or regulatory advice. Validate any recording, storage, or distribution workflow with your own information-security, legal, and compliance functions before using it for regulated reporting.
FAQ
Can I record a PowerPoint presentation with audio and video in the browser?
No. Native narration and webcam recording require the desktop application on Windows or macOS. In PowerPoint for the Web the recording controls are unavailable, so open the file locally first.
Why is the first word of my narration missing on each slide?
PowerPoint does not capture audio during slide transitions, and the three-second countdown must finish before you speak. Add a one-second silence buffer at the start and end of every slide, and remove animated transitions from narrated decks.
How do I record only one slide?
Open that slide, then choose Record > From Current Slide. To overwrite an existing take, first use Record Slide Show > Clear > Clear Narration on Current Slide.
My webcam does not appear in the recording window, what now?
Close any conferencing application holding the camera, check operating-system camera privacy permissions, then confirm the camera toggle and camera preview are enabled in the lower-right controls and that the correct device is selected under Settings.
Where is narration stored, in the file or in a separate audio file?
Inside the presentation. Each slide holds its own audio or video object plus a timing value inside the .pptx container, which is exactly why per-slide re-recording works.
Can I add subtitles to the exported video?
Yes. Attach a WebVTT (.vtt) caption file to the embedded media object via Playback > Insert Captions, or add captions to the exported MP4 in an external editor or on the hosting platform.
1080p or 4K?
Full HD (1080p) is enough for slide-based content and keeps files small enough for enterprise networks and LMS upload limits. Reserve 4K for decks with dense charts or high-detail footage, and expect a substantially larger file.
Does the exported video keep animations, ink, and laser-pointer gestures?
Yes. The export includes slide timings, narration, animations, transitions, embedded media, ink, and laser-pointer gestures.
Which resources should I keep after publishing?
Keep the archived .pptx, the exported MP4, the .vtt caption file, and the pre-export validation checklist. Together they make the recording reproducible and auditable.
Further reading
For software evaluations, tool comparisons, and feature benchmarks across digital media platforms, see the overview.