Last updated: March 2026. All menu labels verified against the Photos app interface in iOS 16, iOS 17, and iOS 18, plus the macOS Photos export dialog.
The Short Answer
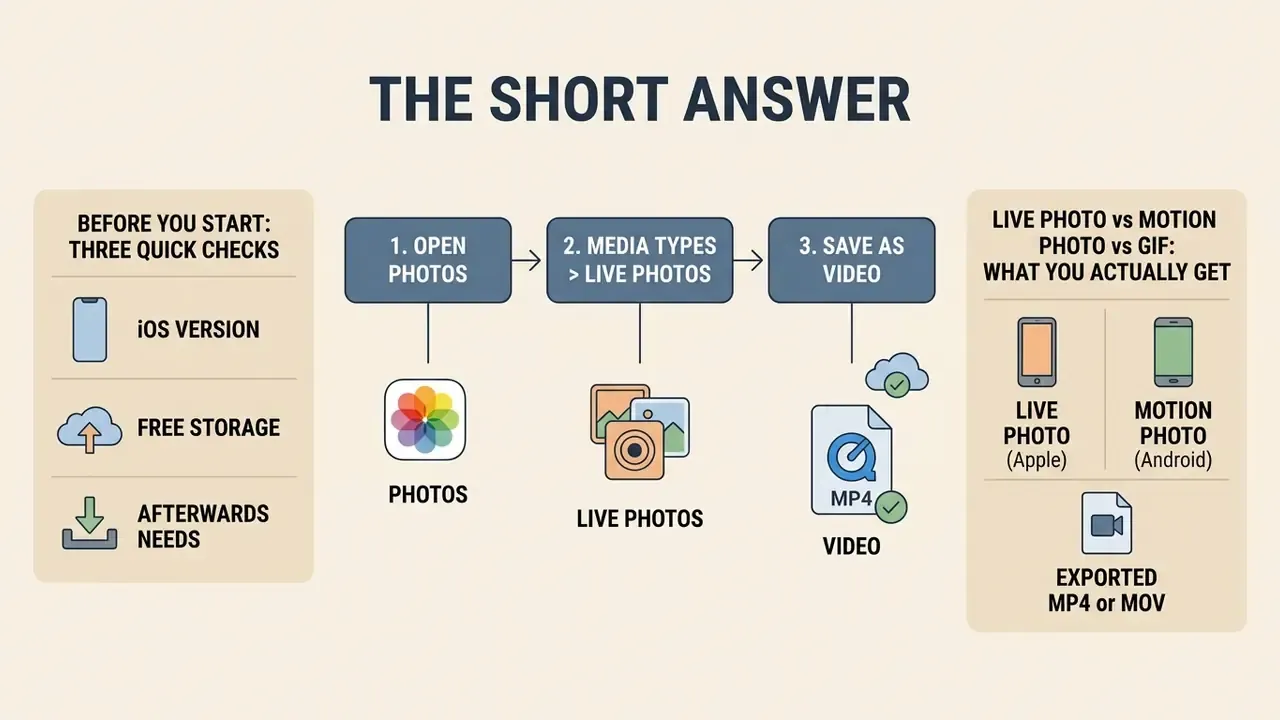
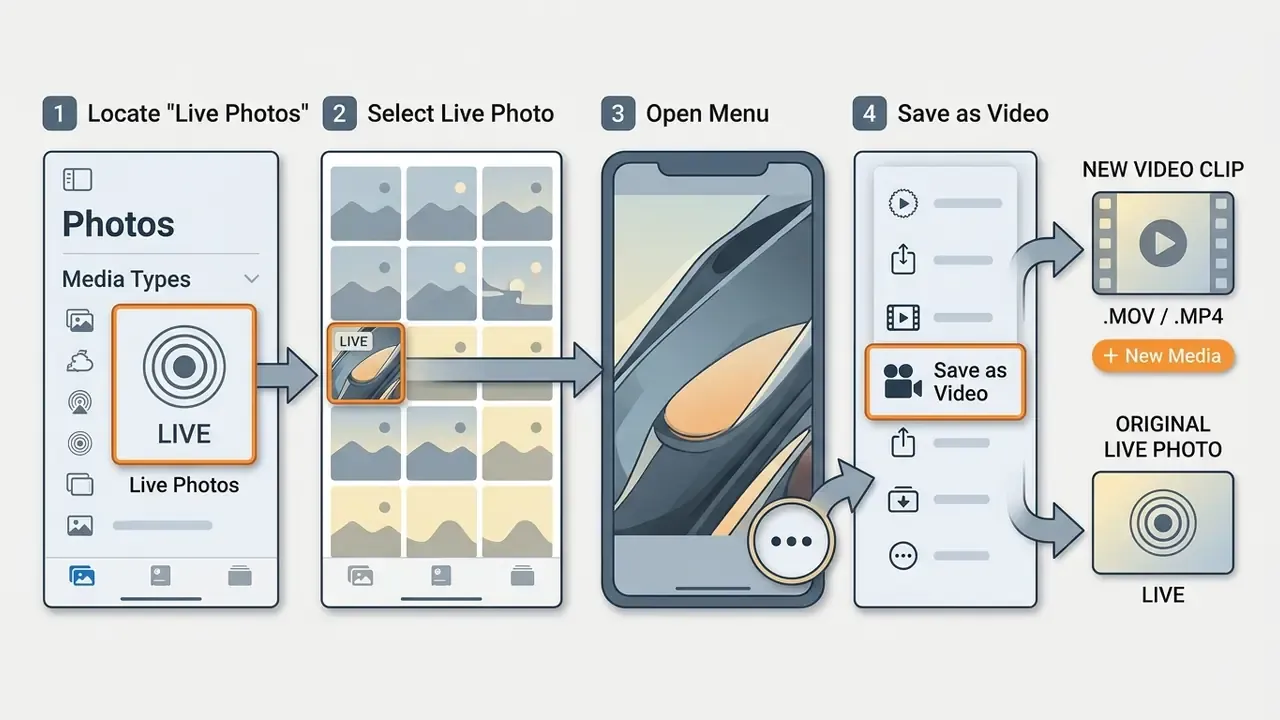
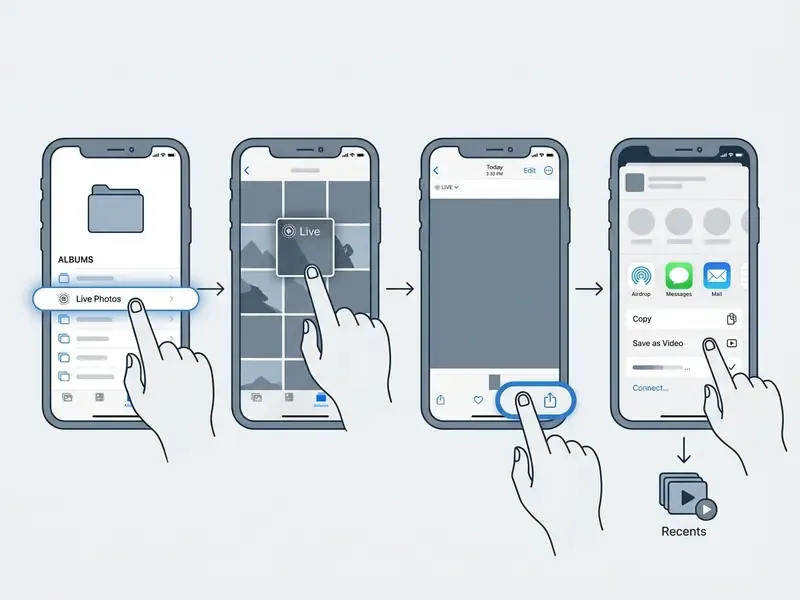
Open Photos → Media Types → Live Photos, select one or more clips, tap the More button (…) or Share, then choose Save as Video. iOS extracts the embedded QuickTime MOV stream without re-encoding it, writes a new clip to Recents, and leaves the original Live Photo untouched. For continuous playback, apply Loop or Bounce from the Live badge before you export. For lossless desktop work, use File → Export → Export Unmodified Original in Photos on Mac. Avoid unverified online converters when the footage carries personal, corporate, or location data.
Before You Start: Three Quick Checks
- iOS version.The one-click Save as Video command shipped in iOS 13. On older builds you will need a third-party converter or a Mac.
- Free storage.The conversion adds a file rather than replacing one, so every export costs space in your camera roll. Budget roughly 2 to 6 MB per clip.
- What you need afterwards.Keep the original Live Photo if you still want it as a live wallpaper. Use the exported video for everything you send outward.
Live Photo vs Motion Photo vs GIF: What You Actually Get
- Live Photo (Apple) paired HEIC or JPEG still plus a short MOV stream, with audio. Plays only where the pairing is understood.
- Motion Photo (Android) a parallel implementation of the same idea, not the same container. Cross-compatibility is partial at best.
- Exported MP4 or MOV a plain video file that any mobile device, browser, or editor can open. Audio survives.
- GIF loops everywhere, but drops audio, cuts resolution, and quantizes color. Use it only when the destination refuses video.
That distinction matters more than most tutorials admit. A Live Photo that "stopped working" is almost never corrupted. It simply travelled through a channel that kept the static image and discarded the motion.
What Happens When You Convert a Live Photo to a Video?
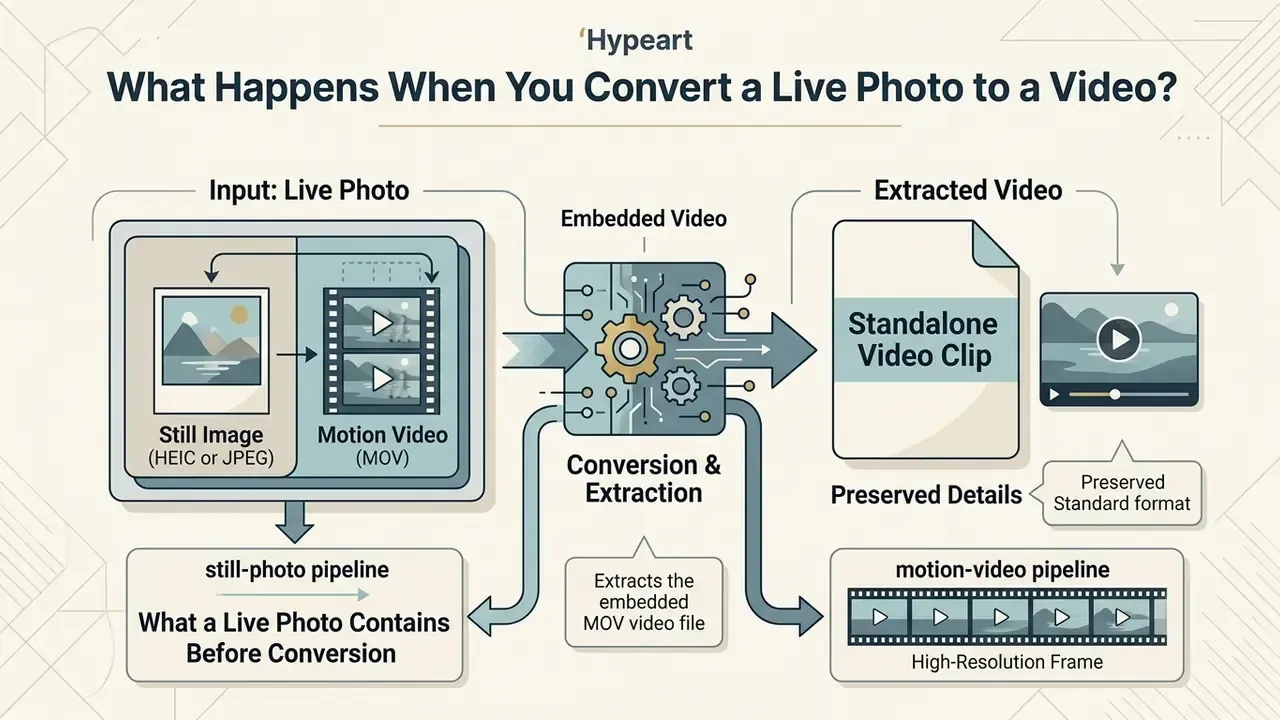
Converting a Live Photo extracts the embedded MOV video file from the paired HEIC or JPEG still image and saves it as a standalone video clip. The process preserves the original audio, frame sequence, and duration, then writes a separate file into your camera roll that non-Apple platforms can play and upload natively.
What a Live Photo Contains Before Conversion
Before conversion, an iPhone Live Photo consists of two separate data streams linked by shared metadata identifiers. The primary component is a full-resolution 12-megapixel still image, saved as HEIC or JPEG. The secondary component is a short QuickTime MOV clip recorded at roughly 15 to 30 frames per second.
Modern iOS devices split these components across two distinct processing pipelines:
- The still-photo pipeline uses full computational photography (multi-frame fusion, high dynamic range, noise reduction) to render a 12.2-megapixel image, 4032×3024 pixels on recent Pro models.
- The motion-video pipeline operates under real-time power and processing limits, recording about 1.5 seconds before and after the shutter moment at ordinary video resolutions, typically 1920×1440 or 1080p.
Visualized, the resolution gap looks like this:
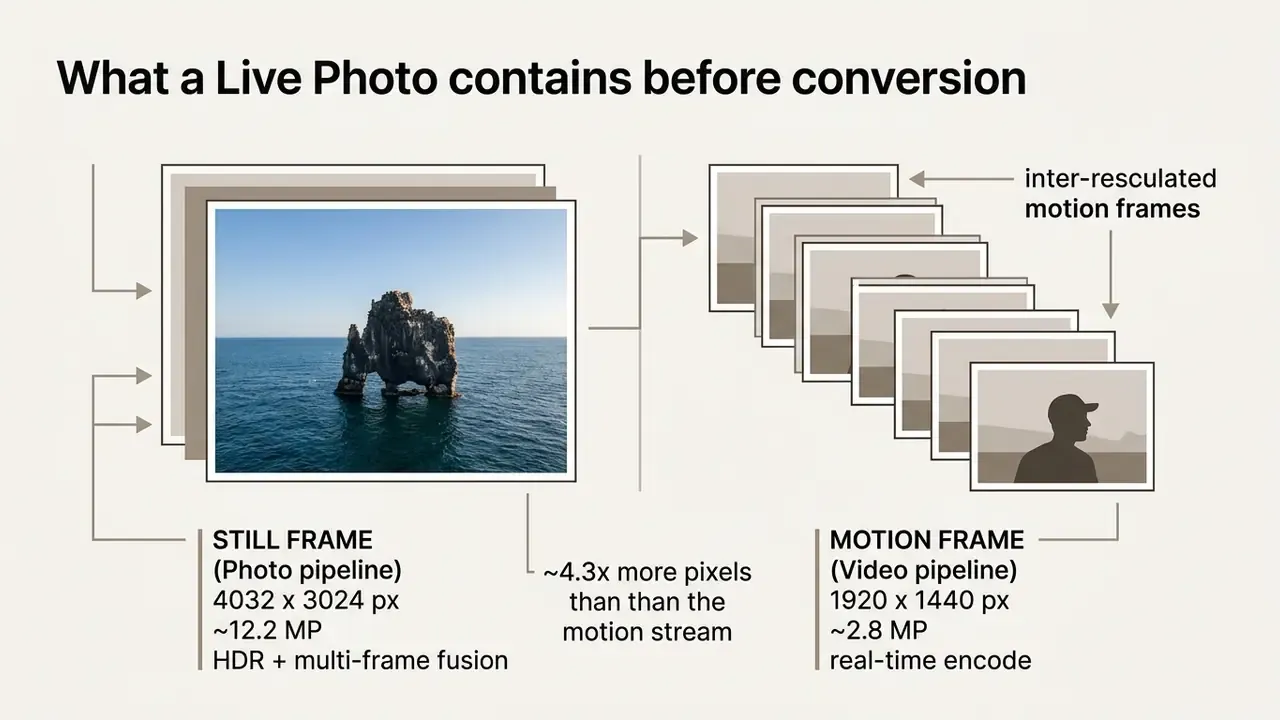
When you trigger a conversion, the iPhone camera pipeline is no longer involved. Your device simply reads the paired MOV file out of the image container and writes it out as a standard video file, leaving the high-resolution still untouched. If you later need to sharpen, crop, or retouch the exported cover frame, or even fix a caption baked into it, a task-specific guide such as how to edit text in jpeg image online will serve you far better than any converter.
Which Method Should You Choose: iPhone, App, Online Tool, or Mac?
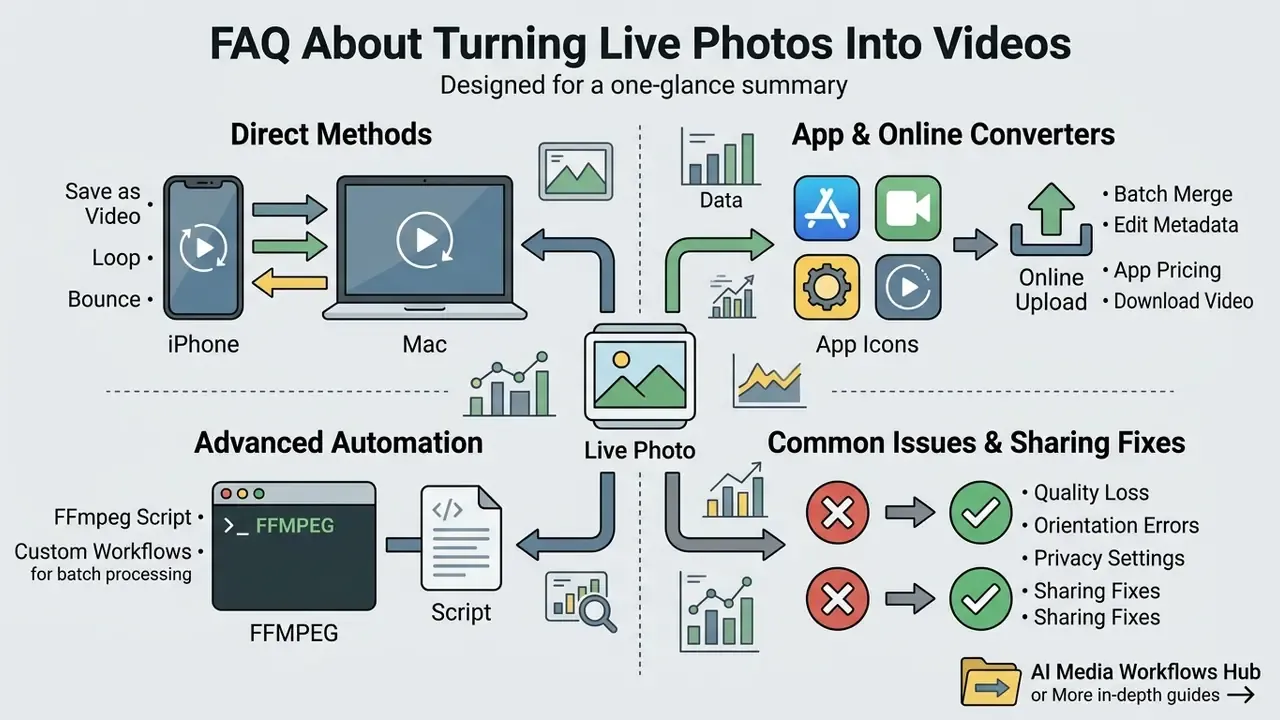
The right conversion route depends on whether you need quick single-file exports, multi-clip editing, browser-based access on a non-Apple machine, or batch processing across a large library. Scan the table, then jump to the section that matches your device.
| Method | Installation Required | Video Editing Capabilities | Quality Impact | Batch Processing | Primary Use Case |
|---|---|---|---|---|---|
| iOS Photos App | None (built-in) | Basic trimming, Loop and Bounce effects | Preserves original MOV encoding (zero loss) | Manual multi-select plus Save as Video | Quick single or multi-clip exports on iPhone |
| Third-Party iOS Apps | App Store download | Text overlay, speed control, audio insertion | Possible re-encoding loss depending on settings | Supported in premium tiers | Creative video editing and custom formats |
| Online Web Converters | None (browser) | Limited trimming and format conversion | Re-compresses the video stream on export | Variable, bandwidth dependent | Conversion on Windows, Android, or Chrome OS |
| macOS Desktop Workflows | None, or NLE software | Full multi-track editing (iMovie, Final Cut Pro) | Lossless raw MOV export available | Native batch export plus ffmpeg scripts | Professional editing and archiving |
One rule of thumb after years of doing this: choose the method by where the file is going, not by which app you happen to have open. If you intend to keep cutting after the export, compare your editing options before paying for a timeline tool.
How to Convert a Live Photo to Video on iPhone in the Photos App
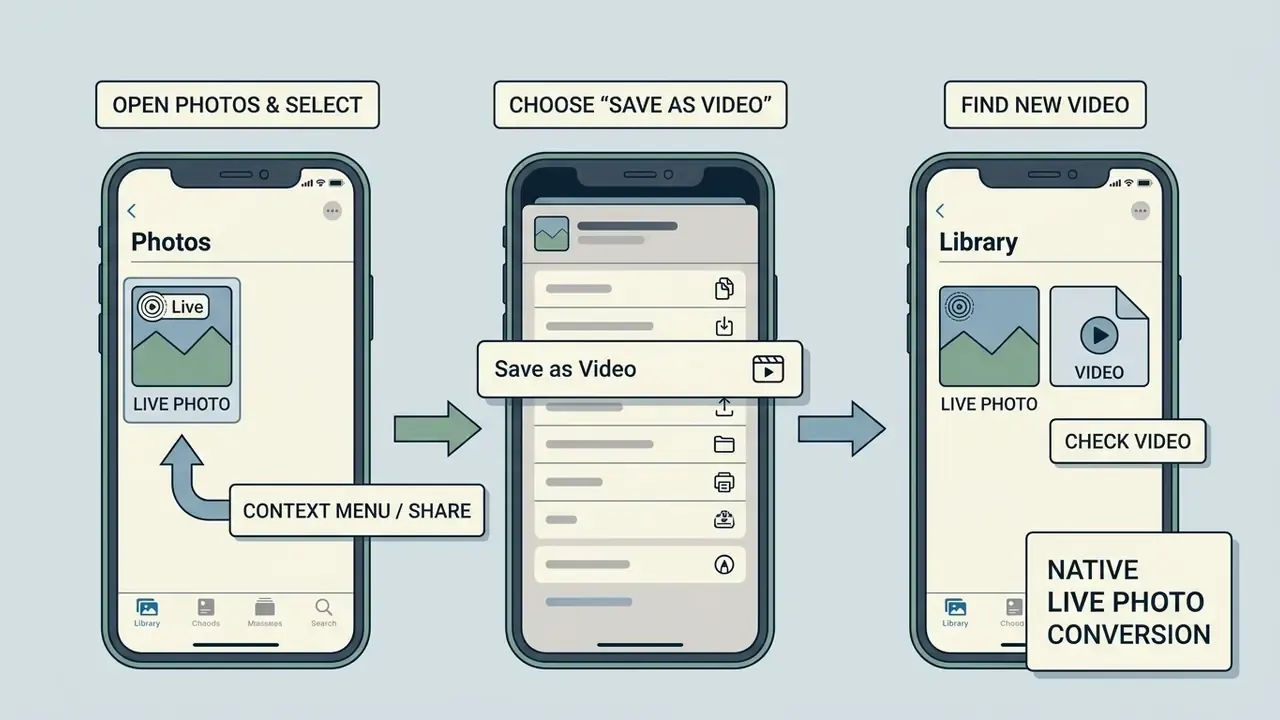
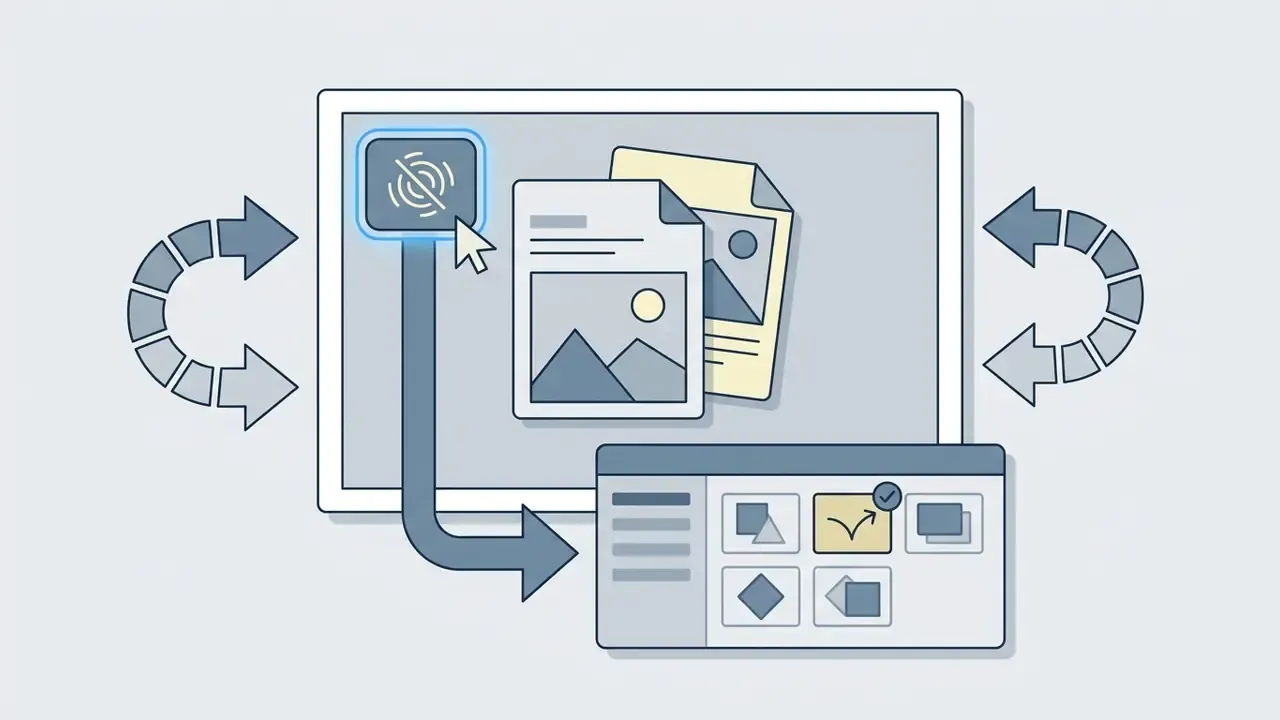
To convert a Live Photo to video on iOS natively, open the Photos app, select one or more Live Photos, open the context menu, and pick Save as Video. Apple added this direct command in iOS 13 and refined it through iOS 16, iOS 17, and iOS 18. No extra software, no upload, no account.
Find and Check the New Video in Your Photo Library
Once the conversion process finishes, the new video appears in two places inside the Photos app:
- The Recents (or Recently Saved) album, sorted by creation timestamp.
- The Videos album under Media Types.
The original Live Photo stays exactly where it was, in the Live Photos album. Verify the export by tapping the new clip and confirming that sound, frame stability, and duration match the live capture. Then trim, caption, or crop it however you like; our walkthrough on how to edit videos on iphone covers the mobile editing side in detail.
Visual walkthrough, native iPhone Live Photo conversion:
Turn Live Photos Into Loop or Bounce Videos
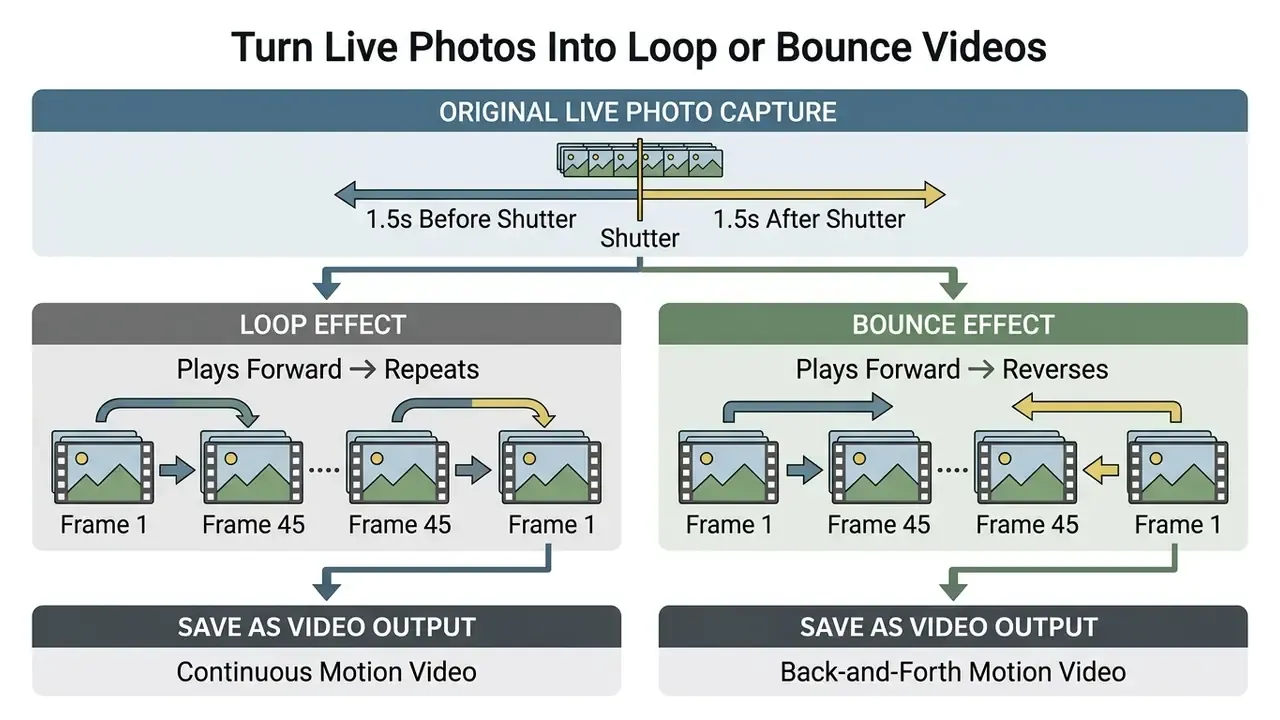
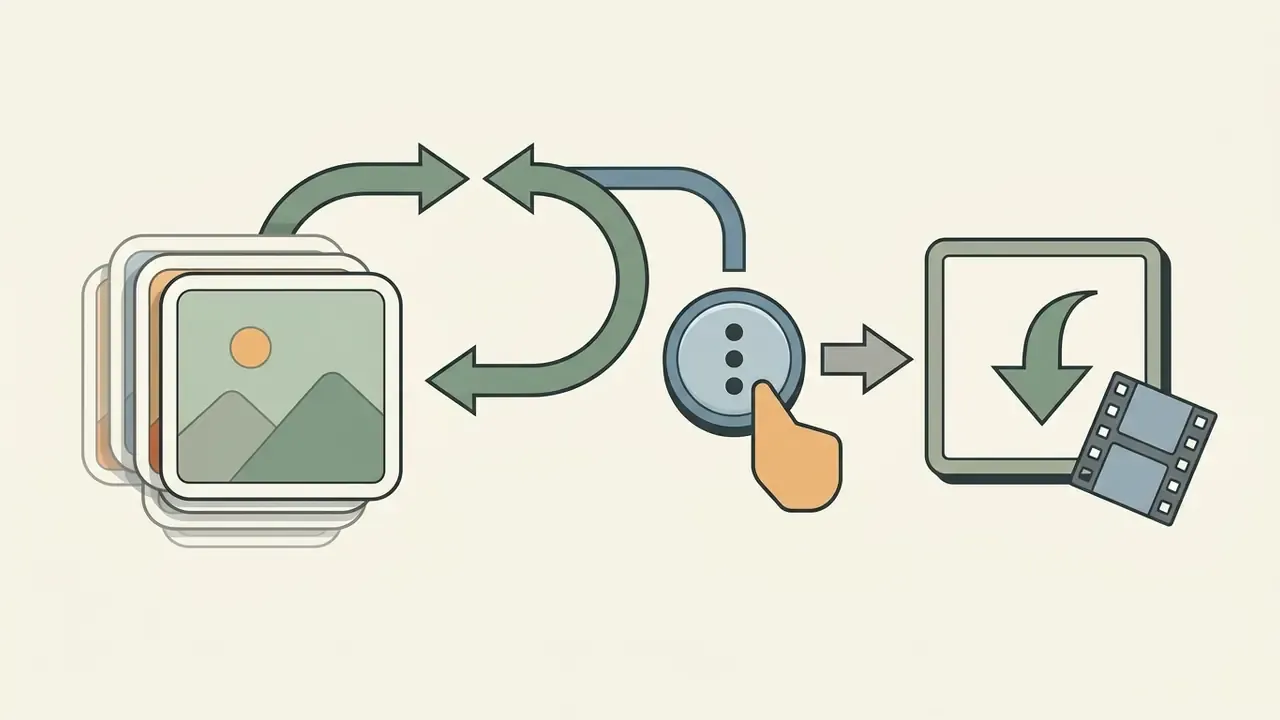
You can convert a Live Photo to video on iPhone with continuous playback by applying Apple's built-in Loop or Bounce effects before you export. Both turn a standard 1.5-second motion capture into a longer video clip that suits social media far better. Since both effects live in the same Photos app, treat this as the second half of the native iOS workflow rather than a separate tool.
Use Loop for a Repeating Video Effect
Loop converts the short video into a repeating sequence by splicing the end of the clip back to the beginning:
- Select your asset in the Photos app.
- Tap the Live drop-down menu in the top-left corner.
- Select Loop.
- Tap the More button (…) top right and choose Save as Video.
The resulting file repeats the motion, which stretches a very short video into something publishable without any manual video editing. Loop and Bounce clips also land in the Animated album, which iOS creates automatically the first time you save one. There is a trade-off, documented by several Apple-focused publishers: Loop and Bounce renders drop the original ambient audio. When sound matters, use plain Save as Video.
Use Bounce for Forward-and-Reverse Motion
Bounce plays the recorded action forward, then immediately backwards, producing a small back-and-forth animation:
Bounce roughly doubles the runtime of the clip, from 1.5 seconds to about 3.0 seconds. That makes it useful for actions with a clear start and stop: a jump, a splash, a wave, a coffee pour. Handy detail. If your source photo has no usable motion at all, a set of generative ai tools can synthesize movement instead of extracting it.
You can also reverse course at any time. Reopen the clip, tap the effect menu, and choose Live to strip the effect entirely.

How to Batch-Merge Multiple Live Photos Into a Single Video
Want to stitch several Live Photos into one continuous sequence for a travel recap, a product demo, or an event highlight, without installing anything? iOS compiles all the selected 1.5-second motion clips into a single continuous video file in your library. This multi-select behavior has been available since iOS 16, and it remains the fastest native route to a longer video.
Limits to expect: the merged export carries no transitions, no titles, and no audio ducking between segments. If you need cross-fades, cross-zooms, captions, or a music bed, move the exported file into a timeline editor (iMovie, CapCut, LumaFusion, Premiere Pro) or a browser-based one. Apple's own iMovie for iOS caps transition duration at 2 seconds and requires adjacent clips to be longer than that, which is precisely why longer montages tend to migrate to a third-party or desktop editor. For repeatable, high-volume pipelines, automation beats tapping: our AI Media API Guides cover scripted ingestion and transcode instead of manual selection.
- Open Photos and tap Select in the top-right corner.
- Highlight multiple Live Photos in chronological order. The order you tap sets the sequence.
- Tap Share (or More …) and select Save as Video.
Sharing Nuances: AirDrop, iMessage, Email, and Instagram
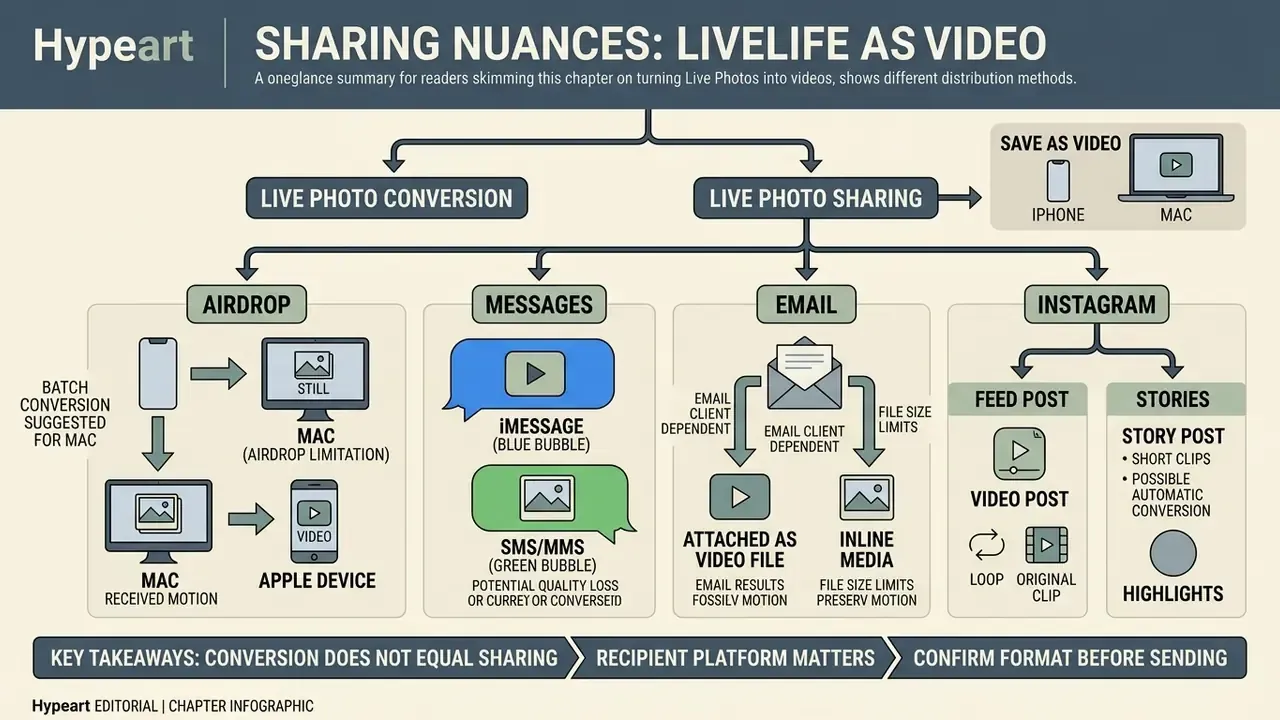
Most "my Live Photo turned into a still picture" complaints are distribution problems, not conversion problems. Sort them out before you hit send.
How to Set a Converted Live Photo as Lock Screen Wallpaper
Troubleshooting: why isn't the wallpaper animating?
If the motion effect refuses to play on your lock screen, check two system settings before blaming the file:
- Turn off Low Power Mode. Go to Settings → Battery and disable Low Power Mode. System throttling pauses animated wallpaper rendering.
- Disable Reduce Motion. Go to Settings → Accessibility → Motion and switch Reduce Motion to OFF.
- Check the source asset. A file you already exported with Save as Video is a plain video and cannot be used as a live wallpaper. Keep the original Live Photo for wallpaper duty and use the exported MP4 or MOV for sharing.
- Trim the length. Motion wallpapers look best with 3 to 5 seconds of smooth movement. Longer or shakier clips render choppy.
- Open Photos, select the Live Photo, tap Share, and choose Use as Wallpaper.
- Adjust the framing and confirm that the Live Photo playback icon (bottom center) is toggled ON.
- Tap Add, then decide whether to apply it to the Lock Screen, Home Screen, or both.
Best Third-Party Apps to Turn a Live Photo Into a Video
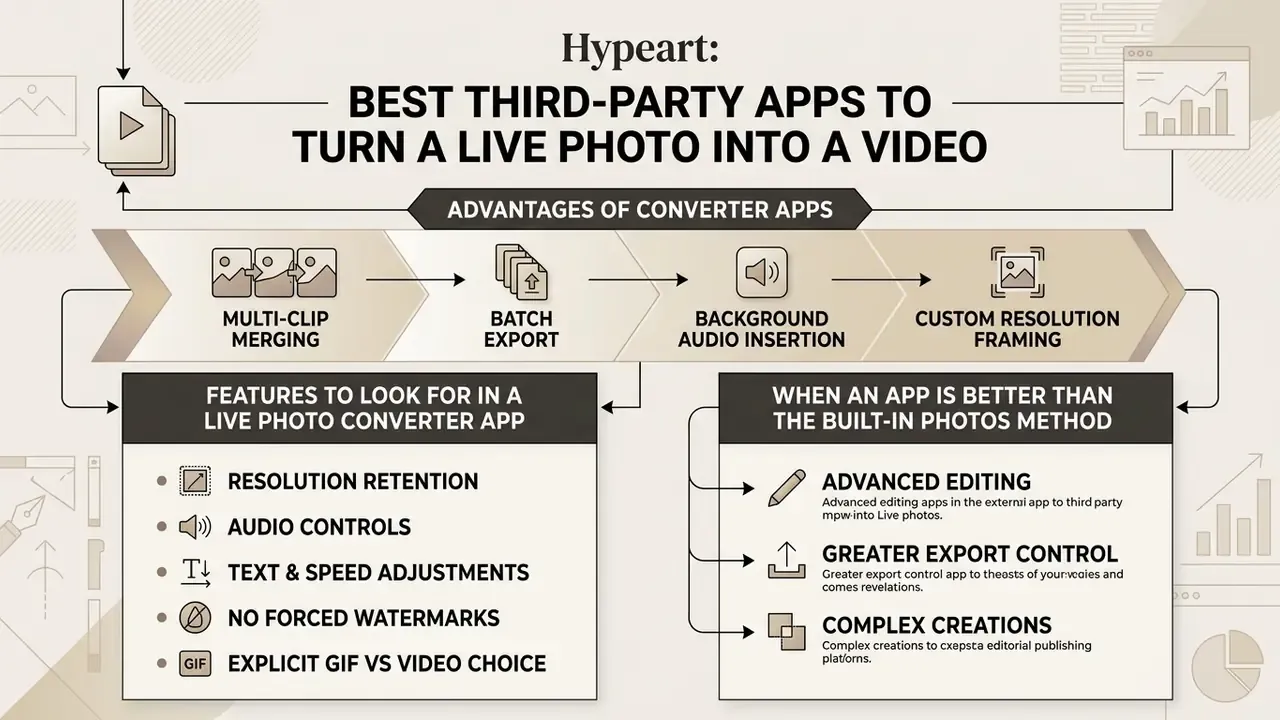
Third-party mobile applications extend the native tools with multi-clip merging, batch export, background audio insertion, and custom resolution framing. The question is whether you need any of that, or just one clean file.
Features to Look for in a Live Photo Converter App
When evaluating a Live Photo converter on the App Store, check these capabilities:
- Resolution retention. Can it export at 1080p or 4K without silently downscaling?
- Audio controls. Can it keep the original ambient audio, or insert music?
- Text and speed adjustments. Speed multipliers from 0.5x to 2.0x, plus text overlay tools.
- No forced watermarks. Clean exports in the free or low-cost tier. Some converters watermark GIF output while leaving MP4 output clean, so test both formats before paying.
- Explicit GIF vs video choice. Prefer MP4 or MOV whenever the destination accepts it. Supported formats including HEVC, H.264, and GIF vary widely between apps.
When an App Is Better Than the Built-In Photos Method
The native iOS route handles single assets quickly and losslessly. Dedicated third-party apps earn their place on bigger jobs. Converting dozens of archived files for a client deliverable, for instance, is where you want multi-select, unified color filters, custom transitions, and one combined export. If the output is billable or brand-facing, review the licensing constraints in our AI Media Commercial-Use notes before you publish.
Practical rule: convert natively first, then import the untouched MOV into the editor of your choice. Never convert twice.
Fact check and app capability verification (self-reported vendor data, verify before purchase):
- Converto and LP Converter class tools. App Store listings in this category advertise direct export to MP4 and GIF, batch export, and custom frame-rate settings. Free tiers are commonly limited by a daily conversion count rather than by watermarks, with full access sold through in-app purchases, typically a low monthly fee or an annual bundle. Pricing shifts often, so check the current listing instead of trusting quoted figures.
- Lively and IntoLive class tools. These listings advertise timeline control, playback-speed adjustment, frame trimming, filters, text and stickers, and repeat-count selection when building a longer video. Basic conversion is generally free, while high-resolution export, watermark removal, and multi-clip stitching sit behind premium tiers. Feature sets are vendor-declared and change between releases.
Convert Live Photos to Video With an Online Converter
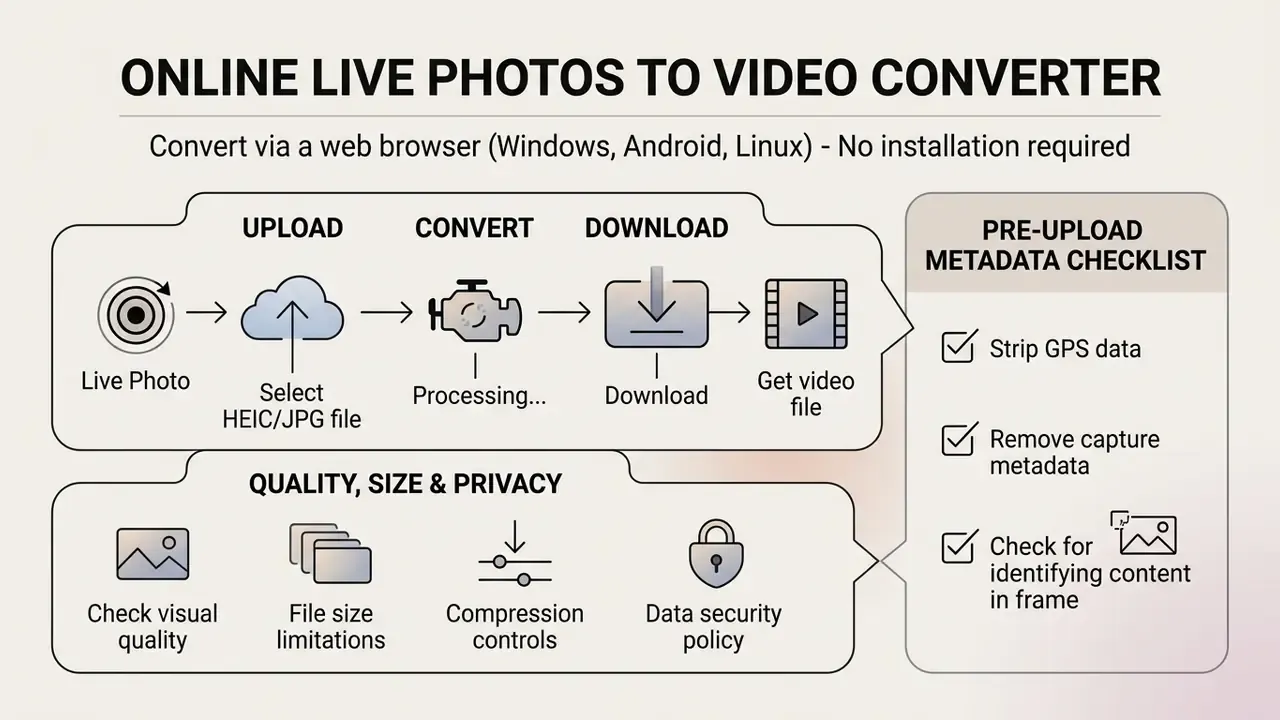
An online Live Photos to video converter works through a web browser on Windows, Android, or Linux, with no need to install anything. That is its entire appeal, and also its main risk.
How to Upload, Convert, and Download a Video File Online
To use a browser-based conversion service:
- Open a browser and navigate to a verified file converter tool.
- Drag and drop your original Live Photo, or its extracted MOV and HEIC package, into the upload area.
- Select MP4 or MOV as the target output format.
- Click Convert, wait for the conversion process to finish, and download the video file to local storage.
Some modern tools claim the conversion runs locally in the browser and the source file never reaches a server. Where that claim is verifiable, it is clearly the better option. Where it is not, assume the file was uploaded.
Check Quality, File Size, and Privacy Before Uploading
Before you push personal or corporate media to a third-party server, weigh the security and technical limits.
- Data privacy. Federal guidance advises against uploading media containing personally identifiable information or geolocation data to unverified public servers. The FBI Denver field office has issued explicit cybersecurity warnings about fake online file-converter sites built to serve malware or harvest uploaded media.
- File size caps and compression. Web converters frequently limit free uploads, typically capping file size somewhere between 2 MB and 25 MB, and then re-encode the video stream with heavy compression that visibly softens detail. If your real problem is file weight rather than format, run the numbers with our calculators and control bitrate deliberately instead of guessing.
Pre-Upload Metadata Checklist for Corporate and Privacy-Sensitive Use
Run this five-point check before any media file leaves a managed device:
- Strip GPS coordinates.On iOS, open the asset, tap the info (i) button, then Adjust → No Location. On Mac, use Image → Location → Hide Location in Photos.
- Remove capture metadata on export.In macOS Photos, uncheck Location Information in the export dialog. For command-line workflows, strip metadata during transcode using the
ffmpegrecipe below. - Check the frame for identifying content.Badges, screens, whiteboards, monitors, door codes, and vehicle plates leak more than EXIF ever will.
- Confirm the tool is approved.Unsanctioned web converters are classic shadow-IT and shadow-AI vectors. The upload leaves your controlled perimeter and may be retained or used for model training.
- Prefer local conversion for regulated data.Where privacy or maximum fidelity matters, convert on-device on iOS or macOS rather than in the cloud.
How to Turn a Live Photo Into Video on Mac
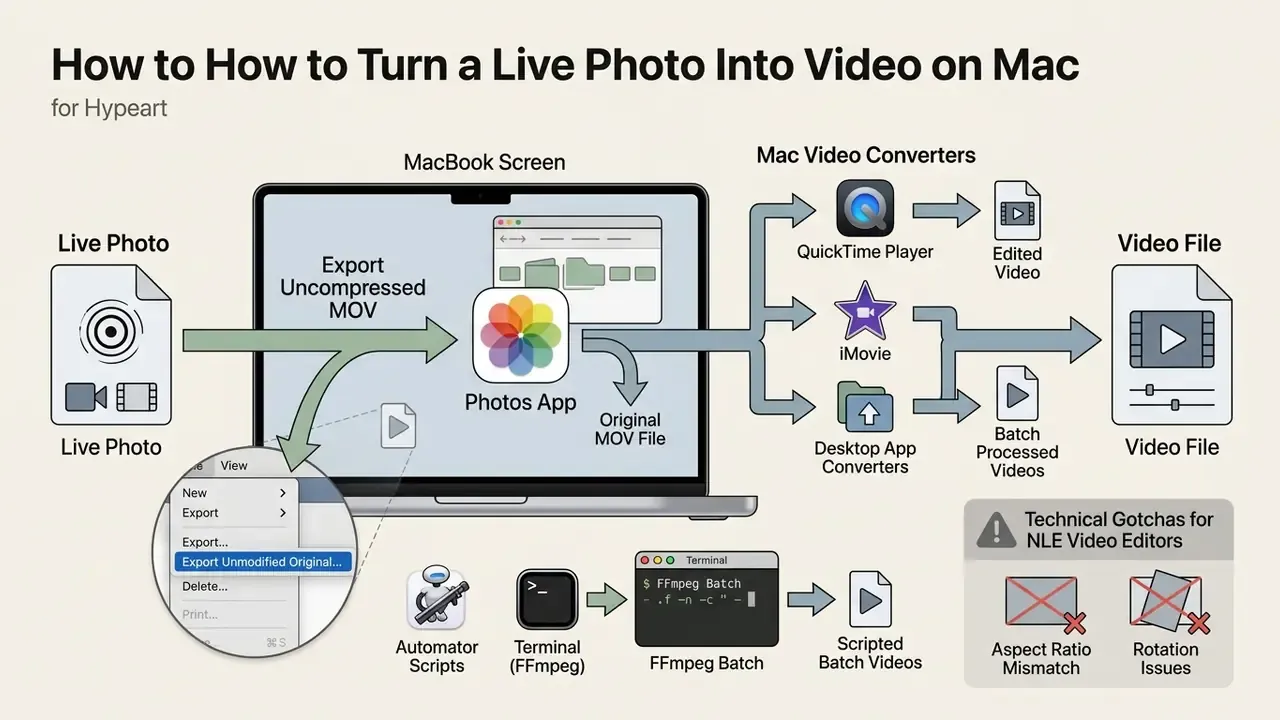
To convert a Live Photo to video on Mac, extract the original uncompressed QuickTime MOV using the macOS Photos app, or process files in bulk with desktop converters and scripts.
Access the Original Live Photo From Photos on Mac
With iCloud Photo Library enabled, your Mac syncs Live Photos captured on your iPhone automatically. To export the raw media streams:
- Open the Photos app on your Mac.
- Select one or more Live Photos.
- Click File → Export → Export Unmodified Original for [N] Photos.
- Choose a destination folder and click Export.
macOS writes two files per asset: a high-resolution still (.HEIC or .JPG) and an uncompressed short video (.MOV). The .MOV is immediately usable as a standalone video clip.
Two practical notes. If Optimize Mac Storage is on, a Live Photo may first appear as a still until the motion component downloads from iCloud, so open the asset once and let it finish before exporting. And if you set the clip to Loop in Photos on Mac, File → Export → Export GIF becomes available for a platform-agnostic looping file.
Use a Mac Video Converter for Editing or Batch Work
For advanced editing or batch work:
- QuickTime Player. Open the exported MOV for basic trimming (
Command + T) or export at a different resolution (File → Export As → 1080p / 4K). - iMovie. Drag the exported MOV files straight into the timeline to combine clips, add titles and transitions, and render a high quality video. Our notes on how to edit on macOS go deeper into desktop assembly, and if the result is headed for a channel, the publishing-side settings in how to edit for YouTube cover export presets.
- Automator and Terminal scripts. Advanced users can normalize hundreds of MOV exports into standardized MP4 files with no manual intervention.
Ready-to-use ffmpeg batch recipe. Put the exported .MOV files in one folder, open Terminal there, and run:
# 1. Batch-convert every exported Live Photo MOV to H.264 MP4
mkdir -p converted
for f in *.MOV; do
  ffmpeg -i "$f" -c:v libx264 -crf 18 -preset slow \
         -c:a aac -b:a 128k -movflags +faststart \
         "converted/${f%.*}.mp4"
done
# 2. Same batch, but normalize to a constant 30 FPS and strip all metadata
#    (fixes variable-frame-rate jitter and removes GPS/EXIF before sharing)
for f in *.MOV; do
  ffmpeg -i "$f" -r 30 -vsync cfr -map_metadata -1 \
         -c:v libx264 -crf 18 -c:a aac -b:a 128k \
         "converted/${f%.*}_30fps.mp4"
done
# 3. Concatenate all converted clips into one continuous montage
ls converted/*.mp4 | sed "s/^/file '/;s/$/'/" > list.txt
ffmpeg -f concat -safe 0 -i list.txt -c copy montage.mp4
Technical Gotchas for NLE Video Editors
- Aspect ratio mismatch. Live Photos are captured at 4:3 (4032×3024 for the still, 1920×1440 for the motion stream), while widescreen delivery uses 16:9. Importing into Premiere Pro or Final Cut Pro, apply Auto Reframe or a crop constraint to avoid pillarboxing, then re-export at the target ratio: 9:16 for Reels and Shorts, 1:1 for square feeds.
- Variable frame rate. In low light, iOS drops the motion frame rate from roughly 30 FPS toward 15 FPS to extend exposure. Adobe's guidance notes the same behavior, so playback speed may need correcting in post. Combining several Live Photo clips on one timeline? Normalize everything to a constant 30 FPS using the
-r 30 -vsync cfrrecipe above, or you will get jitter and audio drift. - Codec path. iPhone capture defaults to HEVC on modern devices. Transcode to H.264 MP4 for the widest compatibility with older NLEs, ad platforms, and Windows playback.
- Color and audio. The motion stream lacks the still frame's HDR grading. Expect flatter color and grade the clip rather than expecting it to match the exported cover photo. Codec and quality comparisons live in our AI Media Benchmarks library.
FAQ About Turning Live Photos Into Videos
Can You Convert a Live Photo to a Video on Non-Apple Devices?
Yes. Windows and Android cannot natively interpret Apple's paired Live Photo metadata structure, but you can still reach the video component:
- Upload the media to cloud storage (Google Photos, iCloud.com, or Dropbox).
- Export the standalone MOV component.
- Use a web converter to produce a universally supported MP4 file. On Windows, opening the HEIC still may also require the HEIF and HEVC codec extensions. Without them, the static image will not even preview. Android treats Apple Live Photos as either a plain still or a separate video file, since its Motion Photos format is a parallel implementation rather than the same container.
Will Converting a Live Photo Reduce Video Quality?
Native iOS and macOS conversion does not reduce quality, because the operating system extracts the pre-existing MOV file without re-encoding the stream. Smartphone video pipelines do, however, capture motion at lower spatial resolution than still computational photos. The exported video therefore reflects the resolution and compression of the camera's video path, not the sharpness of the still.
"Live2K confirms that Live Photo motion frames carry ≈2.8 MP against ≈12.2 MP in the key photo, a gap caused by two different processing pipelines rather than by the conversion step." Source: Lou et al., Live2K Dataset, arXiv (2026). https://arxiv.org/abs/2507.03760 Lossy third-party web converters can degrade the result further through secondary compression. If you need to rescue detail in an exported frame, an AI-assisted photo editor or upscaler is the right remedy. Another round of conversion is not.
Can You Share a Converted Live Photo Video on Social Media?
Yes. Saved as a standard MP4 or MOV, the clip meets the formatting requirements of every major platform.
"Experiments on the ORBIT dataset showed that using the full Live Photo frame sequence instead of a single still improves object classification and video understanding in visual-assistance tasks." Source: Khoshsirat & Kambhamettu, Empowering Visually Impaired Individuals, arXiv (2023). https://arxiv.org/abs/2312.01900
- Instagram Reels and Stories. Supports 9:16 vertical uploads. Instagram's published guidance covers aspect ratios from 1.91:1 to 9:16 at a minimum of 30 FPS. Feed posts need at least 3.0 seconds.
- TikTok. Accepts short MP4 and MOV uploads natively. Export at 1080×1920 for the cleanest result, and see how to edit TikTok footage for pacing and caption conventions.
- YouTube Shorts. Accepts vertical exports under 60 seconds.
- Messaging apps (WhatsApp, Telegram). Play converted clips as native video attachments rather than static pictures. Neither has a dedicated Live Photo mode.
Why Did My Live Photo Arrive as a Still Image?
Because the delivery path stripped the motion component. Usual culprits: AirDrop to a Mac, email attachments, SMS or MMS to Android, and posting a Live Photo directly to the Instagram Feed. Convert with Save as Video first, then send the MP4 or MOV.
Does Saving as Video Delete the Original Live Photo?
No. The export creates an additional asset. The original Live Photo stays in the Live Photos album with its still frame and motion component intact. The side effect is duplication, so if you convert often, your library will fill with near-identical pairs. Schedule a cleanup.
Can I Add Music, Captions, or Transitions During Conversion?
Not with the native command. Save as Video is pure extraction, nothing more. Audio replacement, text overlays, filters, speed ramps, and transitions all require a third-party iOS app, a browser-based editor, or a desktop NLE after the native export.
Appendix A: Editorial Revision Log