Why should a risk or finance leader care about a slider? Because board packs, model validation summaries, and audit exhibits are read under pressure, often projected badly, and sometimes archived as evidence. A washed-out chart is not just ugly. It is a small governance defect.
"Controlling opacity is fundamentally a risk-management exercise for visual design. Unadjusted graphics compete directly with key data, while calibrated transparency establishes a clear hierarchy for decision-makers."
Marcus Hale, author.
Quick summary for busy readers
- Single image: select the graphic, then Format > Format options > Adjustments, and drag the Transparency (Opacity) slider. 0% is fully opaque, 100% is fully invisible. Reset image reverts every adjustment instantly.
- Multiple images: select them with
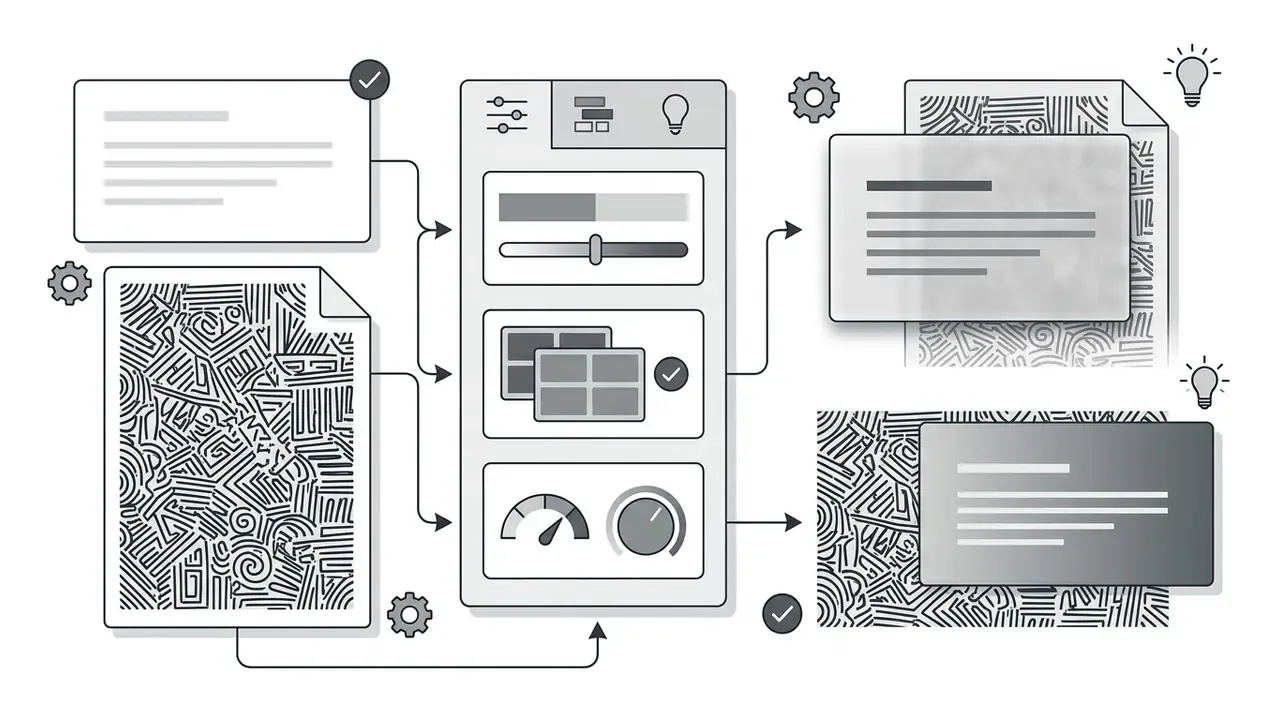
Shift+ click, pressCtrl + Alt + G(Cmd + Option + Gon macOS) to Group, then move one opacity slider to fade all assets uniformly. - Readable text over photos: insert a rectangle, set Fill color > Custom with 40-60% transparency for dark overlays, then use Arrange > Order > Send Backward so the shape sits between the photo and the text box.
- True background removal: the opacity slider fades the whole image. Isolating a subject requires Google's Edit image > Remove background feature, Microsoft PowerPoint's Remove Background tool, or an external cutout service exporting 24-bit PNG with an alpha channel.
- Mobile: the native iOS and Android apps do not expose a full opacity slider in every build. The reliable route is opening
slides.google.comin Chrome or Safari with "Request Desktop Site" enabled. - Compliance caution: never upload confidential financial charts, client data, or unreleased reports to unvetted third-party background removers. Treat them as Shadow AI tooling until approved.
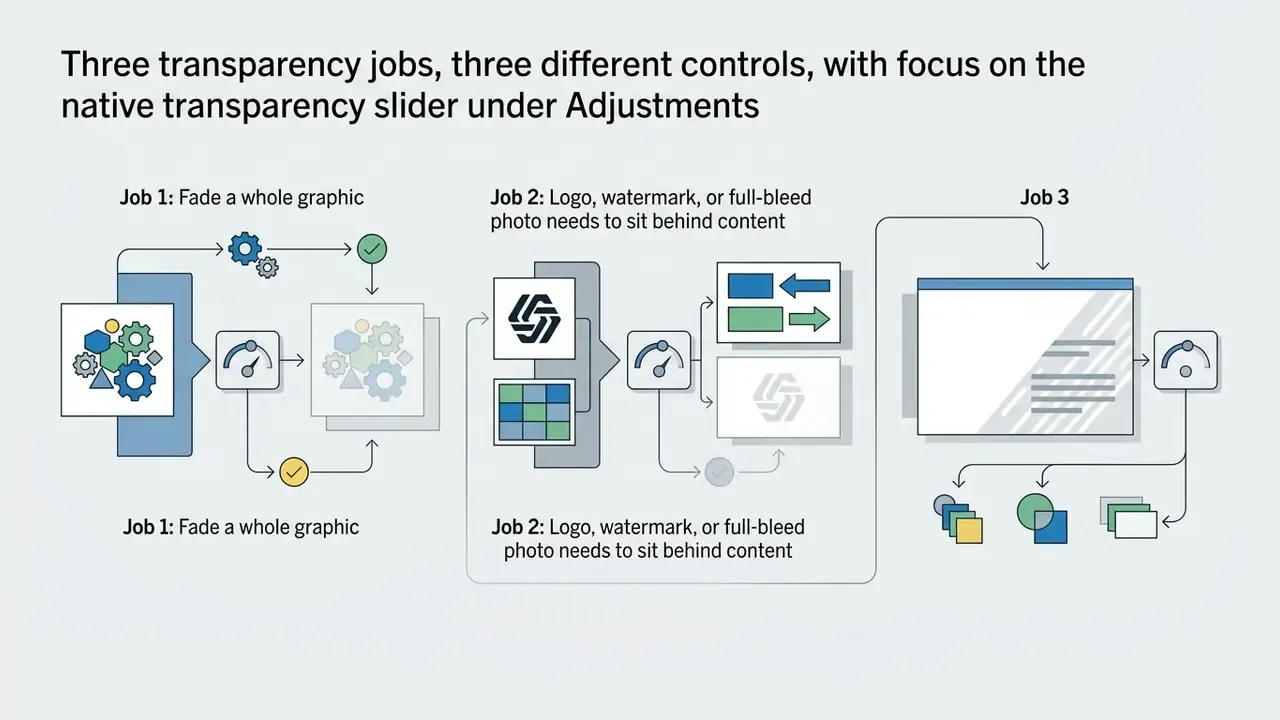
Three transparency jobs, three different controls
Most confusion around this task comes from one wrong assumption: that a single slider does everything. It does not. Before touching the interface, decide which of these three jobs you actually have.
For teams in regulated environments there is a fourth, quieter question: where is the file allowed to travel? Job one and job two stay inside your Workspace tenancy. Job three may not. That distinction is the reason this guide keeps returning to data handling, and why the comparison table below carries a privacy column rather than a marketing column.

How to make an image transparent in Google Slides with the transparency slider
You can make an image transparent in Google Slides by selecting the graphic, opening the Format options menu, and adjusting the opacity slider under the Adjustments panel. This native function uniformly alters the global alpha channel of the selected object, anywhere from 0% to 100% opacity.
"The opacity control determines how much of the slide background shows through an image without altering the underlying pixel content."
Insert and select the image in Google Slides
To insert an image into Google Slides, click Insert in the top menu, hover over Image, and choose your file source. You can upload an image from your computer, search the web and stock libraries, or pull assets from Google Drive and Google Photos. The By URL and Camera options cover remote files and ad-hoc captures.
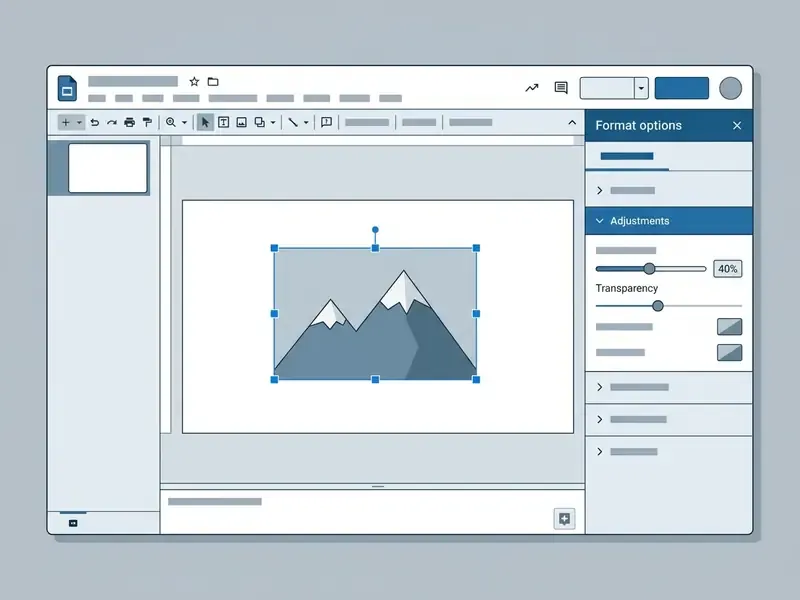
Once the image lands on the active slide, click directly on the graphic to select it. Selection shows blue control handles around the object perimeter, which activates the formatting tools in the top toolbar. No handles, no active object, and every transparency control stays greyed out. That single detail explains most "the option is missing" complaints.
Open Format options and adjust transparency
To open the formatting menu, right-click the image and select Format options, or choose Format > Format options from the top menu. A sidebar pane opens on the right side of your browser workspace. Power users can call the same pane with Ctrl + Alt + Shift + K (Cmd + Option + Shift + K on macOS). If your build ignores the shortcut, fall back to the menu path.
Expand the Adjustments section inside the Format options pane to find the opacity slider. Drag it right to push transparency toward 100% (fully transparent), or left toward 0% (fully solid). Some interface locales label the control Opacity rather than Transparency. Slider, range, and behaviour are identical; only the wording differs.
There is no numeric entry field, which is a genuine annoyance when you need repeatable brand values across a 60-slide deck. The workaround: set one image, copy it, and reuse it rather than re-dragging the slider slide after slide.
Because the adjustment is non-destructive, the underlying file resolution never changes. Fading a low-resolution asset simply makes existing compression artefacts more visible, so start from the sharpest source available, or upscale it first with one of the AI image upscalers used for large-format collateral.
Reset an image after changing its transparency
You can revert transparency changes instantly: select the modified graphic and click Reset image in the top toolbar. Alternatively, right-click the object and choose Reset image from the context menu. You can also drag the slider back to 0% if you want to keep other edits.
Resetting removes all non-destructive formatting edits, including transparency level, brightness, contrast, and colour adjustments. The object returns to its original solid appearance with no manual slider recalculation.
"Reset image returns the photo to its original state, removing opacity, brightness, contrast, and recolor settings."
How to change transparency for multiple images at once
Adjusting opacity frame by frame is inefficient in graphics-heavy presentations, for example a quarterly reporting deck with three dozen screenshots. You can batch-apply transparency settings through object grouping: To reuse the same faded backdrop across a deck, copy the adjusted image, open the next slide, paste it, then apply Arrange > Order > Send to back so text placeholders stay clickable. Template-driven teams go one step further and bake the faded layer into the theme master, which is roughly the same logic behind an ai slide generator for teachers: define once, reproduce everywhere.
- Hold
Shiftand click each image on the canvas to select multiple elements, or drag a marquee selection across the cluster. - Right-click any selected image and click Group (or press
Ctrl + Alt + G/Cmd + Option + G). - Click Format options in the top toolbar to expand the right sidebar pane.
- Open Adjustments and drag the Opacity slider. The chosen transparency percentage applies uniformly across all grouped assets.
- Right-click the group and select Ungroup (
Ctrl + Alt + Shift + G/Cmd + Option + Shift + G) when you need to reposition individual elements later.
How to make an image background transparent in Google Slides
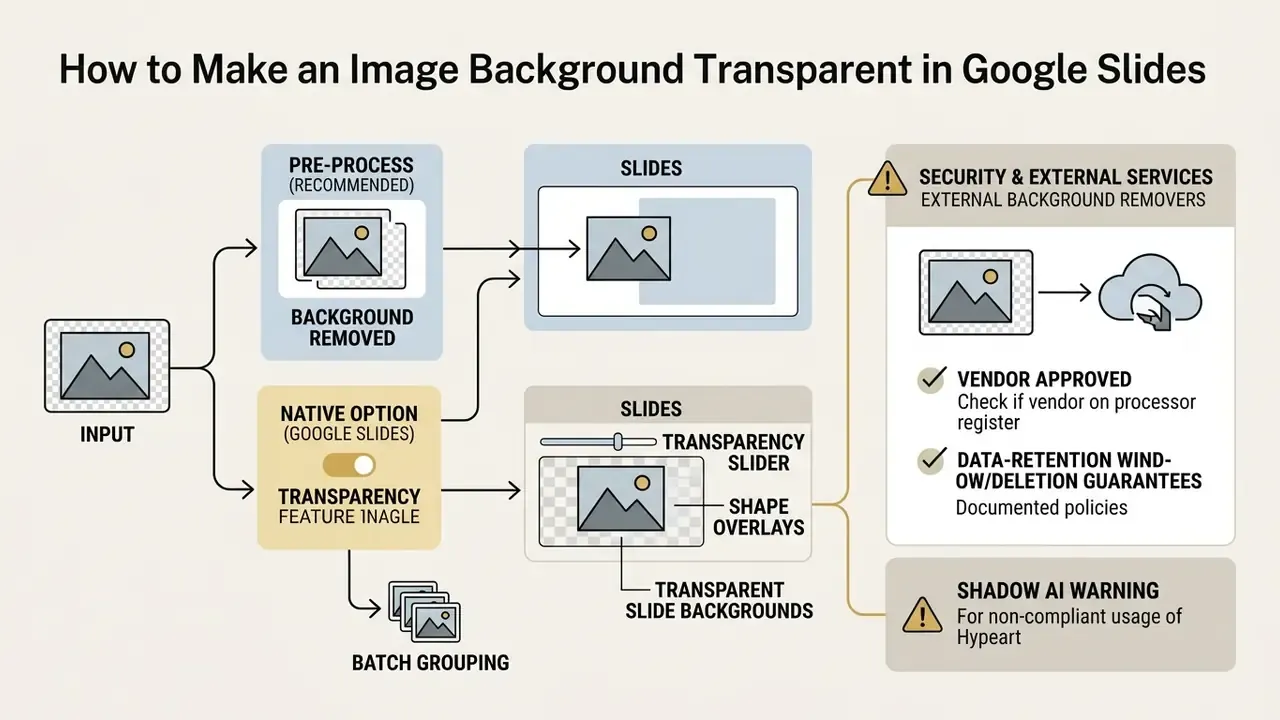
Making an image background transparent means isolating the foreground subject from the surrounding pixels. That is functionally different from lowering global image opacity. The native transparency slider fades the entire image object, subject included. Background removal extracts the subject so the underlying slide content shows through cleanly.
"Background removal uses AI segmentation to isolate the subject; images with a removed background cannot be restored with Reset image, only by undoing the action."
Where the feature is enabled for your account, the native path is Format > Image > Edit image > Remove background, or Edit image > Remove background from the context menu. Availability depends on account eligibility and rollout status, so design the workflow with a fallback in mind.
Remove an image background before inserting it into Slides
To get complete removal regardless of account eligibility, preprocess raster images with dedicated background removal software or built-in Google Workspace image editing utilities before you assemble the final slide elements. Automated background removers apply machine-learning segmentation that classifies pixels as foreground or backdrop, then deletes solid or complex backgrounds while keeping the main subject at full opacity. (Vendor segmentation accuracy varies by model and subject complexity. Independent benchmark data is needed before treating any single tool as reliable for fine hair, glass, or motion blur.)
For automated asset generation, visual teams standardize collateral with an ai product image pipeline or an ai product description generator so that every asset arrives with a clean transparent backdrop and matching copy. Isolated cutouts export as PNG files with active alpha channels, which means zero visual collision when they land on a branded presentation theme. Free browser-based photo editors handle the same cutout task for one-off assets, while a broader photo editor comparison helps teams pick a repeatable option. Where in-house models are used, the quality of your cutouts depends heavily on ai image training data, not on the button you click last.
Shadow AI and data-security warning
Pre-process transparent cutouts in PowerPoint and free tools
No dedicated design software, and no permission to send assets to an online service? Microsoft PowerPoint can isolate subjects locally before you import them into Slides:
- Insert your photo into PowerPoint, select it, and open the Picture Format tab.
- Click Remove Background on the far-left toolbar.
- Use Mark Areas to Keep (green brush) and Mark Areas to Remove (red brush) to refine the cutout. Choose Discard All Changes to start over.
- Click Keep Changes, right-click the isolated subject, select Save as Picture, and save strictly as PNG (*.png) to preserve the transparent alpha channel. Saving as JPEG destroys transparency, because JPEG has no alpha channel at all.
- Upload the PNG into Google Slides through Insert > Image > Upload from computer.
Browser-based removers such as Remove.bg or Photoroom follow the same logic: upload, let the model cut the subject, download a PNG. The decisive detail in every workflow is the export format. A 24-bit PNG, or WebP with alpha, keeps per-pixel transparency, while flattened formats bake in a white box that will clash with your theme. Video teams hit the identical constraint when they composite an ai avatar video over branded slides: alpha channel or nothing.
How to set a transparent background color for Google Slides
Need to make a solid slide backdrop translucent, or prepare a custom canvas colour layer? Note: to create a full-bleed photo backdrop with adjustable opacity, insert a full-size image matched to the standard Google Slides canvas, 960 x 540 pixels at 16:9 widescreen, click Arrange > Order > Send to Back, and set opacity via Format options > Adjustments. Pre-cropping the file to 960 x 540 prevents edge distortion when it stretches across the slide.
For a pre-baked translucent canvas, export a transparent PNG from an external editor and load it through Change background > Choose image. Slides preserves the alpha channel of the uploaded file. And if the result goes wrong, Change background > Reset to theme restores the original look in one click.
- Right-click any empty area of the slide canvas and select Change background, or use Slide > Change background.
- Click the Color swatch circle, then the + (Custom) button under the palette grid.
- Find the Opacity / Transparency slider at the bottom of the colour picker window.
- Drag the slider left to introduce transparency, click OK, then Done for the current slide, or Add to theme to propagate the change across the deck.
Create a transparent overlay with a shape in Google Slides
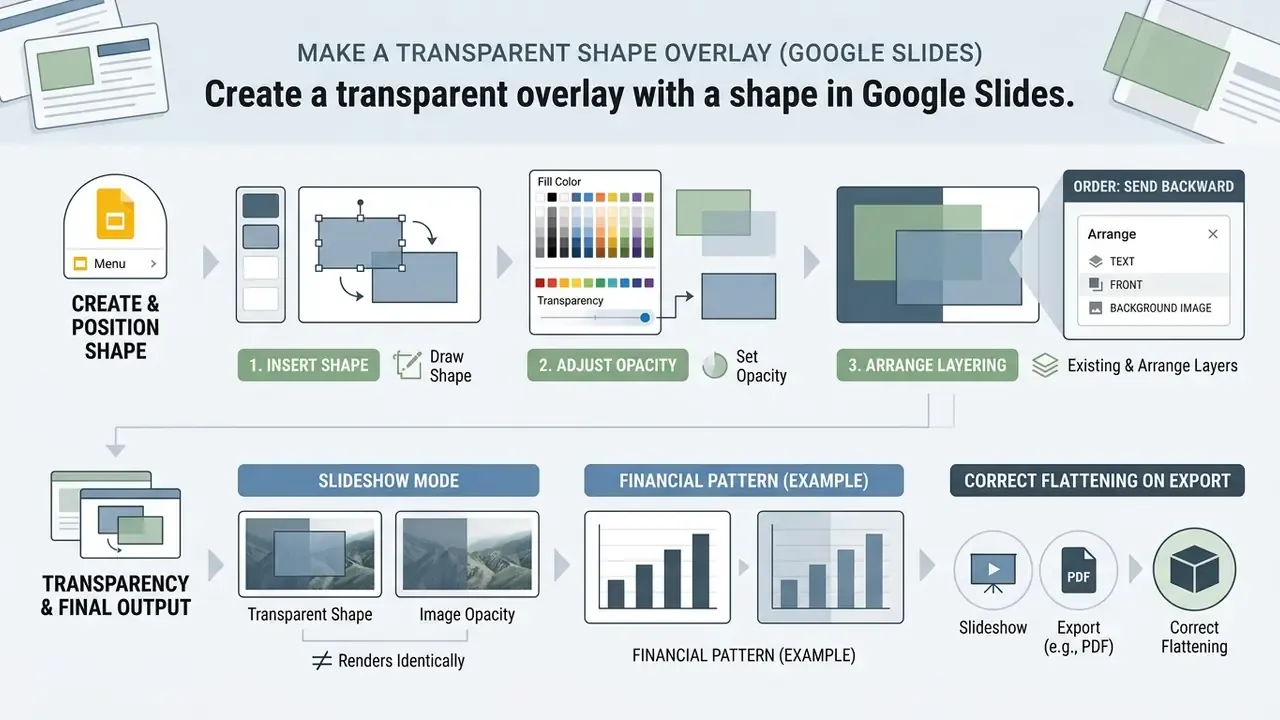
You can create a transparent overlay in Google Slides by inserting a geometric shape over a background image and reducing its fill opacity. The technique builds a visual barrier that increases text contrast while keeping the atmosphere of the underlying photograph.
"Shape fill transparency is configured through Fill color, then Custom, then the transparency slider, which gives precise control over the alpha channel."
Set fill color and border color transparency for a shape
Choose Insert > Shape > Shapes and draw a rectangle across your background graphic. With the shape selected, click the Fill color paint bucket icon in the toolbar, select Custom, and drag the transparency slider to your target level. You can type a HEX value in the same dialog to lock the overlay to a brand colour.
Click OK to apply the semi-transparent fill. To kill harsh edges, click the Border color pencil icon and select Transparent, which makes the shape boundary completely invisible. Choosing Fill color > Transparent instead of a custom alpha value removes the fill entirely, handy for invisible click zones and empty framing rectangles. Before layering, it is worth improving the source photograph itself with AI image enhancers, so the overlay compensates for composition rather than for bad exposure.
Place the transparent shape between text and the image
To set correct z-index layering, select the transparent shape, click Arrange > Order, and choose Send Backward. That moves the shape one level down, behind your text box, while it stays above the background image layer. Send to Back would drop it below the photo, so use single-step ordering when three layers are in play.
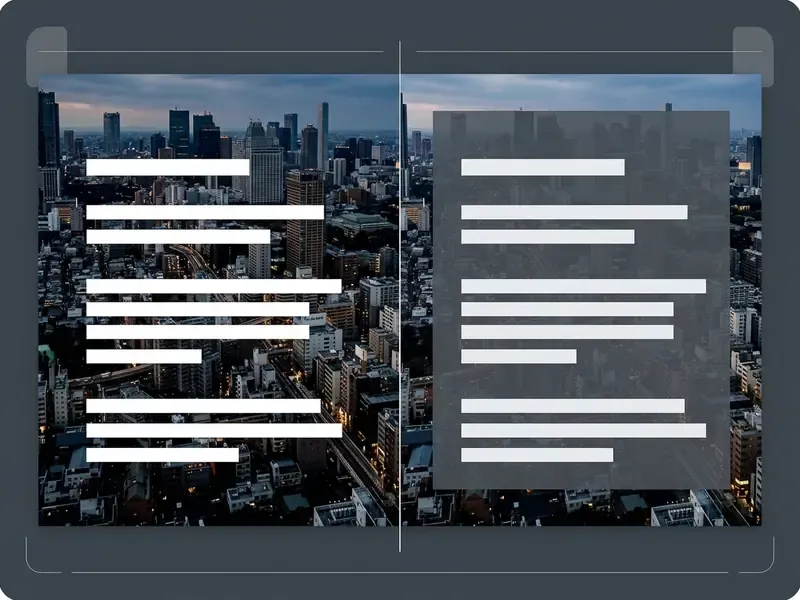
Consider a familiar pattern in financial reporting. Body copy placed straight onto dark photographic covers became unreadable once decks reached a boardroom projector. The documented remedy is a semi-transparent black rectangle at roughly 45% opacity, inserted between the background photograph and the primary text elements. The structural fix lifts measured text contrast to accessibility thresholds without commissioning bespoke artwork for every slide. (Illustrative workflow pattern. Actual contrast outcomes depend on the photograph and typography, and should be verified with a contrast checker.)
Transparent shapes and image opacity render identically in Slideshow (present) mode and flatten correctly on PDF export. That matters for audit packs and regulator submissions: what a reviewer opens as a PDF matches what the deck shows on screen.
Apply transparency gradients to an image or shape
You can apply transparency gradients to a shape in Google Slides by configuring custom gradient stops with variable alpha settings inside the fill colour palette. The result is a smooth transition from solid colour to complete transparency across the element.
"Complex, high-spatial-frequency backgrounds measurably reduce text legibility even when nominal contrast ratios appear sufficient."
Select the target shape, open the Fill color menu, and switch to the Gradient tab. Click Custom, select individual gradient stops, and use the opacity slider to set one side to 0% transparency and the opposite stop to 100%. Add extra stops with the + icon for multi-step fades, and resize the gradient effect simply by resizing the host shape.
Gradients let presenters fade slide edges into solid text zones without a visible seam: darkening the lower third of a cover photo so white headlines stay legible, or fading one flank of an image into the slide's base colour. Because images themselves accept only a global opacity value, a gradient-filled rectangle on top is the standard workaround for partial, directional transparency. Teams producing high volumes of layout variants pair these shapes with template automation and AI art generators to keep slide production consistent.
Choose between Google Slides, background removers, and online tools
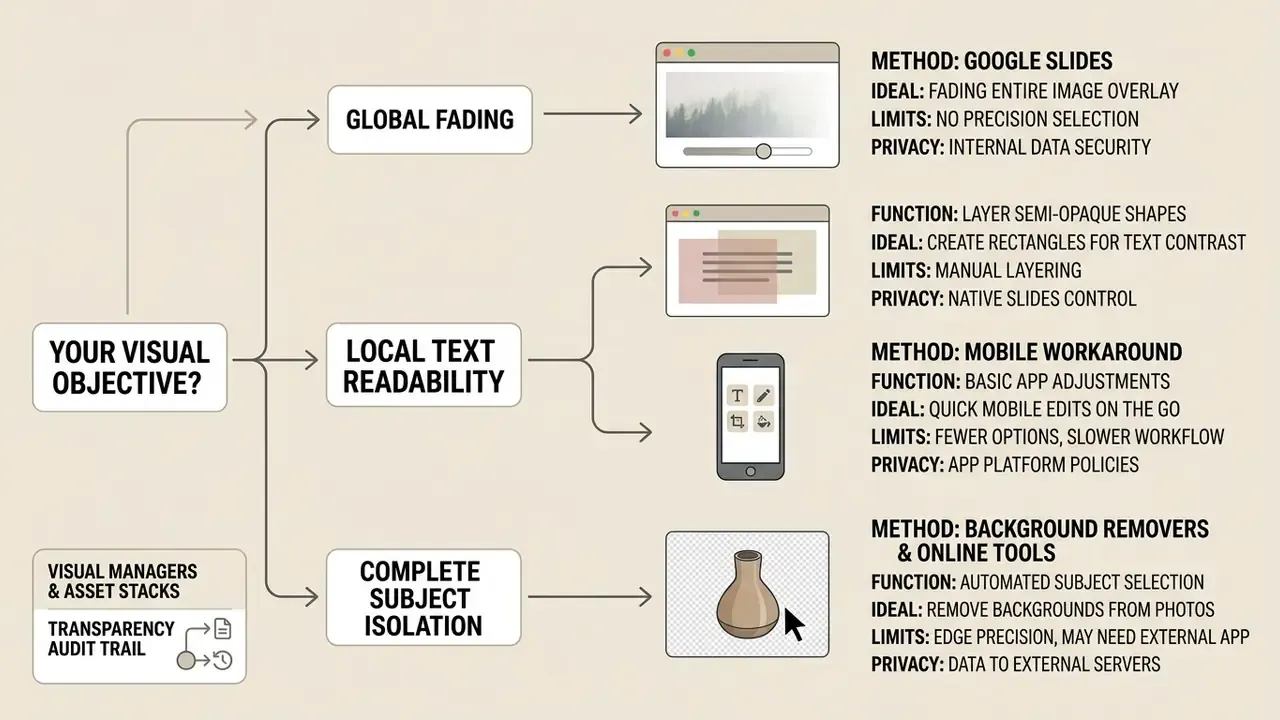
The right method depends on whether your objective is global image fading, localized text readability, or complete subject isolation. In regulated environments it also depends on where the image file is allowed to travel.
| Method | Core function | Ideal use case | Key limitations | Data privacy and audit trail |
|---|---|---|---|---|
| Google Slides transparency slider | Reduces global image opacity uniformly (0 to 100%) | Fading decorative background graphics and watermarks | Cannot remove a specific background; the subject becomes translucent too; no numeric percentage entry | Stays inside your Workspace tenancy; version history retained in Drive |
| Transparent shape overlay | Semi-transparent solid or gradient layer inserted between layers | Improving text contrast over complex background photos | Requires manual layering and z-index positioning on each slide | Fully local to the deck; no external processing |
| Native Remove background (Slides, Drawings, Vids) | AI segmentation inside Google Workspace | Quick cutouts without leaving the editor | Account-eligibility dependent; result cannot be restored via Reset image, only Undo | Processed under your Workspace agreement |
| External AI background remover | Algorithmic foreground subject segmentation | Clean product cutouts, headshots, batch catalogs, multiple images at once | Requires external preprocessing or API integration; export must be PNG to keep alpha | Third-party processor; needs vendor review, retention terms, and upload logging |
Read the table as a decision path, not a ranking. Fading one picture? Slider. Fixing readability? Overlay. Batch removing backgrounds from pictures with AI for a product catalog? External tooling, plus an approval record.
"The background replacement feature in Google Slides lets you enter a text prompt and choose from AI-generated options while leaving the foreground subject intact."
When assessing tool capabilities across enterprise asset stacks, visual managers lean on resources like an AI Media Comparison hub or an AI Media Benchmarks and Review Proof report to validate output quality and compliance boundaries. Teams that transform existing photography rather than generate it from scratch typically evaluate image-to-image generators alongside dedicated removers, and catalog-scale operations integrate AI Product Photography for Ecommerce models to automate staging before elements reach Slides. For portrait-heavy decks, an AI headshot generator produces consistent, pre-cut subject assets.
Fix common transparency issues in Google Slides
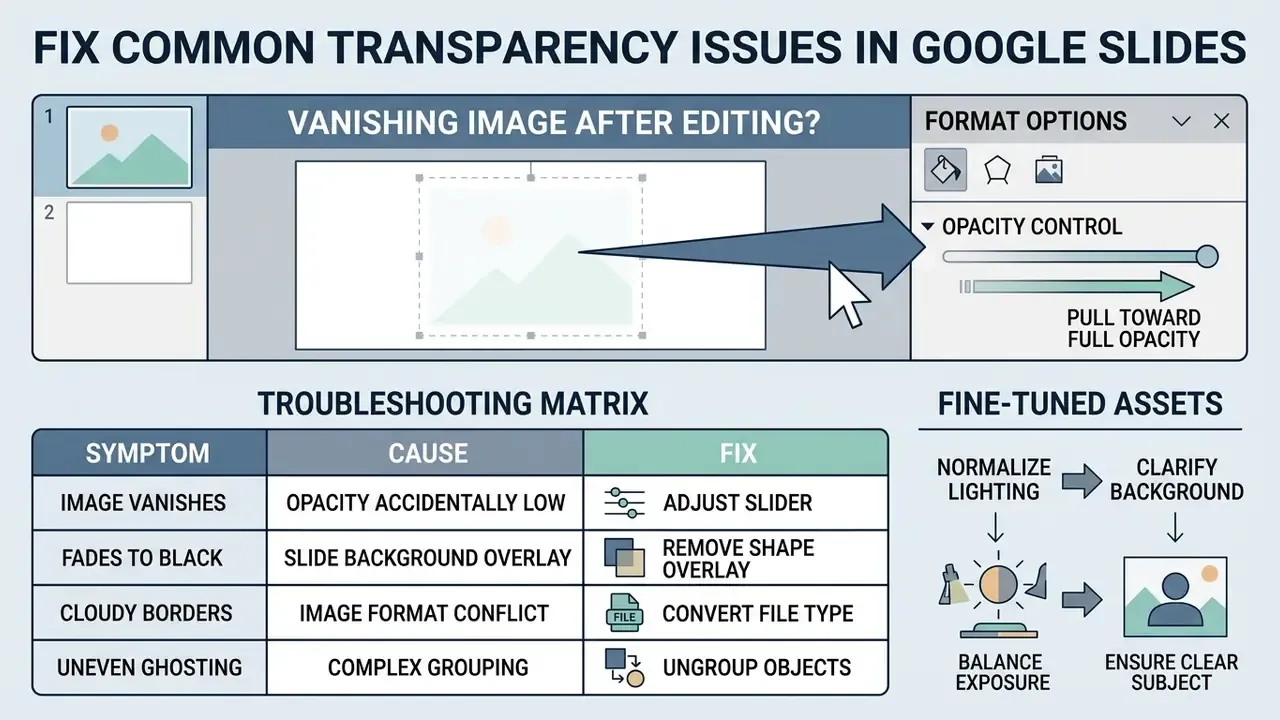
If an image vanishes after editing, open the Format options pane and pull the opacity control back toward full opacity. Total disappearance almost always means the transparency slider sits at 100%. If transparency settings look disabled in your toolbar, check that an object is actively selected on the canvas, since Format options stay hidden or greyed out until an image, vector, or shape is highlighted. Remember, too, that Slides exposes different controls for different object classes: images use Adjustments, shapes are driven from the Fill color palette. That is why the option can look "missing" on one element and present on another.
Troubleshooting matrix: symptom, cause, fix
| Issue / symptom | Probable cause | Instant fix |
|---|---|---|
| Image completely disappeared | Opacity slider set to 100% (completely transparent) | Open Format options > Adjustments, drag opacity back toward 0%. |
| Format options greyed out | No image selected on the slide canvas | Click directly on the image or shape to show the blue anchor handles. |
| Transparency slider not visible | Adjustments section collapsed in the sidebar | Click Adjustments in the Format options pane to expand it. |
| Image looks washed out or blurry | Brightness and contrast mismatched, or a low-resolution source | Click Reset image, or return brightness to 0 and re-fade using opacity only. |
| Shape will not go transparent | Solid colour picked from the default palette | Click Fill color (paint bucket) > Custom, set the alpha slider, or choose Fill color > Transparent. |
| Colours look muddy where layers overlap | Compound transparency stacking several translucent objects | Flatten the stack: keep one overlay layer, or pre-composite in an image editor. |
| PNG shows a white box | File exported without an alpha channel, for example as JPEG | Re-export the cutout as 24-bit PNG or WebP with transparency, then re-upload. |
| Fade looks fine on screen, wrong on the projector | Display gamma differs from the presentation hardware | Test in Slideshow mode on the actual room hardware, or swap in a different image with stronger separation. |
"On Android, image transparency, brightness, and contrast are available through Format, then Adjustments; advanced options require the desktop version."
When custom styling demands fine-tuned assets, creators normalize object lighting and background clarity upstream with free browser-based photo editors or a repeatable batch pipeline. For batch media modification across internal platforms, technical teams rely on standardized documentation such as AI Media API Guides to run scalable graphics pipelines.
Design tips for transparent images in a Google Slides presentation
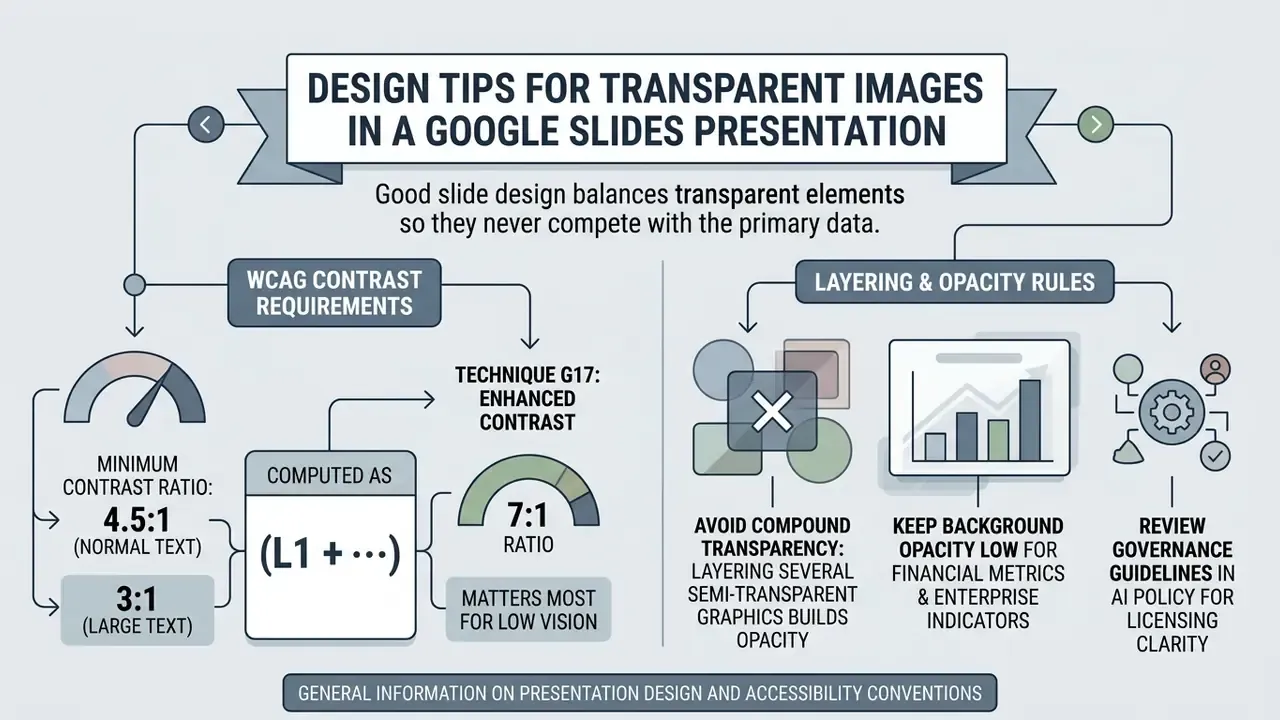
Good slide design balances transparent elements so they never compete with the primary data. Under WCAG 2.2 accessibility standards (W3C, 2023), body text needs a minimum contrast ratio of 4.5:1 against its background. (An earlier revision of this guide cited "WCAG 2.1 (W3C, 2025)", which carried an incorrect year: WCAG 2.1 was published in 2018, WCAG 2.2 in 2023.)
Avoid layering several semi-transparent graphics on top of each other, because compound transparency builds uneven colour and visual noise. Avoid transparency on low-resolution images, since fading amplifies pixelation. And never fade the backdrop of a critical text block past its contrast floor; distracting backgrounds cost more attention than they buy.
When you present financial metrics or enterprise performance indicators, keep background opacity low. Practitioners commonly work below the 20% mark for photographic backdrops. More reliably, place a solid or near-solid colour block behind text boxes and verify the result with a contrast checker rather than by eye. (The 20% figure is a working design convention, not a mandated threshold. The measurable requirement is the 4.5:1 ratio.) Align transparent images with the other objects on the slide to keep visual balance, and always review a well designed slide both in Slideshow mode and as an exported PDF, because projectors and printed audit packs render faded layers differently from a laptop screen. Budget planning for asset volumes and rendering time can be sanity-checked with interactive calculators.
For enterprise content systems that need licensing clarity, review the governance guidelines outlined in AI Media Commercial-Use frameworks.
This guide offers general information on presentation design and accessibility conventions. It does not replace professional accessibility, legal, or compliance advice. Organisations in regulated sectors should validate deck standards with their own accessibility and compliance specialists.
E-E-A-T verification and technical fact check
Verification note. According to the Google Docs Editors Help documentation (2026), adjusting the opacity control in the Format options pane uniformly changes the alpha channel of all pixels inside an image frame. It does not separate background pixels from foreground objects. True background extraction requires the dedicated Remove background AI segmentation feature, an external segmentation service, or pre-formatted PNG assets with preserved per-pixel alpha channels.
Editorial corrections log (Appendix A). An earlier revision stated that "you can adjust image transparency in Google Slides on mobile devices using the Android app interface... iOS mobile app functionality may feature limited formatting options." That claim has been corrected. Official documentation confirms transparency adjustment only for the Android Format > Adjustments path, with no verified equivalent in the iOS app, so the desktop-site workaround is now presented as the reliable cross-platform method. The accessibility citation was corrected from "WCAG 2.1 (2025)" to WCAG 2.2 (2023).
Review. Methods verified against Google Docs Editors Help and Google Workspace Experiments documentation. Accessibility thresholds verified against W3C WCAG techniques G17 and G18. Open question: native Remove background availability still varies by account tier, so the fallback path should stay documented in your internal deck standards until rollout is universal.
FAQ about image transparency in Google Slides
Can you make an image transparent in Google Slides on a phone or iPad?
The native mobile app for iOS and Android does not reliably expose the opacity slider. Google's Android help documents transparency under Format > Adjustments, while no equivalent iOS path is confirmed. To adjust transparency dependably on a mobile device, open your browser (Chrome or Safari), go to slides.google.com, tap the browser menu, and check "Request Desktop Site". Once the editor loads in desktop mode, select the image, tap Format > Format options > Adjustments, and move the transparency slider.
How do you change transparency for several images at the same time?
Select them with Shift + click, group them (Ctrl + Alt + G / Cmd + Option + G), open Format options > Adjustments, and move the opacity slider once. The value applies to every object in the group. Ungroup afterwards to reposition individual assets.
Can you make only part of an image transparent?
Not natively. Google Slides applies opacity globally to the whole image frame. To fade one region, place a gradient-filled or semi-transparent shape over that area, or pre-edit the picture in an external editor and export it as a PNG with a partial alpha mask.
Can you use transparent images and GIFs in Google Slides?
Yes. Google Slides supports pre-formatted transparent PNG, WebP, and GIF files. When you upload a PNG with an existing alpha channel, the platform preserves the transparent background automatically.
"PNG images can designate a palette color as transparent, allowing background colors or images to show through those areas." Harvard University, lecture notes on PNG transparency and image formats (2023). https://cs.harvard.edu/ GIF transparency is limited to a single indexed colour, so it cannot reproduce soft, semi-transparent edges the way PNG or WebP can. Expect hard, slightly jagged outlines on animated assets. You can still adjust global transparency for animated GIFs from the Format options sidebar. Teams that need transparent-ready source assets often start from free AI art generators and export straight to PNG.
Does making an image transparent reduce its quality or resolution?
No. Transparency in Google Slides is a non-destructive display adjustment; it does not recompress or downscale the file. Perceived softness comes from the original resolution, so begin with a high-quality source image.
How do you reset image transparency?
Select the image and click Reset image in the toolbar or context menu, or drag the transparency slider back to 0%. Reset also clears brightness, contrast, and recolor edits. One caveat: a background removed with the AI Remove background feature cannot be restored with Reset image, so use Undo instead.
Does transparency stay visible in Slideshow mode and PDF exports?
Yes. Opacity applied to images, shapes, and gradients renders identically in full-screen presentation mode, and flattens correctly when the deck is downloaded as PDF. That keeps audit and board packs consistent with the on-screen version.
Can I revert to the original theme background?
Yes. Open Slide > Change background and choose Reset to theme, or reapply the theme, to restore the original background settings across the deck.