A minecraft pixel art generator converts two-dimensional raster files into indexed matrices of game blocks. The tool reads input colors, evaluates the target grid dimensions, and maps each pixel to a vanilla block swatch you can actually place in a world.
Simple idea. Fiddly details.
Key Takeaways Before You Start
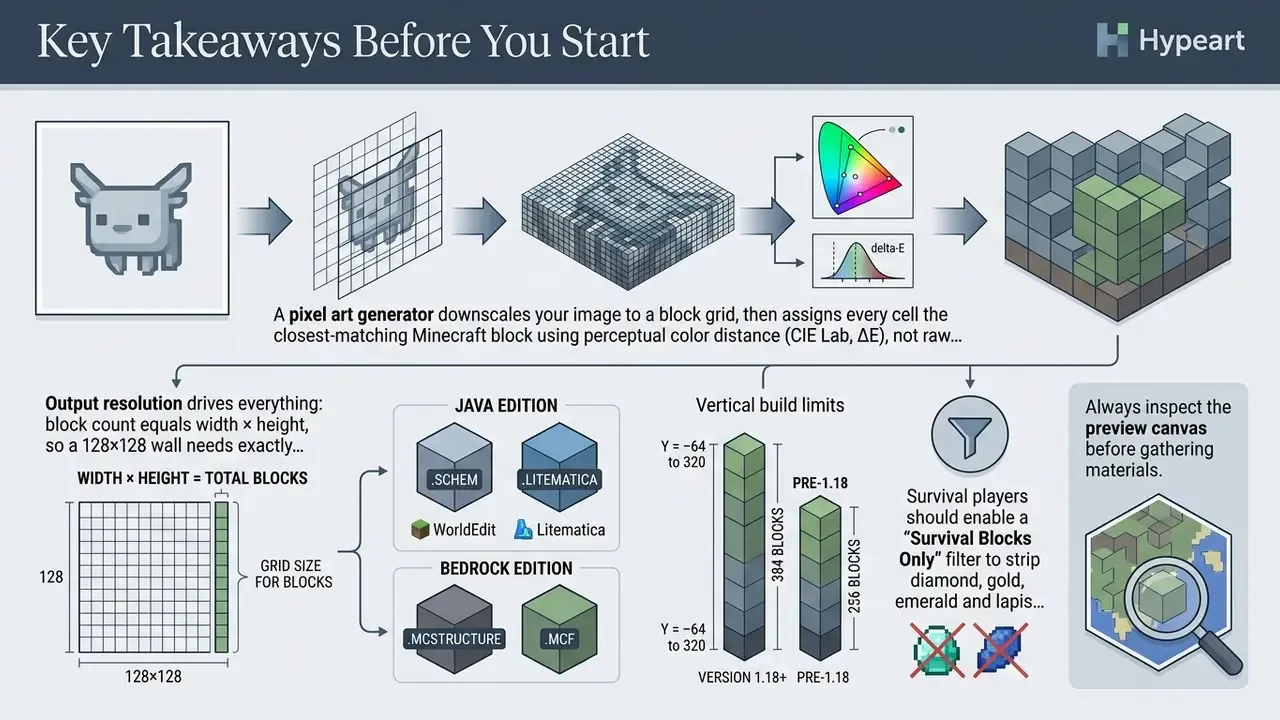
- A pixel art generator downscales your image to a block grid, then assigns every cell the closest-matching Minecraft block using perceptual color distance (CIE Lab, ΔE), not raw RGB guesswork.
- Output resolution drives everything: block count equals width × height, so a 128×128 wall needs exactly 16,384 blocks.
- Java Edition builders use
.schem/.litematic(WorldEdit, Litematica); Bedrock Edition uses.mcstructurewith Structure Blocks; unmodded players can run a.mcfunctiondatapack instead. - Vertical art is capped by the engine: 384 blocks in 1.18+ (Y = −64 to 320) and 256 blocks before 1.18.
- Survival players should enable a "Survival Blocks Only" filter to strip diamond, gold, emerald and lapis blocks from the palette.
- Always inspect the preview canvas before gathering materials. Automated metrics do not fully predict how a build reads to human eyes.
Who This Guide Is For and What You Will Decide
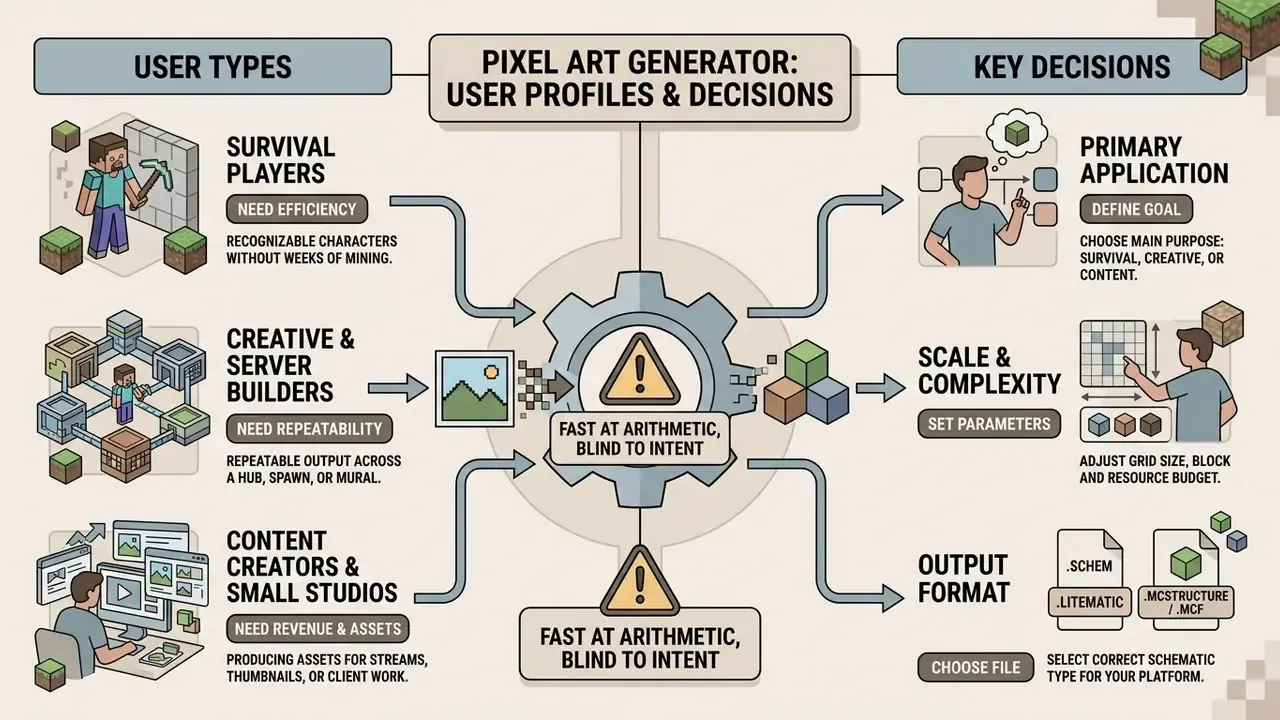
This walkthrough is written for three kinds of readers, and each one leaves with a different decision.
- Survival players who want a recognizable character on a wall without mining for a week. Your decision is grid size versus block budget.
- Creative and server builders who need repeatable output across a hub, a spawn area or a multi-panel mural. Your decision is export format:
.schem,.litematic,.mcstructureor.mcfunction. - Content creators and small studios producing assets for streams, thumbnails or client work. Your decision is licensing and upload privacy, covered further down.
If you only remember one thing, remember this: the generator is fast at arithmetic and blind to intent. It will never notice that the eyes of your character came out asymmetrical.
What a Minecraft Pixel Art Generator Does
A pixel art generator minecraft converts any source image into an organized grid of blocks matching the Minecraft color palette. The conversion pipeline rescales input dimensions, runs color-matching algorithms across the active block swatches, and outputs build-ready instructions. Search demand for the same tool shows up under many labels: mc pixel art generator, pixel art generator for minecraft, pixel art minecraft generator, and branded queries such as scriptolab minecraft pixel art generator. The underlying mechanics barely differ between them.
"A mosaic system lets users rescale and rotate the image without losing the correspondence between source regions and assigned tiles."
Treating a mosaic as a structured matrix rather than a flat render is exactly what makes rescaling, rotation and palette swapping non-destructive. The generator keeps a mapping table between source regions and assigned tiles, so changing the palette re-resolves every cell instead of resampling a bitmap. That is the architectural reason a good converter can switch from wool to concrete instantly while preserving your composition.
Modern web tools work as a complete minecraft picture generator or minecraft art generator, which removes the need to plot individual coordinates by hand. Instead of painting pixel by pixel, you configure grid dimensions and color boundaries, then generate the schematic export. Flat converters process 2D mosaics across horizontal or vertical planes, whereas a minecraft 3d art generator converts volumetric structures or layered models into 3D schematics.
When our team integrated digital assets into a complex server hub, plotting a 128×128 wall banner by hand consumed roughly two working days of designer time across coordinate mapping, palette selection and error correction. That is an internal estimate from one project, not a controlled benchmark. Routing the same source files through an online minecraft pixel art generator from image workflow cut schematic preparation to a few minutes while keeping the visual read intact. The gain is not magic. The generator simply automates two mechanical tasks, downscaling and nearest-color lookup, that humans perform slowly and inconsistently.
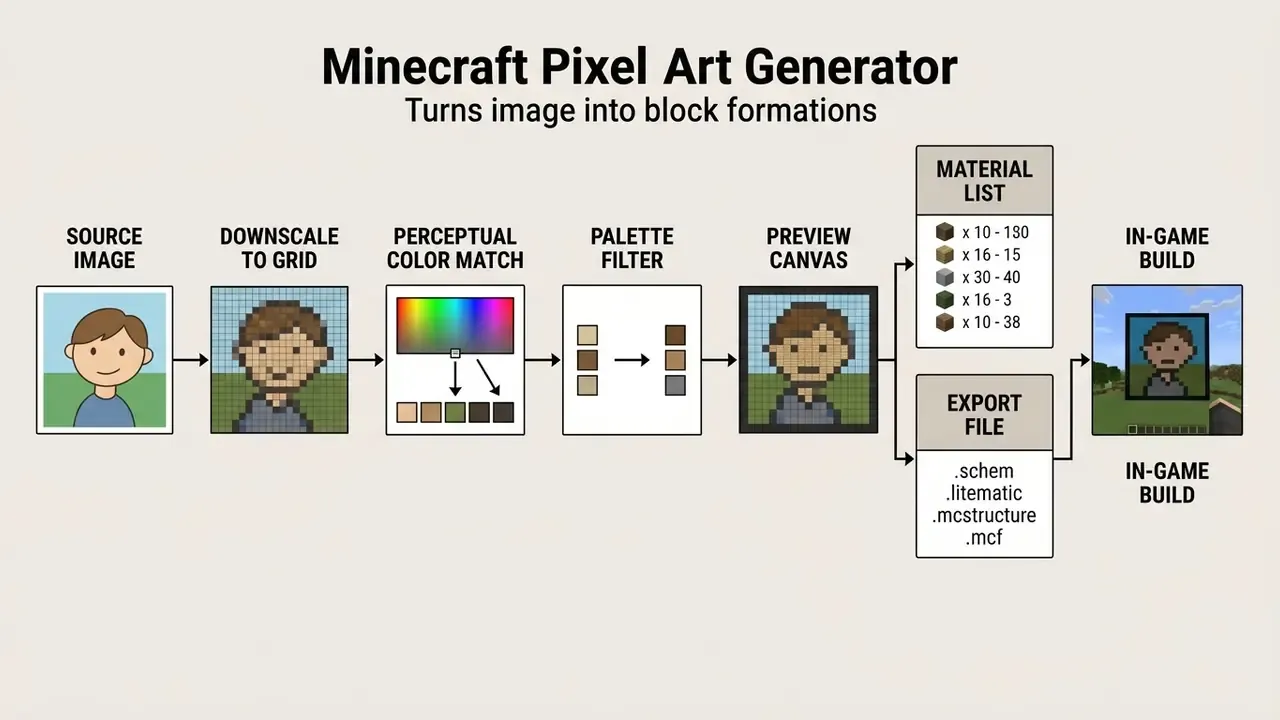
Figure 1. The image-to-blocks pipeline of a Minecraft pixel art generator, from upload to in-world construction. Each stage is reversible: changing the palette or grid size re-runs matching without re-uploading the source.
How to Create Minecraft Pixel Art from an Image: Upload to Build
To convert any image into a Minecraft build, you upload an image, adjust the target dimensions, inspect the live canvas preview, and download the material instructions or the schematic file. This workflow standardizes output formatting across survival and creative modes. Figure 2. Stage diagram for a minecraft pixel art generator from image workflow: size and color selection, then preview, then material list, then download or export, then build. Accessibility note for implementation: keep the same steps in the page as an ordered text list with a descriptive caption, so screen readers and users who block images still get the sequence.
- Upload an imageselect a supported file format (PNG, JPG, WebP, GIF or BMP). Most browser-side tools cap uploads around 10 MB.
- Configure size and paletteset grid width, choose block materials, define color constraints.
- Inspect previewevaluate spatial clarity and block placement on the interactive canvas, using zoom, pan and per-tile hover readouts (x, y, block ID).
- Export material listgenerate CSV shopping counts and layer breakdown sheets.
- Download and buildexport
.schemor.litematicfor Java Edition,.mcstructurefor Bedrock,.mcfunctionfor vanilla datapacks, or follow printable layer guides.
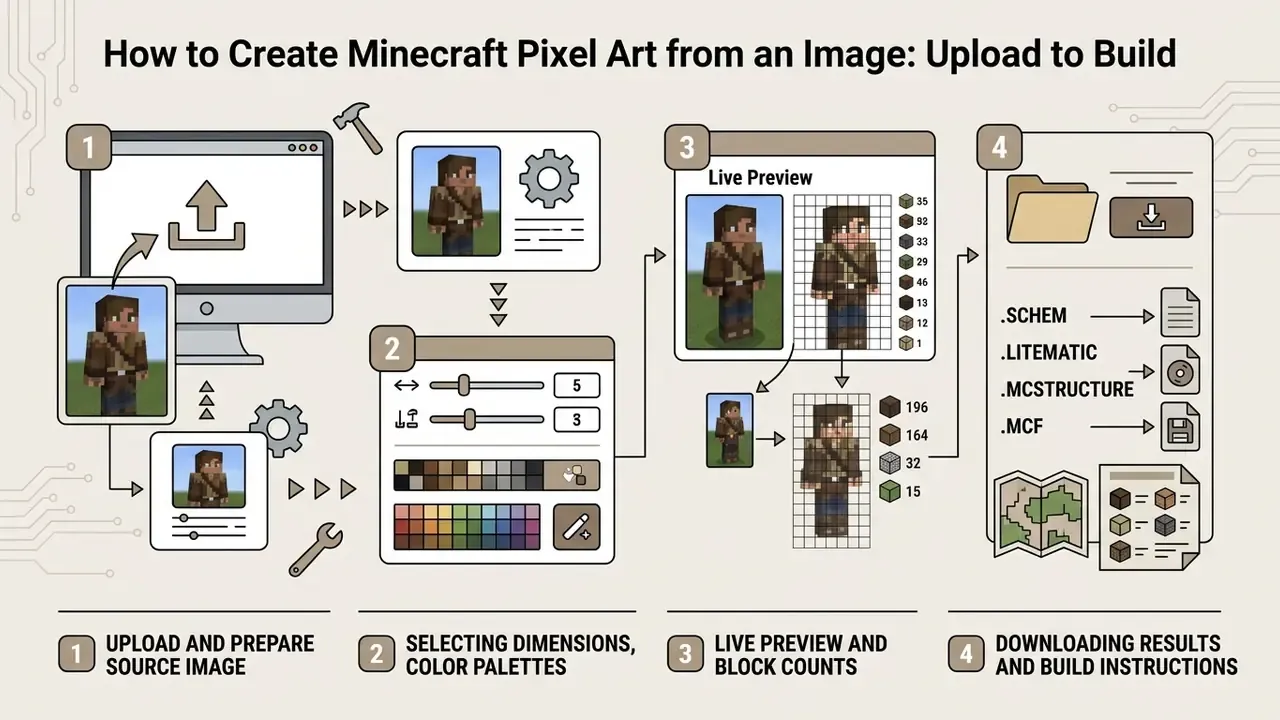
Upload an Image and Prepare the Source Picture
The initial upload step rewards a high-contrast graphic with defined silhouette edges. Processing any image through a minecraft pixel art generator online works best when the subject is cropped tightly, which prevents wasted block allocation on empty background.
Source photos with complex background gradients tend to muddy the grid. Pre-cropping the target object reduces visual noise and preserves primary facial or structural features before color downsampling happens.
Practical preparation rules follow from that: raise contrast until the silhouette reads at thumbnail size, delete or flatten busy backgrounds, remove motion blur and sensor noise, and avoid images where the subject fills less than half the frame. One quick habit that helps more than it should: shrink your source to 100 px wide in any viewer. If you cannot tell what it is, the block version will not save it.
Creators refining cleanup workflows can review our analysis of online photo editors, compare feature caps in free photo editors, or use AI-based image enhancement tools to sharpen low-resolution sprites before conversion.
Selecting Dimensions, Color Palettes, and Live Preview
Grid size controls output detail directly, while color constraints define which blocks are eligible for placement. Standard dropdown selections run from 16×16 sprite canvases to 128×128 wall structures, with custom width and height fields for non-square art.
The interactive preview lets you zoom, pan and verify individual tile assignments before committing to a build. Toggling palette groups, say disabling rare terracotta or concrete variants, updates the canvas immediately, so color balance is easy to judge. Palette character matters as much as palette size: concrete delivers bold, saturated color; terracotta covers muted earth tones; wool stays the most survival-friendly option because dye chains are cheap and renewable.
Downloading Results and Build Instructions
Once verified, the system generates download options: raw schematic files, layer-by-layer instructions, a printable PDF blueprint with grid lines, and component lists. Those outputs support systematic block-by-block construction in survival worlds.
For manual assembly, per-page instructions display grid coordinates next to exact material requirements. A high-resolution grid PNG at roughly 16 px per tile is ideal for a second monitor, or for a printout propped beside your keyboard. Anyone building automated creation pipelines can evaluate workflow optimization in our AI Media Calculators resource center.
Configuring Grid Size, Color Palettes, and Total Block Counts
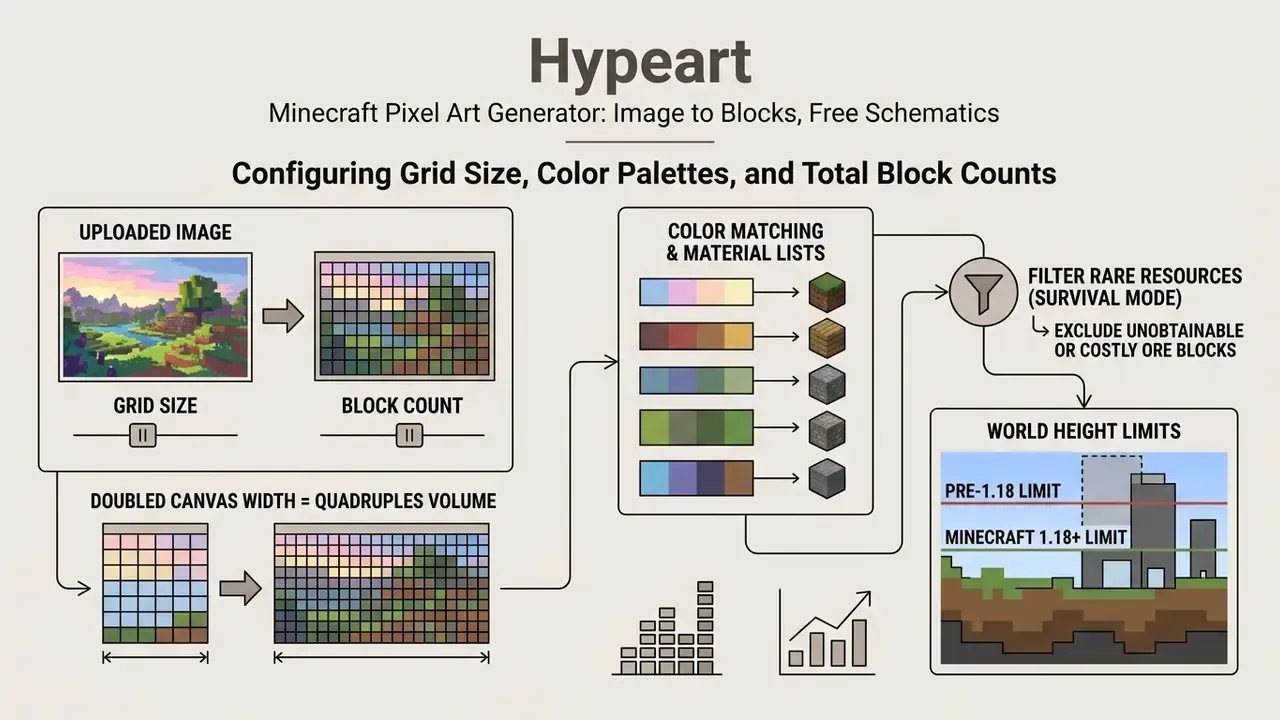
Output resolution determines the total block count, and a doubled canvas width quadruples the required volume. Balancing target grid size, active colors and palette boundaries is the main lever on total build time. Teams sourcing reference art for these grids often start from AI image generators or compare engines in our best AI art generator matrix before committing a design to blocks.
| Scale Tier | Canvas Dimensions | Palette Limits | Total Block Count | Estimated Build Difficulty |
|---|---|---|---|---|
| Small | 16 × 16 to 32 × 32 | 4 – 8 colors | 256 – 1,024 blocks | Simple (survival friendly, 30–60 minutes) |
| Medium | 64 × 64 to 96 × 96 | 8 – 16 colors | 4,096 – 9,216 blocks | Moderate (requires planning) |
| Large | 128 × 128 to 256 × 256 | 16+ colors | 16,384 – 65,536 blocks | Advanced (requires schematics) |
Managing a minecraft pixel art generator with block count properly prevents resource shortages mid-build. A 128×128 canvas requires exactly 16,384 blocks, which makes palette optimization critical before you gather anything. For recognizable characters, 29 to 40 blocks wide is usually enough; detailed photographs need 58 to 96 blocks wide to stay readable.
Minecraft World Height Limits Warning
Color Matching: How the Generator Picks Minecraft Blocks
Generators match pixel values to game blocks by calculating color distance in a perceptual space such as CIE Lab. Using a Euclidean distance calculation (ΔE), the system assigns each source pixel to the visually closest vanilla block texture:
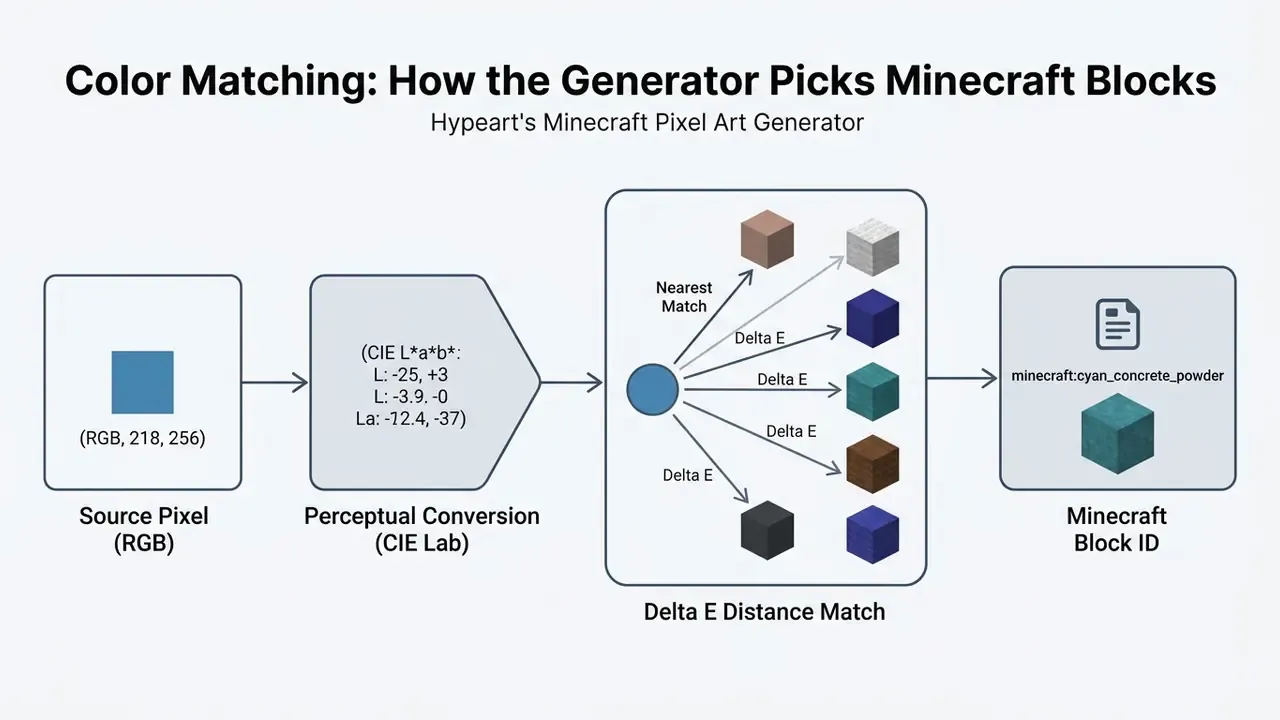
The classic ΔE*ab formula above is defined by NIST as the Euclidean distance between two CIELAB coordinates, and CIE 015:2018 Colorimetry, 4th Edition remains the reference standard for colorimetric practice. Because Lab distance does not track human perception uniformly across the gamut, modern implementations increasingly use CIEDE2000-style weighting. That is why two tools with the same block list can pick different blocks for the same pixel. Plain RGB Euclidean matching, still used by several free converters, is the least perceptually accurate of the three approaches and tends to flatten skin tones and dark blues.
On dithering. Advanced implementations apply Floyd-Steinberg dithering to smooth transitions across complex gradients, distributing quantization error into neighboring cells instead of banding them.
"Palette-constrained quantization via Gumbel-Softmax makes discrete voxel color choice differentiable while preserving semantic consistency."
Enable dithering for photographs and soft gradients. Disable it for logos, flags and sprite art, where flat color fields must stay clean. Restricting active swatches to accessible materials like wool or concrete keeps color fidelity respectable while keeping gathering requirements sane.
Material Lists and Block Count Math
A comprehensive material list aggregates total block requirements into a structured shopping sheet. The summary groups items by type and color, which gives survival players precise resource counts before construction begins.
Organizing resource requirements into full stacks (64 blocks per stack) simplifies inventory management. Order the list by shulker box, then by stack, then by remainder, so a single gathering trip covers one color group. Teams structuring commercial media assets can consult our guides on commercial use rights for brand placement projects.
Getting More Accurate Minecraft Pixel Art
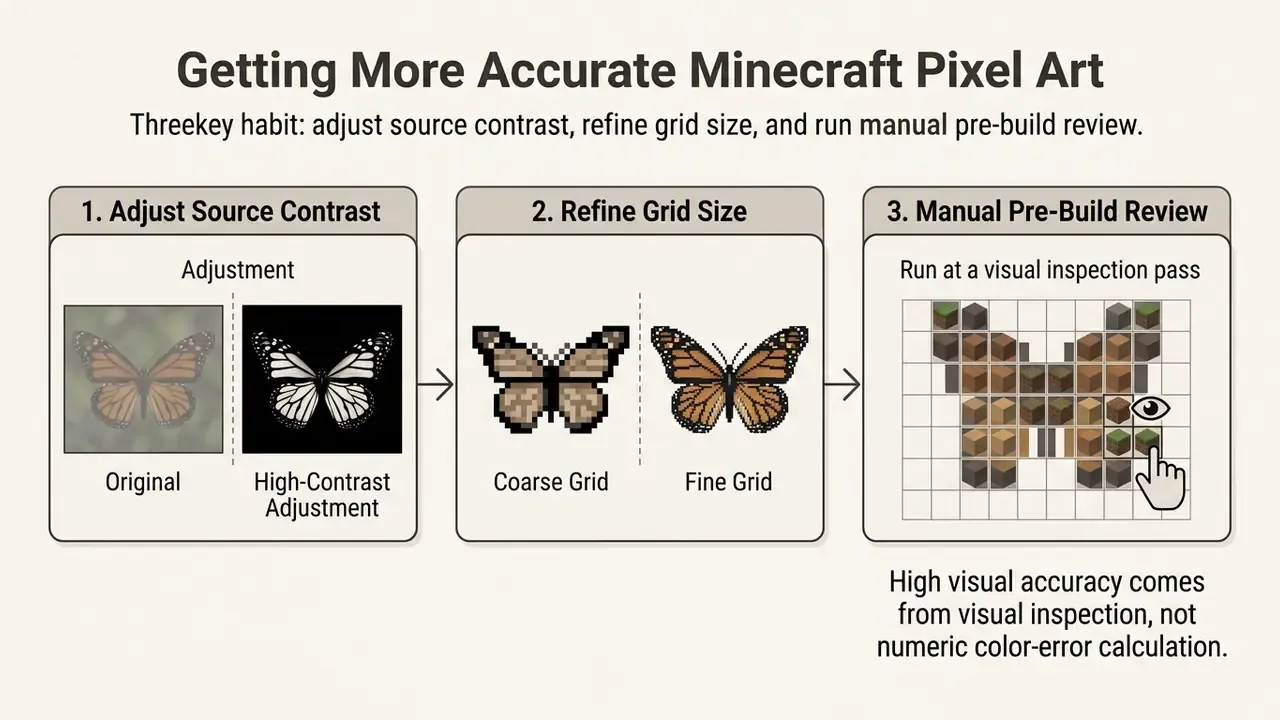
High visual accuracy comes from three habits: adjusting source contrast, refining grid size, and running a manual pre-build review. Inspecting the preview canvas before gathering materials eliminates the most common alignment defects.
The practical reading of that finding is straightforward. Automated output is functional, but a short pass of human curation is what makes it feel intentional. Fix isolated stray blocks, redraw eyes and text by hand, and simplify noisy regions before you place the first block.
Checklist0 / 8
"Automated metrics do not always agree with human ratings: some aggregate measures predict perceived quality better than simple per-block error."
Java vs. Bedrock Edition: Choosing Export Formats
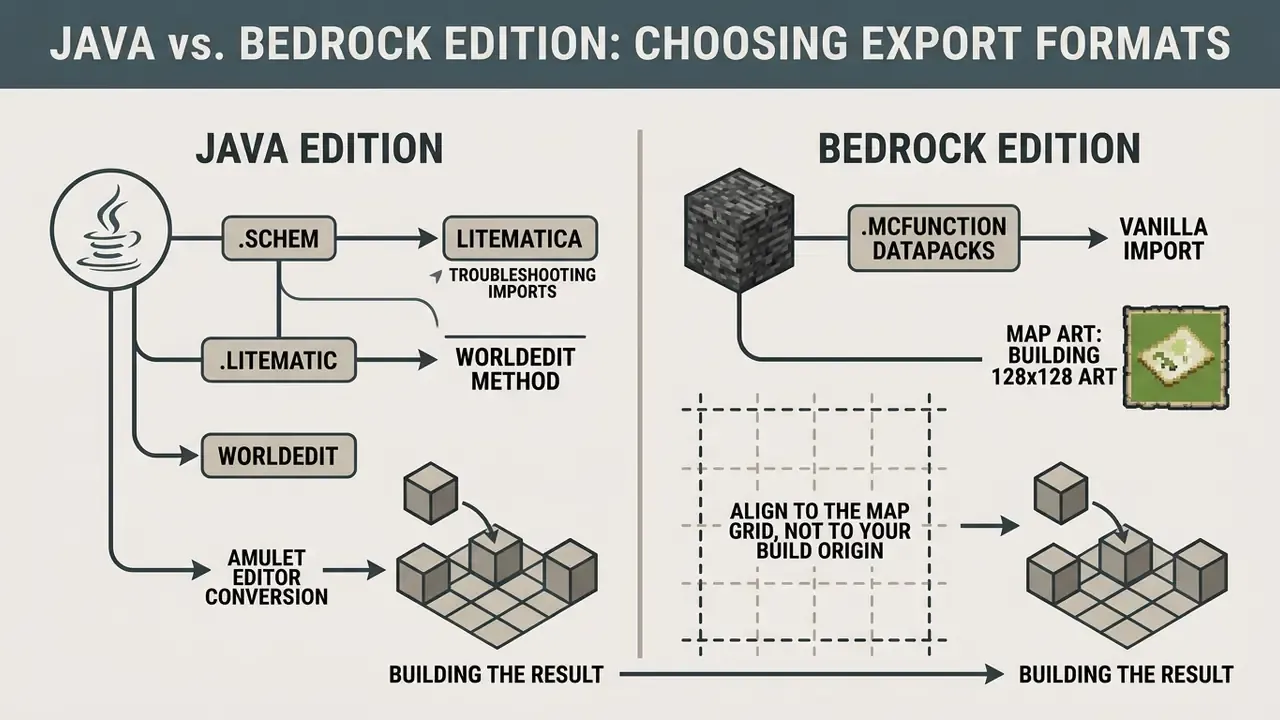
Minecraft Java Edition relies on external modification frameworks such as Litematica and WorldEdit for schematic imports, whereas Minecraft Bedrock Edition depends mostly on .mcstructure files or manual layer guides. Your export format follows directly from the target platform.
| Feature / Criteria | Minecraft Java Edition | Minecraft Bedrock Edition |
|---|---|---|
| Primary file formats | .litematic, .schem (Sponge v2/v3), legacy .schematic, .mcfunction | .mcstructure, PNG/PDF grid guides |
| Mod & plugin support | Litematica, WorldEdit, FastAsyncWorldEdit, Amulet | Limited (behavior packs, Structure Blocks, /structure) |
| Import automation | Direct paste via //paste, ghost hologram overlay, datapack function | Structure Block in Load mode, or manual build |
| Vanilla (no-mod) path | .mcfunction datapack executed from a command block | Structure Block (Windows) or manual layer guide |
| Transfer complexity | Low (automated via client mods) | Moderate to high (platform dependent) |
Understanding edition boundaries prevents format corruption. Java map structures use GZip NBT storage, while Bedrock stores world data in LevelDB, so direct file transfers are incompatible without conversion utilities. Copying a Java map_<id>.dat into a Bedrock world simply will not resolve.
"Terrain-adaptive PCGML in Minecraft operates on volumetric representations compatible with Java Edition schematic formats, which confirms the gap between platforms."
A second compatibility axis is version, not edition. The 1.13 "Flattening" removed numeric block IDs from Java Edition in favor of namespaced identifiers such as minecraft:white_concrete, so pre-1.13 .schematic files must be translated before they load in modern worlds. Sponge Schematic v3 stores block states as resource locations, for example minecraft:wheat[age=3], which is why current generators target v2/v3 rather than the legacy MCEdit format. Creators exporting schematics for client work should also review usage rights for AI-generated images before publishing derived assets.
Schematic, Litematica, and WorldEdit for Minecraft Java
In Java Edition, schematic formats store block states using namespaced identifiers (for example minecraft:blue_concrete). Mod tools load these files straight into world coordinates or project them as semi-transparent holographic overlays.
The Litematica mod reads .litematic files placed in the .minecraft/schematics/ directory and loads them through M → Load Schematics, which lets you verify placement accuracy in real time. The "create a placement" option must be enabled for the hologram overlay to render, and that catches a lot of first-time users. WorldEdit uses //schem load <filename> followed by //paste to insert massive structures instantly, reading from plugins/WorldEdit/schematics or config/worldedit/schematics.
Vanilla Import via .mcfunction Datapacks
If you play on an unmodded client, or on a server without WorldEdit access, export the design as an .mcfunction file. Place the generated file inside your world's datapacks/your_pack/data/pixelart/functions/ directory, add the required pack.mcmeta, then run /reload and execute /function pixelart:build in-game. Run it from a command block, since large functions exceed chat command limits. Every setblock line is placed automatically, with no third-party modifications required.
Two operational notes. Split very large artworks into several functions, for example one per 32 rows, to avoid command-limit throttling. And stand at the intended origin corner before executing, because generated coordinates are usually relative (~ ~ ~) to the executor.
Building the Result in Minecraft Bedrock
A dedicated minecraft pixel art generator bedrock workflow exports .mcstructure templates or structured layer guides. You place Structure Blocks in Load mode within Windows environments to import compatible structure files; the template itself lives in the structures subdirectory of a behavior pack and can be rotated or offset before placement. Structure export and import through Structure Blocks is documented by Microsoft Learn as a Bedrock feature, with export limited to Windows, which constrains automated transfer on consoles.
When native file injection is unavailable on console platforms, players construct the art manually using row-by-row guides. Following per-layer PDF grids keeps block alignment accurate without external mods: build the bottom row first, verify block counts every ten rows, and mark completed sections on the printout. Tedious, yes. It also produces the cleanest results, because you catch mistakes while they are still one row deep.
Map Art: Building 128×128 Art for In-Game Item Maps
Map art is a separate output mode worth knowing. An in-game item map at default zoom covers a 128×128 block area, so a horizontal mosaic built at exactly 128×128 blocks fits one map item perfectly when framed. Two rules separate clean map art from a smeared render:
- Align to the map grid, not to your build origin.Map boundaries are fixed to world coordinates in 128-block steps, so locate the correct corner (use a map item plus a coordinate readout) before placing the first block.
- Respect map shading.On the ground plane, Minecraft maps render lighter or darker variants of a block color depending on relative height, which is why staircase map art uses three tones per material. If you build perfectly flat, expect a single tone per block and choose a generator palette optimized for flat map art.
For multi-panel murals, generate the source image at 256×256 or 384×384, slice it into 128×128 tiles, one per map, then frame the panels in a grid on the wall.
Minecraft 3D Art Generator: Volumetric Builds from an Image
A minecraft 3d art generator converts volumetric models or layered source images into 3D block structures. Unlike flat mosaic converters, a minecraft 3d pixel art generator calculates depth geometry (X, Y, Z) to construct free-standing sculptures.
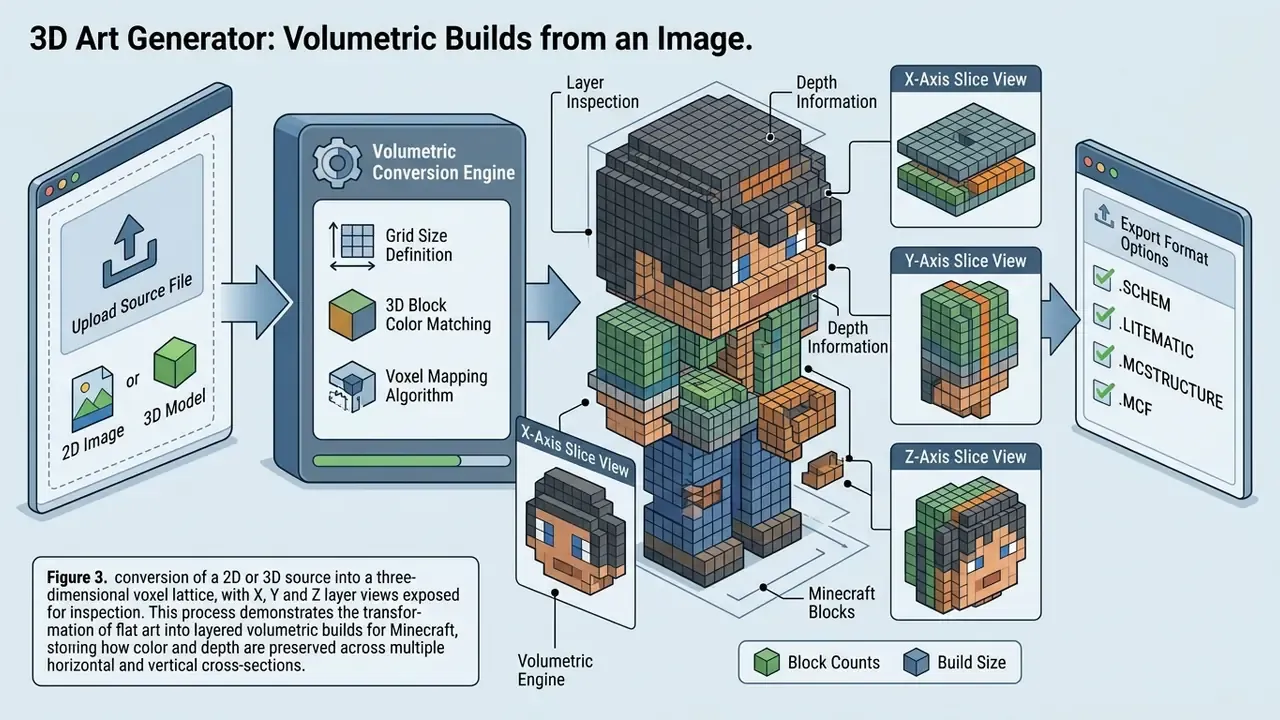
Tools that process OBJ, STL, GLB or GLTF models map surface textures across 3D voxel grids, then expose target size, block palette, a 3D preview and a layer view before exporting JSON, .mcfunction or .litematic. Buildability checks matter more here than in flat art: good converters flag floating blocks, unsupported overhangs and total block counts before you commit a single stack.
"Fast voxelization with level-of-detail support enables efficient representation of microgeometry and performance control when rendering large structures."
Depth-extrusion algorithms read image luminosity to create relief structures, which adds architectural depth to custom builds. Bright regions push forward, dark regions recede, and a single flat file becomes a bas-relief. It is not a substitute for real modeling, but for logos and portraits on a wall it looks far better than a flat mosaic. Users working on volumetric conversion can also review our overview of image-to-image generators for preparing source renders and depth maps before voxelization.
Free Access, Pricing, and Commercial Use of the Generator
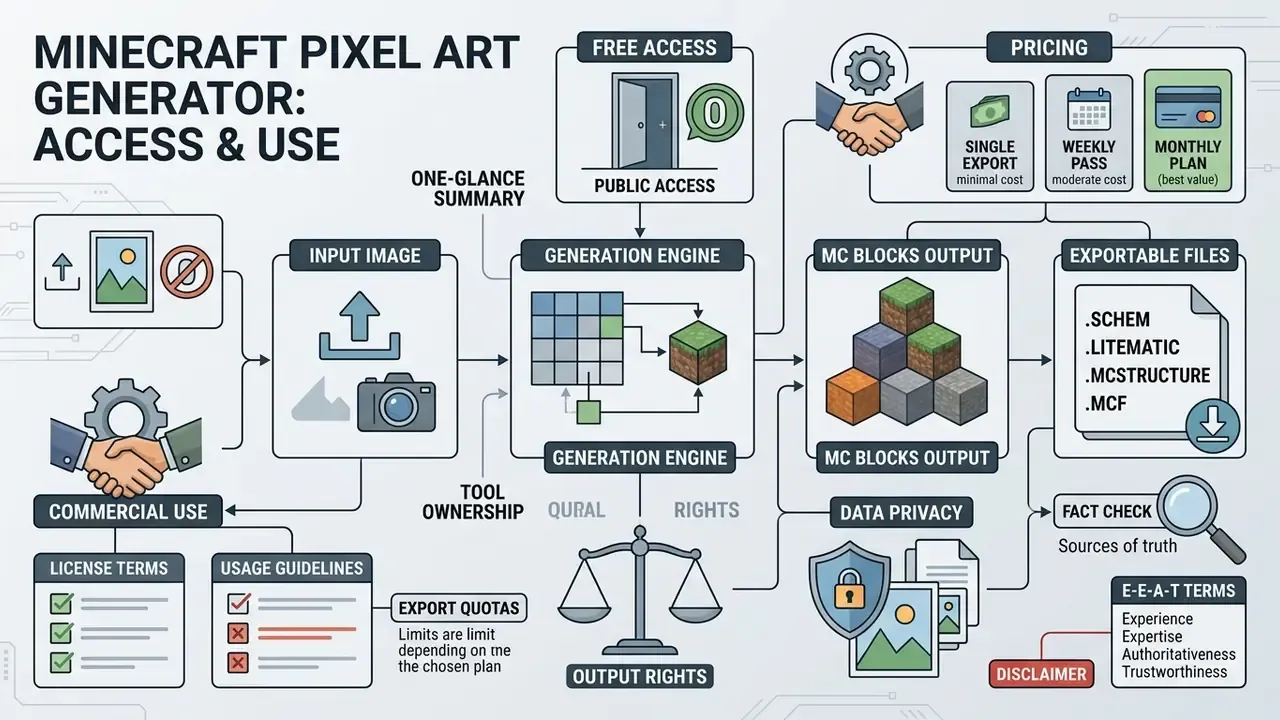
Most online converters offer free access for core image conversion, though advanced export formats or batch processing often sit behind a premium tier. Checking the service terms before you ship anything commercial is not optional.
E-E-A-T Terms and Licensing Fact Check:
Data privacy of uploaded images. Prefer converters that process files client-side. Several browser-based generators state that all conversion runs locally in the browser, often via Web Workers, and that images never reach a server, which removes retention and training-data concerns entirely. If a tool does upload your file, check three things before you feed it proprietary artwork: whether uploads are deleted after processing, whether files are used to train models, and whether generated links are publicly shareable. For corporate or client work, a local-processing tool is the lower-risk default.
Users comparing platform cost structures can consult our AI Media Pricing Guides for licensing breakdowns, or review options among AI image generators available without sign-up. Organizations managing intellectual property assets can also track legal framework updates in our litigation section, which covers ongoing disputes over rights to machine-generated visual output.
FAQ: Import Errors, Limits, and Palette Problems
Which image formats can I upload?
PNG, JPG/JPEG, WebP, GIF and BMP are supported by nearly every converter, and the typical maximum file size sits around 10 MB. Vector SVG input works in some tools after rasterization.
How big can pixel art be?
Width is effectively unlimited, but height is capped by the engine: 384 blocks in 1.18+ (Y = −64 to 320) and 256 blocks before 1.18. Outputs above 200 blocks per side demand enormous material budgets. A 256×256 wall is 65,536 blocks.
Litematica refuses to load my .schem file. What now?
.schem file. What now?Convert it. Either paste the .schem with WorldEdit in a test world and re-save the selection as .litematic, or run the file through Amulet Editor and export a .litematic directly. See the troubleshooting box above.
Can I build pixel art without any mods?
Yes. Export an .mcfunction datapack and run /function pixelart:build from a command block, or print the PDF/PNG grid and place blocks row by row. Bedrock players on Windows can also use a Structure Block in Load mode with a .mcstructure file.
Why do colors look different in Bedrock than in the Java preview?
Some blocks render with different tints and lighting between editions. Switch the generator's edition toggle if it has one, then nudge brightness and saturation slightly before regenerating.
My schematic pastes but every block is wrong or missing.
That usually signals a version mismatch. Pre-1.13 files use numeric block IDs removed by the Flattening, so run them through a converter to namespaced IDs (minecraft:white_concrete) first.
Does this work in Survival mode?
Yes, and the material list is the reason. Enable "Survival Blocks Only", reduce the color count, and gather by stack. Wool is the most renewable palette; concrete gives the strongest colors for a moderate resource cost.
Which palette should I choose?
Concrete for bold, saturated logos and characters. Terracotta for muted, natural tones. Wool for cheap survival builds. "Full mix" for photographic accuracy, when resource cost is not a constraint.
What about memory limits on huge builds?
Very large NBT schematics can exhaust client memory during a WorldEdit clipboard operation. Split the art into vertical strips, paste them sequentially, or use FastAsyncWorldEdit, which streams edits instead of holding the whole clipboard in memory.
Can I use the same file on a server and in single player?
Usually yes, provided the game version matches. Server plugins read from the server-side schematics folder, while client mods such as Litematica read from your local .minecraft/schematics/ folder, so the same file often needs to exist in two places.
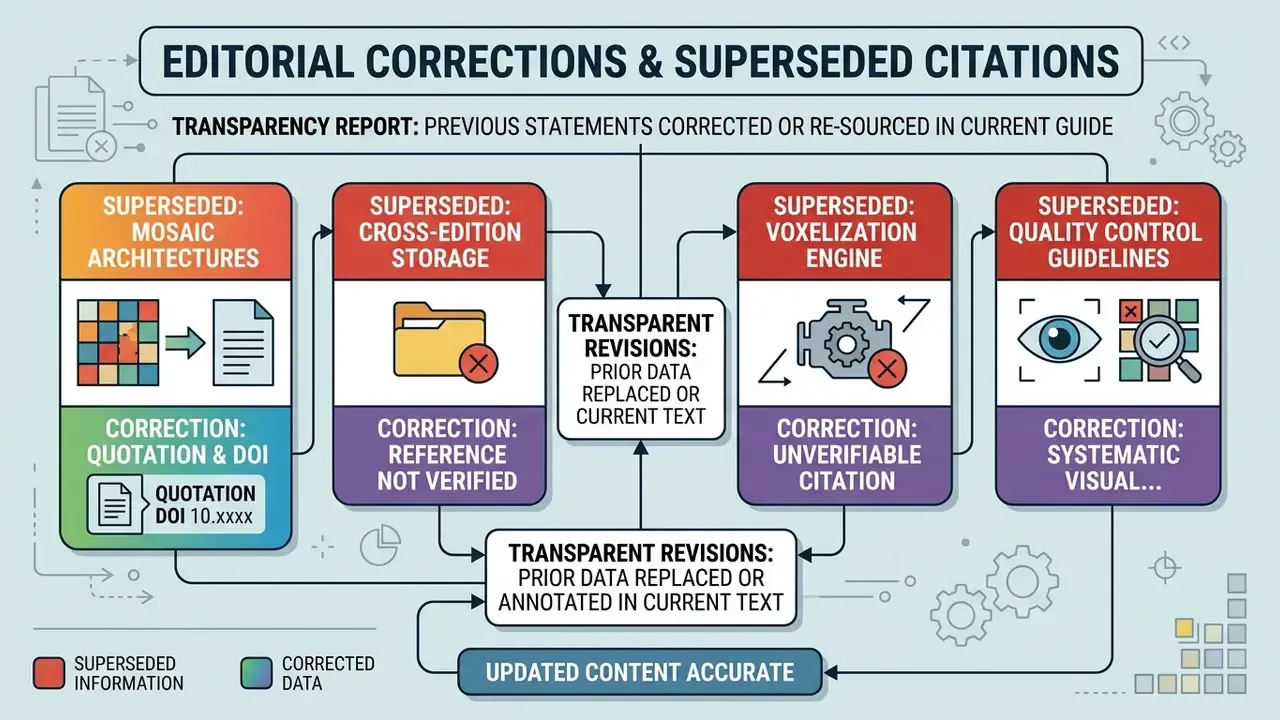
Appendix A: Editorial Corrections and Superseded Citations