Choose Your Method in 30 Seconds
- Generative Upscale (
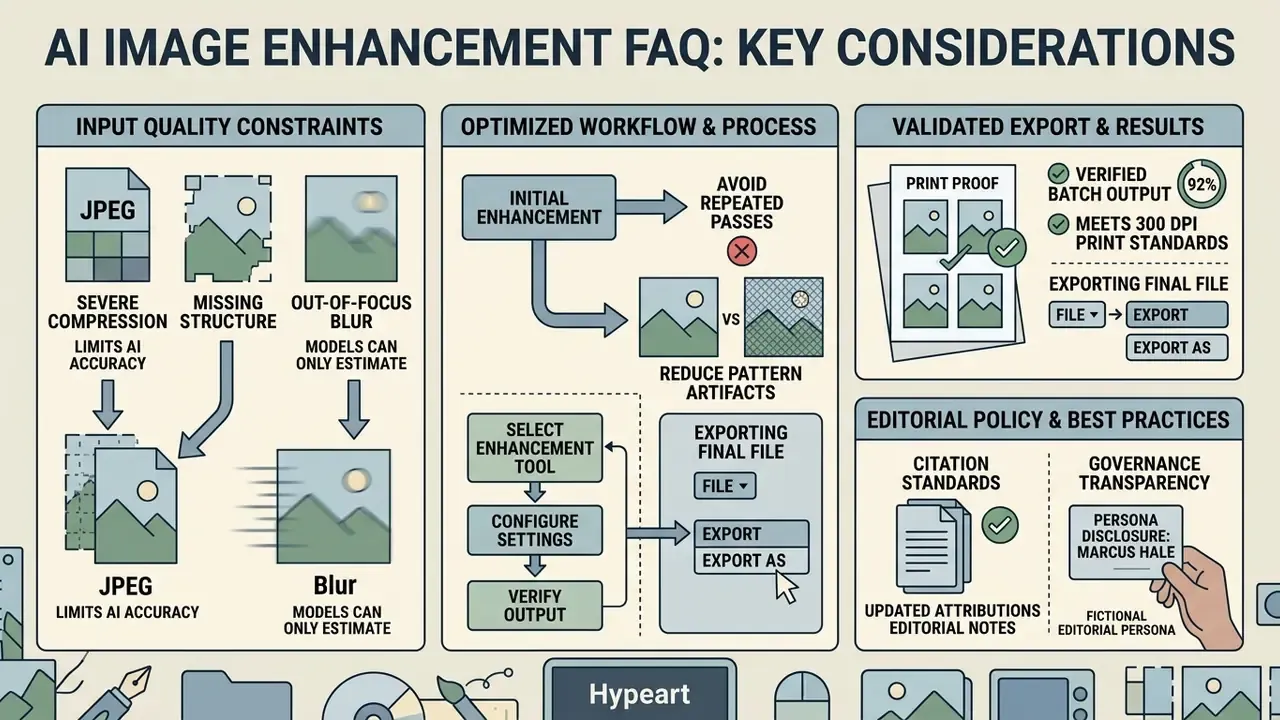
Image > Generative Upscale) synthesizes new pixels with selectable AI models: Firefly Upscaler (up to 6144×6144 px), Topaz Gigapixel (up to 56 MP), Topaz Bloom (up to 9 MP), at 2x or 4x. It consumes generative credits and creates a new document. Use it for legacy, low resolution, or heavily compressed assets. - Super Resolution (Adobe Camera Raw →
Enhance) doubles width and height (4x total pixel count), consumes zero generative credits, and writes a new DNG. Use it for RAW, TIFF, and high-quality JPEG camera files where identity and geometry must stay intact. - Preserve Details 2.0 (
Image > Image Size) is deterministic, edge-aware resampling with a Reduce Noise slider. No pixels are invented. Use it for forensic, legal, regulated, and brand-critical scaling where every pixel must be traceable to the source. - Governance rule of thumb: generative methods infer plausible detail; they do not recover lost facts. Any asset used as evidence, in regulated disclosures, or in scanned-document workflows should stay on the deterministic path (Preserve Details 2.0 or Super Resolution), with Content Credentials recorded before delivery.
Why Image Scaling Turned Into a Control Question
A few years ago, enlarging a photo was a production chore. Now it is a model decision. The moment a neural network fills in pixels that were never captured, the output stops being a copy and becomes a prediction, and predictions need an owner, a method record, and a review step.
That shift matters well beyond creative teams. Compliance and operations groups in US financial services already process scanned statements, identity documents, KYC selfies, insurance claim photos, and cheque images. An analyst who "cleans up" a blurry identity capture with a browser upscaler has quietly introduced an unlogged model into a regulated workflow. Classic shadow AI, just with pixels instead of prompts.
So the practical framing for this guide is simple. Three questions decide the method: what is the source file, what is the risk class of the output, and who signs off? Everything below follows that order, from interface steps through render-time budgets to the audit trail you leave behind.
Can Photoshop AI Enhance Image Quality?
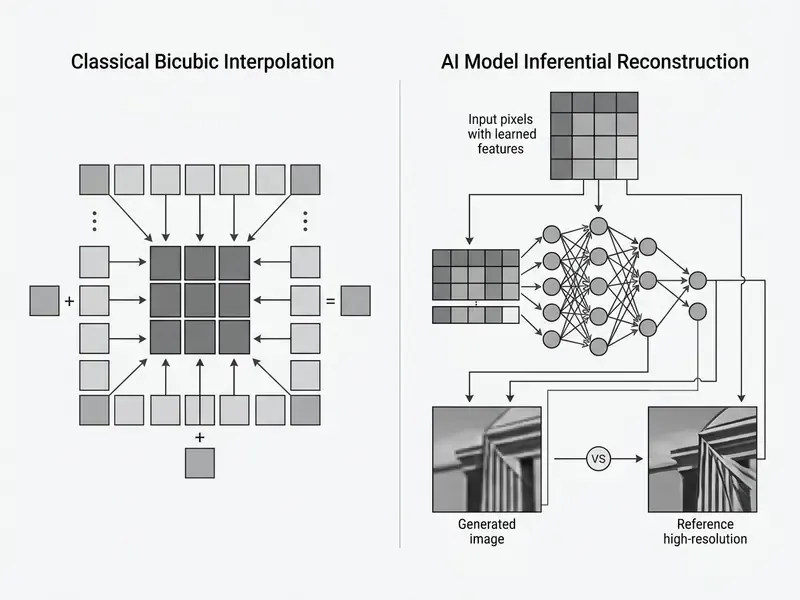
Adobe Photoshop enhances image quality and increases pixel resolution using generative neural networks and machine learning models trained on millions of images. These tools replace standard bicubic interpolation by predicting missing structural data, refining soft edges, and removing compression artifacts.
Quantitative benchmarking supports the move away from classical interpolation. In a large-scale evaluation of real-time super resolution networks, every submitted neural method beat the Lanczos baseline on reconstruction fidelity while still running in real time:
For a broader view of how this class of tooling is structured across desktop, web, and mobile products, compare the capabilities of mainstream AI photo editors before committing a production pipeline to a single vendor.
Generative Upscale for Image Enlargement in Photoshop
Generative Upscale in Adobe Photoshop increases image size up to 4x per side by generating missing pixel information through dedicated AI models. The feature accesses models including Firefly Upscaler for identity preservation, Topaz Gigapixel for real-world photo fidelity, and Topaz Bloom for creative texture addition (Adobe Help Center, 2026, https://helpx.adobe.com/photoshop/desktop/generative-upscale.html). It creates a new document upon execution, so the original source file stays untouched. That single behaviour is worth more than it looks: it gives you a before-and-after pair for review without extra bookkeeping.
Super Resolution in Camera Raw for Increasing Resolution
Super Resolution in Adobe Camera Raw doubles the linear width and height of an image, producing a fourfold increase in total pixel count. The machine learning model analyses raw, JPEG, or TIFF files to sharpen edge transitions and micro-textures, then exports the result as a new DNG file (Adobe Help Center, 2026). It remains the conservative, non-generative option for high res printing and aggressive cropping, because it extends structure that the sensor actually recorded rather than inventing new subject matter.
Fact check, Adobe documentation. Generative Upscale supports 2x and 4x scaling outputs up to a maximum side length of 4096 pixels on Photoshop on the web, and up to 6144×6144 pixels for Firefly Upscaler on desktop. Super Resolution in Camera Raw operates at a fixed 2x linear factor and does not consume generative credits. Source: Adobe Photoshop Help Center (2025 to 2026 releases), https://helpx.adobe.com/photoshop/desktop/generative-upscale.html
How to Choose the Right AI Method to Upscale Image in Photoshop
Selecting the appropriate AI upscaling method in Photoshop depends on original image quality, target output dimensions, and required fidelity to source pixels. Low resolution web graphics benefit from Generative Upscale, whereas uncompressed camera raw files are better served by Super Resolution or Preserve Details 2.0.
When to Use Generative Upscale, Super Resolution, and Image Size
Use Generative Upscale when working with low quality images that need synthesized fine details or artifact reduction up to 4x scaling. Apply Super Resolution in Camera Raw when boosting linear resolution by 2x on raw files, JPEGs, or TIFFs without modifying facial structure or background geometry. Choose Image Size with Preserve Details 2.0 for precise target dimensions, deterministic resampling, and controlled noise reduction with no generative inference at all.
For regulated industries the decision rule tightens further. Scanned contracts, identity documents, insurance claim photography, KYC captures, and any asset that may enter a dispute file should never pass through a generative model, because the output contains synthesized pixels that cannot be reconciled with the original capture. Deterministic resampling keeps the pixel lineage auditable. One caveat worth stating plainly: even non-generative Super Resolution is a model, so it still belongs in your tooling inventory with a version number attached.
Which Source Images Produce Natural-Looking AI Upscale Results
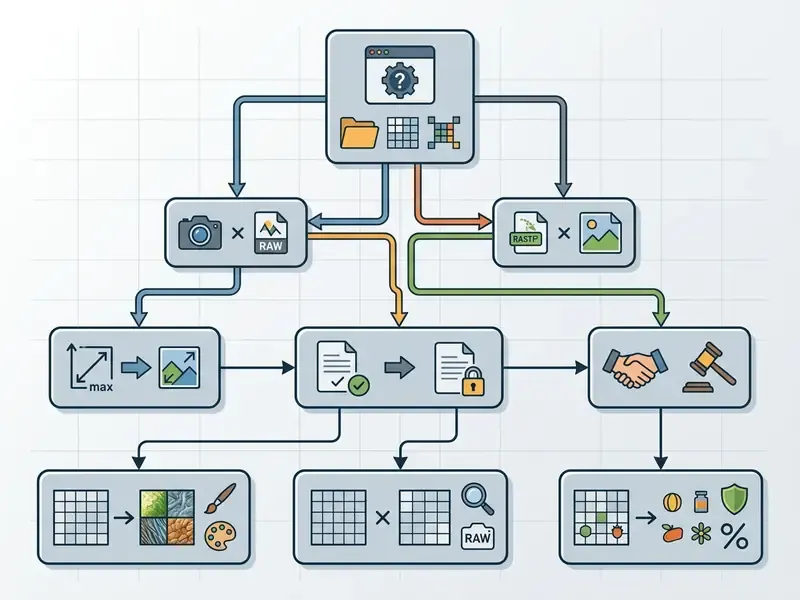
Natural looking results occur when original images have clean lighting, moderate contrast, and coherent structural edges, even at low resolutions. Highly compressed JPEGs with severe blockiness or out-of-focus blur force AI models to guess missing structures, which can create artificial textures or facial deformations. The mechanism behind those failures is a mismatch between the degradation baked into the source file and the degradation the model learned during training:
Practical input requirements that improve the odds of a natural result: start from the highest quality master available rather than a re-saved web derivative, prefer PNG or maximum-quality JPEG and TIFF inputs, and keep the enlargement factor in the moderate 2x to 4x band so noise and compression blocks are not amplified into structure. A quick sanity test before committing a batch: if the image looks mushy at 100% zoom in its native size, the model has nothing real to extend.
AI Upscaling Selection Matrix for Adobe Photoshop Workflows
| AI Upscaling Method | Source Format and Quality | Max Output Scale | Detail Synthesis Mode | Generative Credit Cost | Primary Use Case |
|---|---|---|---|---|---|
| Generative Upscale (Firefly) | Low-res JPEG/PNG, legacy graphics | 2x, 4x (max 4096 to 6144 px) | Restores facial identity, smooths artifacts | Consumes credits | Restoring old photo assets and legacy scans |
| Generative Upscale (Topaz Gigapixel) | Mid-res photo assets, product shots | 2x, 4x (up to 56 MP)* | Preserves realistic micro-textures and edges | Premium credit tier | Commercial product photos and print delivery |
| Generative Upscale (Topaz Bloom) | AI-generated art, digital illustrations | 2x, 4x (up to 9 MP)* | Synthesizes artistic details with Creativity slider | Premium credit tier | Creative reinterpretation of concept art |
| Super Resolution (Camera Raw) | RAW, DNG, TIFF, high-res JPEG | Fixed 2x linear (4x total px) | Machine learning edge enhancement, non-generative | 0 credits | Large-format printing of camera photos |
| Preserve Details 2.0 | Any raster layer, Smart Object | Arbitrary pixel dimensions | Classical edge-aware resampling with noise slider | 0 credits | Forensic, legal, and deterministic scaling |
| Smart Object + Free Transform | Raster layers, design assets, composites | Arbitrary, re-editable | Non-destructive background resampling | 0 credits | Layout scaling inside multi-layer documents |
* Model ceilings depend on active Creative Cloud and Firefly API limits and can change between builds; verify in the Generative Upscale dialog box before batching.
Teams that need to benchmark these ceilings against non-Adobe options can review dedicated AI image upscalers and their licensing terms side by side.
How to Upscale Image Using Generative Upscale in Photoshop
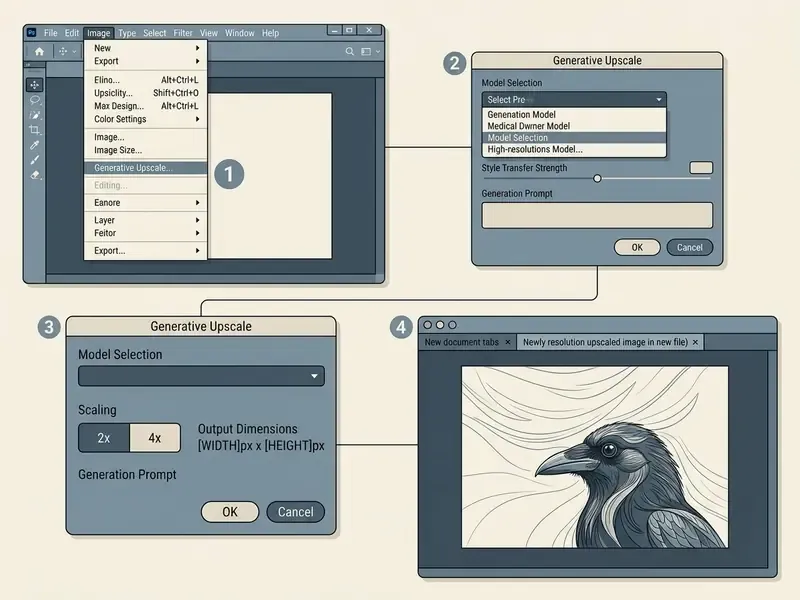
Upscaling an image using Generative Upscale in Photoshop means opening the source file, navigating to Image > Generative Upscale, selecting an AI model, and running the process to produce a high resolution document. This workflow isolates generative changes from source layers, which is exactly what you want when a reviewer has to compare the two.
Where to Access Generative Upscale and Select an AI Model
Open the raster image in Adobe Photoshop, set the colour mode to RGB via Image > Mode > RGB Color, then select Image > Generative Upscale. In the dialog box, choose the scale factor (2x or 4x) and pick the preferred AI model from the dropdown menu (Adobe Help Center, 2026). Choose Firefly Upscaler for standard photo restoration, Topaz Gigapixel for photographic accuracy, or Topaz Bloom for artistic styling.
On Photoshop on the web the path is Generative > Generative upscale after uploading the file. The web surface caps output at 4096 px per side and a maximum 1:4 width-to-height ratio, so extremely panoramic crops must be split or handled on desktop.
Case study, legacy catalog migration (internal editorial pipeline, 2026). An editorial team processed 450 legacy catalog JPEGs through Photoshop Generative Upscale using the Topaz Gigapixel model at 4x magnification. The automated batch pipeline created standalone documents for each file, maintaining colour profiles while eliminating compression noise. Reviewers inspected every output at 100% zoom against the source and scored it pass or fail on three criteria: effective resolution at or above 300 DPI at the target print size, no visible halo or texture repetition on product surfaces, and legible product-label typography. Under that manual sign-off protocol, 414 of 450 files (92%) passed without retouching. The remaining 36 files, mostly assets with printed serial codes and fine woven textiles, were re-run through single-pass Super Resolution plus manual Smart Sharpen. Methodology note: scoring was visual, performed by two reviewers with tie-break by the art director, and is reported as an internal production benchmark rather than a controlled study.
How to Inspect Fine Details and Export the High Quality Image
Performance and Render Time Benchmarks
Render time is the hidden variable in AI upscaling budgets, because a single-asset workflow that feels instant becomes a multi-hour queue at catalog scale. The figures below are indicative production timings measured on a desktop workstation (8-core CPU, 12 GB VRAM discrete GPU, NVMe scratch disk) and an Apple Silicon laptop. Treat them as planning baselines, not vendor guarantees.
Indicative Render Time and Output Weight per Method (single 12 MP source asset)
| Method | Processing Location | Typical Time per Asset | Output File Weight | Batch Scalability |
|---|---|---|---|---|
| Preserve Details 2.0 (2x) | Local CPU/GPU | 2 to 6 seconds | ~4x source pixel count, standard PSD/TIFF weight | High (Actions, Image Processor) |
| Super Resolution (2x, Camera Raw) | Local GPU, ML accelerated | 10 to 45 seconds | Linear DNG, up to 10x source file size | Medium (filmstrip multi-select) |
| Generative Upscale, Firefly Upscaler (4x) | Adobe cloud | 20 to 90 seconds plus upload and download | New document, up to 6144×6144 px | Low (Action-driven, credit-gated) |
| Generative Upscale, Topaz Gigapixel (4x) | Adobe cloud, premium tier | 30 to 120 seconds plus transfer | New document, up to ~56 MP | Low to medium |
| Standalone batch upscaler (folder mode) | Local GPU or vendor cloud | 5 to 30 seconds per asset, unattended | Depends on export preset | Very high (folder watch, presets) |
Two planning implications follow. First, cloud-based generative models add network transfer time that scales with asset weight, so a 4x upscale of a large TIFF can spend more time in transit than in inference. Second, deterministic local methods remain the only realistic option when thousands of assets must be processed inside a fixed nightly window. If your pipeline has a hard cut-off at 06:00, credits are not the constraint. Throughput is.
How to Use Super Resolution in Camera Raw
Super Resolution in Camera Raw increases image resolution by running a deep convolutional neural network over raw pixel data to double the linear dimensions. It creates an enhanced DNG file that keeps camera profile settings and non-destructive editing intact.
Opening Images in Camera Raw and Launching Enhance
Open a raw image, or right click a JPEG or TIFF file in Adobe Bridge and select Open in Camera Raw. The fastest route from Photoshop is File > Browse in Bridge (Ctrl+Alt+O or Cmd+Option+O), then Ctrl+R (Windows) or Cmd+R (macOS) on the selected thumbnail to open it directly in the Camera Raw processor. In the filmstrip panel, right click the image thumbnail and select Enhance from the context menu (Adobe Help Center, 2026). Alternatively, press Ctrl+Shift+E (Windows) or Cmd+Shift+E (macOS) to open the Enhance Preview dialog box directly. Note that some Camera Raw builds map Enhance to Ctrl+Shift+D or Cmd+Shift+D; if one shortcut does nothing, fall back to the context menu.
Evaluating Super Resolution Results in the Preview Window
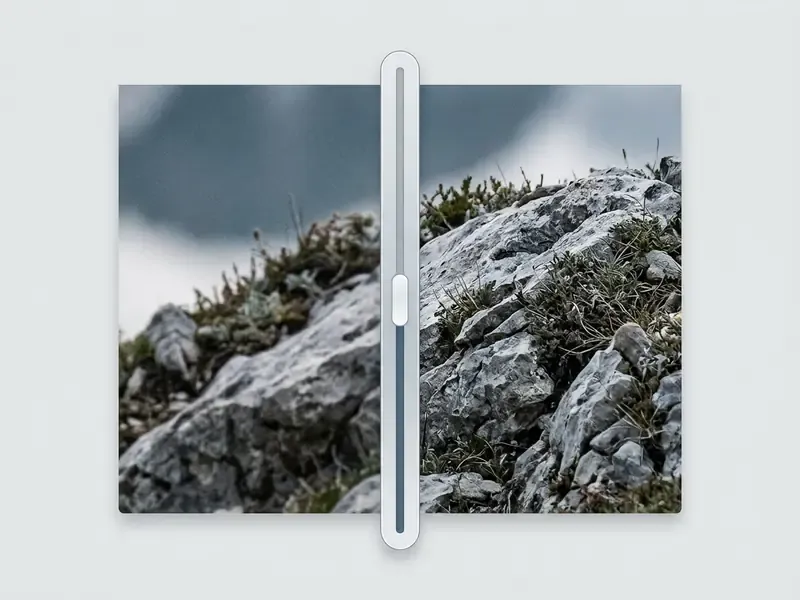
Check the Super Resolution box inside the Enhance Preview dialog to display the estimated completion time and the calculated target pixel count. For RAW sources the Raw Details option is also available; it stays disabled for JPEG input. Click and hold inside the preview window to toggle between the original crop and the enhanced rendering, and drag the preview to inspect different regions. Hair, fabric weave, foliage, and printed type are where reconstruction quality is actually decided. Click Enhance to process the file; Camera Raw automatically saves a new file with the .dng suffix alongside the original source.
Storage and hardware warning. Super Resolution constructs an uncompressed, linear DNG file that can be up to 10 times larger than the source RAW or JPEG asset. Batch operations therefore need high-speed NVMe SSD storage to avoid write-throttle bottlenecks, plus a dedicated GPU with at least 4 GB of VRAM (NVIDIA RTX-class or Apple Silicon M-series recommended). A 500-file batch of 40 MB RAW originals can occupy several hundred gigabytes of derivative DNGs, so provision scratch space before the run, not during it.
Teams that also need to extend canvas rather than only enlarge pixels can compare dedicated AI outpainting tools against Photoshop's own Generative Expand.
Practical Tips for Better Super Resolution Output
- Work from RAW when possible. RAW files carry more sensor data, so the model has more real structure to extend. JPEG, PNG, and TIFF are supported, but they offer less headroom.
- Super Resolution applies once per file. If 2x is not enough, export the enhanced DNG to another format and run the feature again, while accepting that the second pass compounds reconstruction error.
- Fine-tune after, not before. Adjust Sharpening, Noise Reduction, and Texture in Camera Raw after enhancement to balance detail against artifact visibility.
- Use a machine-learning capable GPU. Core ML, Windows ML, Apple M-series, and NVIDIA RTX hardware materially shorten processing time on large files.
Troubleshooting Camera Raw Super Resolution
1. The "Enhance" option is missing.
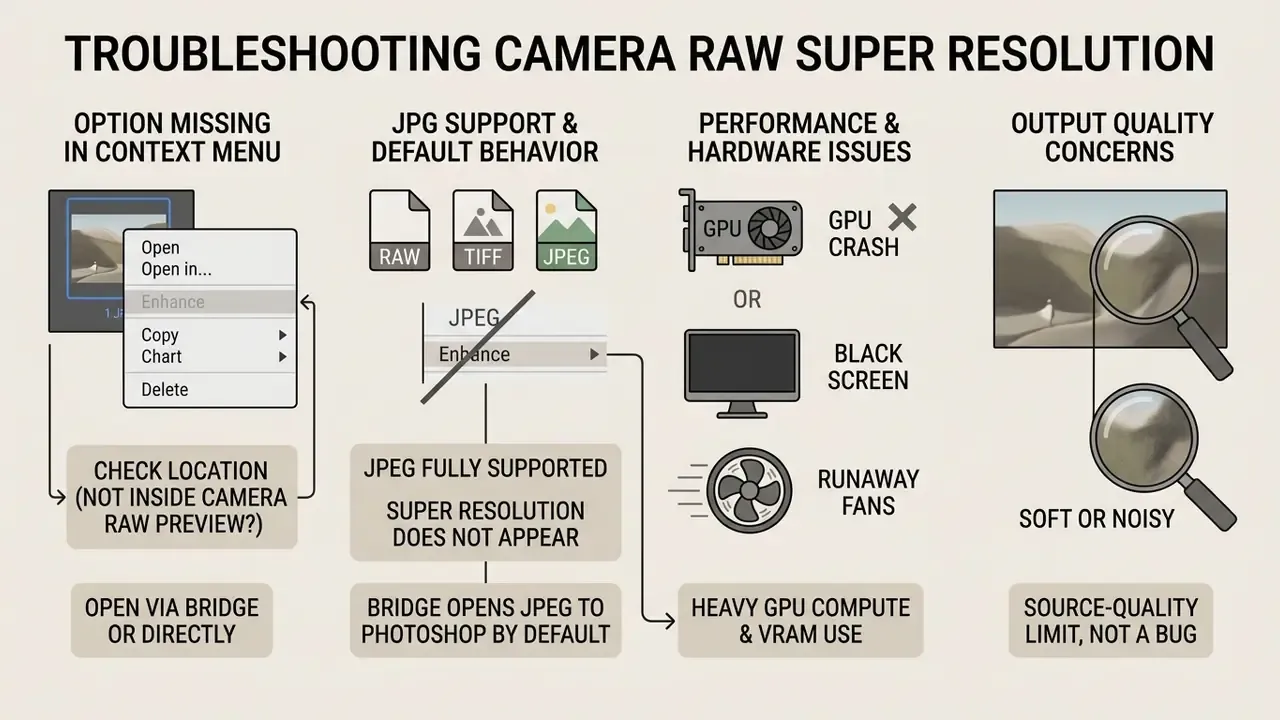
If right clicking your image does not show the Enhance command, you are almost certainly inside the Camera Raw Filter (Filter > Camera Raw Filter) rather than the Camera Raw processor. Super Resolution is not available through the filter. Fix it by opening the file through Adobe Bridge (File > Browse in Bridge), right clicking the thumbnail and choosing Open in Camera Raw, or by setting JPEG and TIFF files to open automatically via Edit > Preferences > Camera Raw > File Handling (set JPEG/HEIC and TIFF to "Automatically open all supported files"). Keeping the two entry points straight, processor via Bridge and camera raw filter via the Filter menu, resolves the majority of "Super Resolution not showing" reports.
2. Super Resolution does not appear for JPEG images.
Camera Raw fully supports JPEG, but Adobe Bridge opens JPEGs into Photoshop by default. Right click the JPEG thumbnail instead of double clicking it, then choose Open in Camera Raw, or change the File Handling preference described above.
3. GPU crashes, black screens, or runaway fans during enhancement.
Super Resolution leans heavily on GPU compute and VRAM. If the system blacks out or Camera Raw hangs mid-render, navigate to ~/Library/Application Support/Adobe/CameraRaw/GPU (macOS) or %APPDATA%\Adobe\CameraRaw\GPU (Windows) and remove the TempDisableGPU2 file so Camera Raw re-detects the adapter. You can also disable Use Graphics Processor for Performance in Camera Raw Preferences to force CPU processing. Update the display driver before re-testing, otherwise you will repeat the cycle.
4. Output looks soft or noisy despite a successful render.
That is a source-quality limit, not a bug. Heavily compressed, motion-blurred, or out-of-focus captures do not contain the structure the model needs. Revisit the input, or switch to a standalone tool with explicit degradation controls.
How to Improve Image Quality Without Generative Upscale
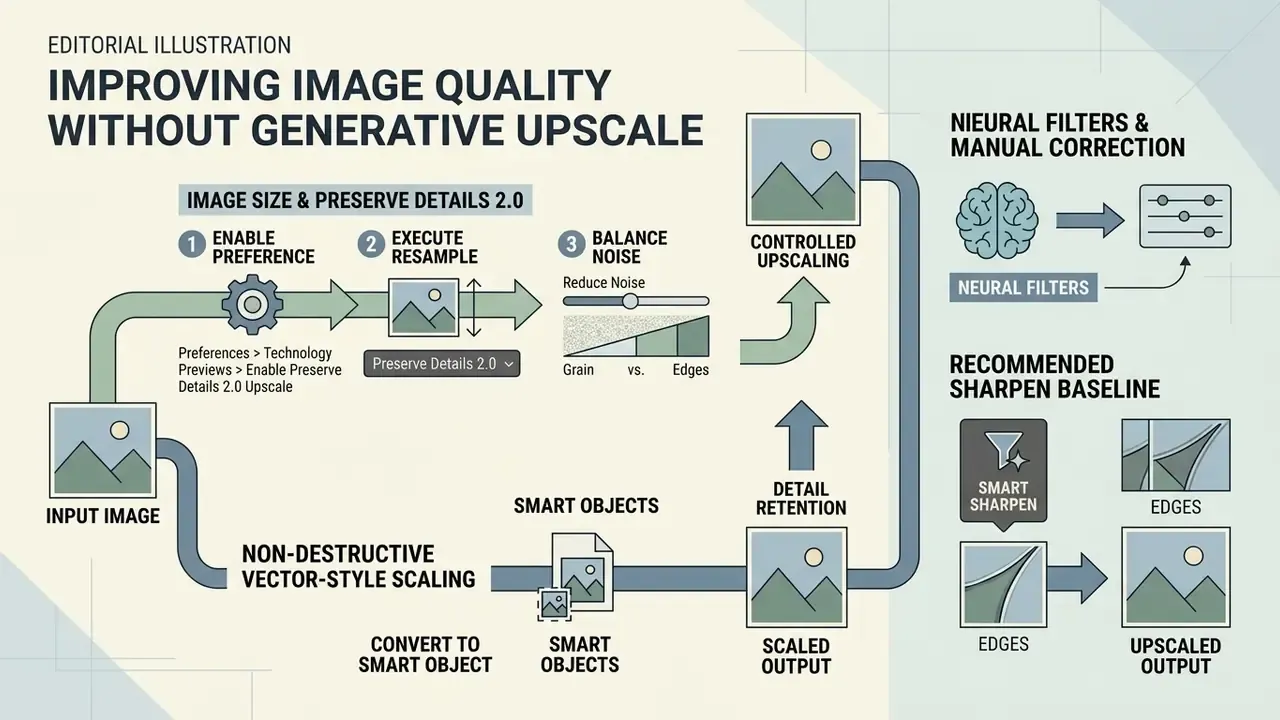
Improving image quality in Photoshop without generative models relies on deterministic resampling, non-destructive Smart Objects, Neural Filters, and edge-sharpening filters. These tools adjust sharpness, contrast, and noise without synthesizing unverified details, which is the whole point when the asset has to survive review.
Where a fully non-generative pipeline is mandated, it is still worth benchmarking dedicated AI image enhancers that expose degradation-specific controls rather than a single global slider.
Image Size and Preserve Details 2.0 for Controlled Upscaling
Step 0, enable the feature in Preferences. Before opening the resample dialog, confirm the algorithm is available: go to Edit > Preferences > Technology Previews (Windows) or Photoshop > Preferences > Technology Previews (macOS), make sure Enable Preserve Details 2.0 Upscale is checked, then click OK. In several Photoshop builds the option stays hidden in the resampling dropdown until this preview flag is active, which is the most common reason users report that "Preserve Details 2.0 is missing."
Step 1, execute the resample. Open the Image Size window via Image > Image Size (Cmd+Option+I or Ctrl+Alt+I). Make sure the chain-link icon between Width and Height is engaged to lock the aspect ratio, confirm that Resample is enabled, and choose Preserve Details 2.0 from the resampling algorithm dropdown menu (Adobe Help Center, 2026, https://helpx.adobe.com/photoshop/desktop/crop-resize-transform/resize-adjust-resolution/resampling-options.html). Enter the target pixel dimensions or percentage in a single step rather than several incremental jumps.
Step 2, balance noise against detail. Adjust the Reduce Noise slider between 0% and 100% while watching the preview window at 100% zoom, trading edge sharpness against grain smoothing. High values suppress compression grain but soften micro-texture, so judge the result on the actual subject matter. Skin and sky tolerate more smoothing than fabric or foliage. Enlargements up to roughly 400% stay usable with this method in practice; beyond that, edge reconstruction visibly flattens.
Non-Destructive Vector-Style Scaling via Smart Objects
To enlarge images or design assets without permanently baking pixel distortion into the working file, use non-destructive Free Transform:
This method is the right choice inside multi-layer layouts and composites, where the scaling decision may still change. It is not a substitute for Preserve Details 2.0 or Super Resolution when the goal is a genuine increase in delivered image resolution.

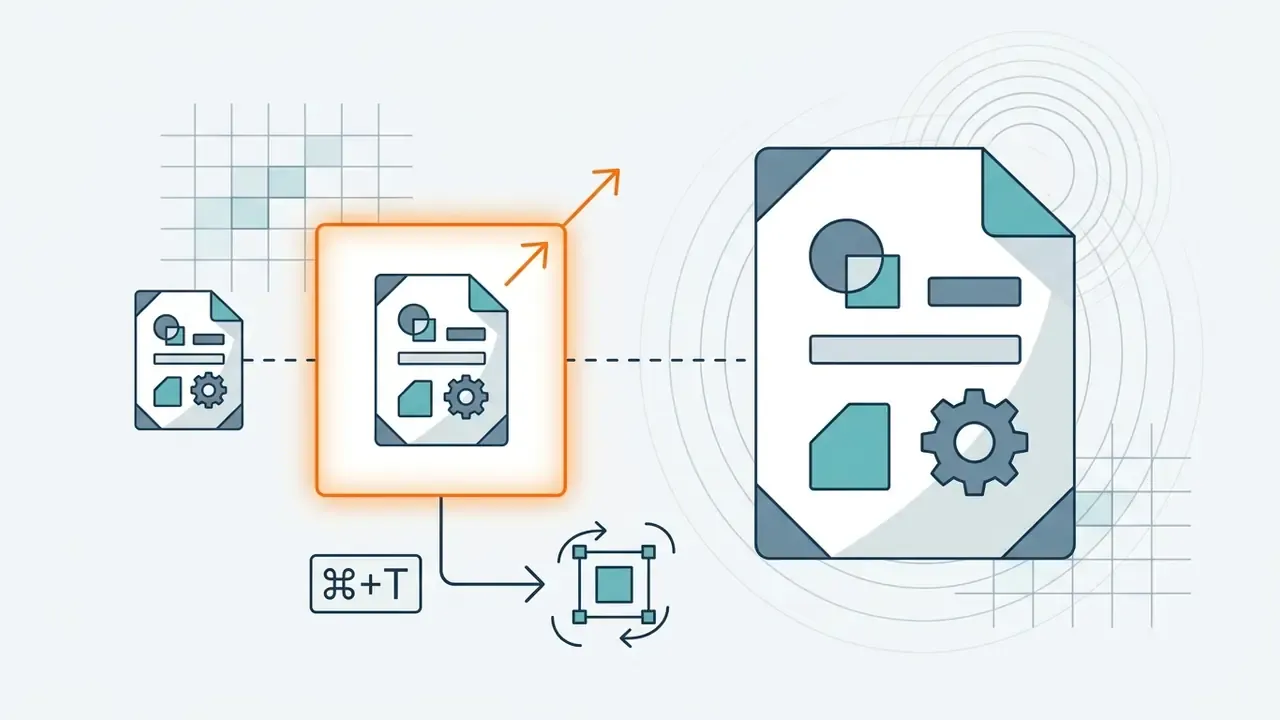
Ctrl+T (Windows) or Cmd+T (macOS) to activate Free Transform, or use Edit > Free Transform.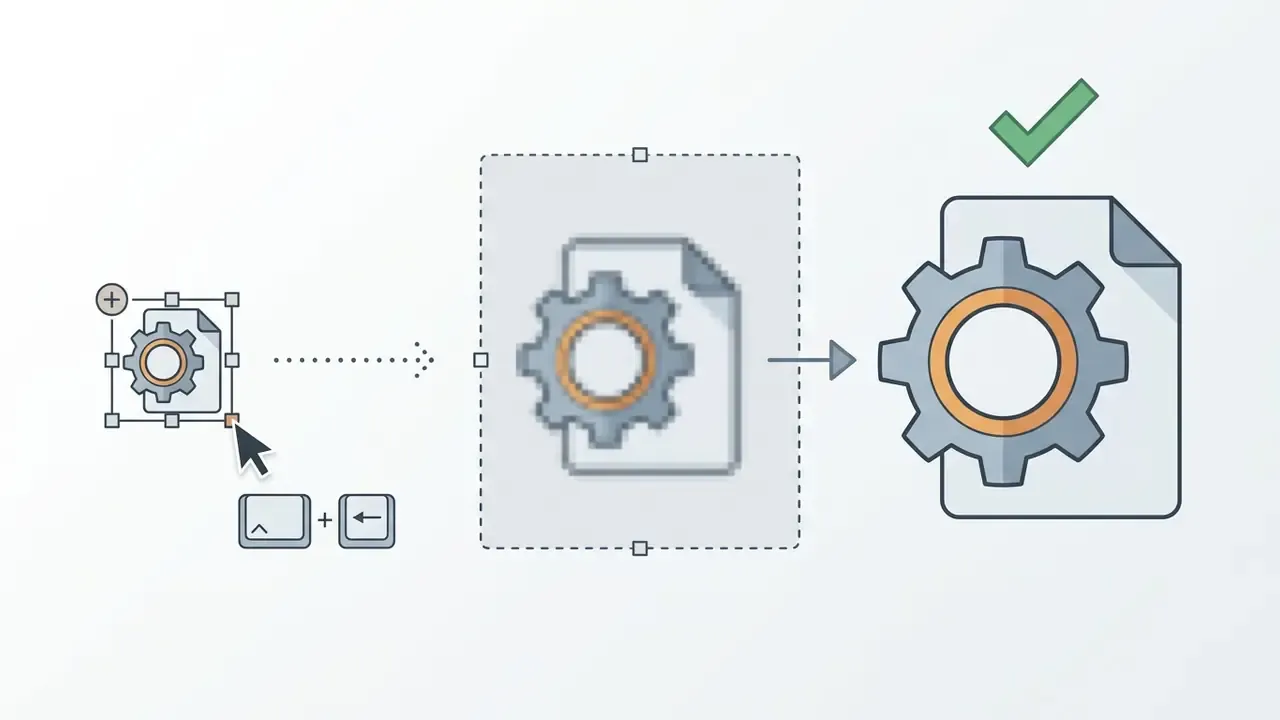
Alt (Windows) or Option (macOS) and drag a corner handle outward to scale from the centre point toward the target dimension. The preview may look coarse mid-drag and re-renders cleanly on commit.
Enter, or click the checkmark in the options bar, to commit. Photoshop applies background resampling while preserving the original source pixels inside the Smart Object container, so the layer can be scaled back down later without cumulative quality loss.Smart Objects, Neural Filters, and Manual Detail Correction
Convert standard image layers to a Smart Object by right clicking the layer and selecting Convert to Smart Object. Apply non-destructive adjustments such as Filter > Sharpen > Smart Sharpen, or run Filter > Neural Filters to use Photo Restoration for scratch removal and tone correction on an old photo (Adobe Help Center, 2026). Neural Filters explicitly recommend the Smart Object route, because filters then remain editable smart filters rather than baked pixels. Smart Objects let operators modify filter radius, strength, and blending modes at any point in the edit cycle, the same non-destructive discipline described in our guide to photo editors.
Recommended Smart Sharpen baseline for upscaled output. When refining soft focus after an enlargement, apply Filter > Sharpen > Smart Sharpen to the Smart Object and start from these values:
For an even gentler alternative, duplicate the Smart Object, apply Filter > Other > High Pass at a 1 to 3 px radius, and set the layer blend mode to Overlay or Soft Light with reduced opacity. Classic Filter > Sharpen > Unsharp Mask remains valid when threshold control matters: Amount governs strength, Radius governs spread, and Threshold decides which tonal transitions are affected, which protects smooth skin and gradients from grain amplification.
For complementary workflows in automated asset pipelines, consult our batch image processing workflows or, if you are mapping the wider toolchain first, see the overview of production workflow guides.
Why AI Image Enhancement Does Not Always Yield Perfect Results
AI image enhancement fails when input files lack minimum structural data, pushing deep learning models toward hallucinated textures, unnatural facial features, or distorted text. Understanding these boundaries prevents quality degradation in production environments, and it keeps expectations honest in the room where budgets get approved.
Competition data quantifies both the upside and the ceiling:
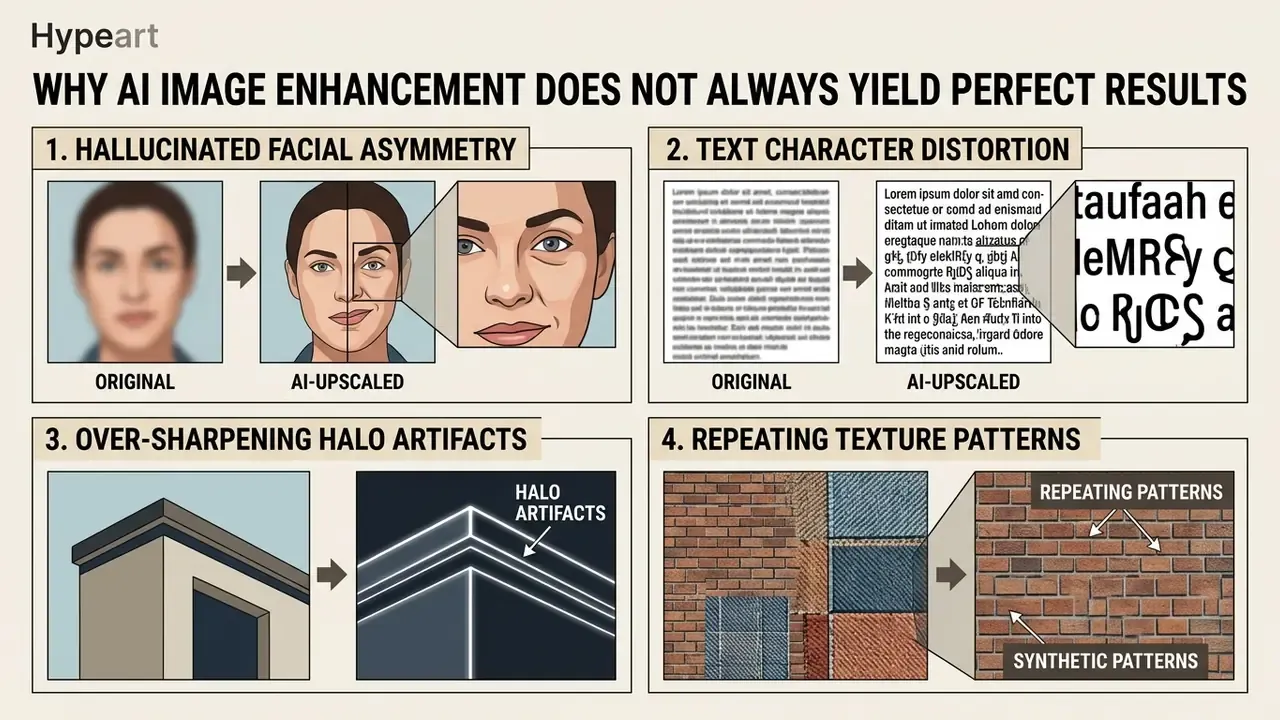
Artifacts, Noise, and Hallucinated AI Details
When low quality images with extreme compression artifacts or motion blur undergo AI upscaling, neural networks read noise blocks as structural features. The mismatch produces unnatural skin smoothing, distorted character glyphs, and repeating background patterns:
Generative models invent visual detail based on training statistics rather than recovering lost physical reality. Face-restoration research makes this explicit: at very low input resolutions a model can produce a high quality face that no longer resembles the original subject, altering eye colour, skin texture, and component shapes. Vendor language reflects the same boundary. Adobe describes Super Resolution as predicting missing pixels from surrounding visual information, and generative upscaling documentation frames output as plausible detail synthesized from learned priors.
During an audit of automated media assets, a digital publisher found that double-pass AI upscaling on legacy product imagery had distorted branding text on product labels. Reverting the pipeline to single-pass Super Resolution with manual Smart Sharpening restored text legibility across all catalog items and kept brand compliance intact for retail distribution. Small fix, large avoided embarrassment.
Common Errors in Upscaling and File Saving
QA Verification Checklist Before Production Release
Use this sign-off list on every AI-enhanced asset before it enters a published channel, a print run, or a client deliverable. It converts subjective "looks fine" review into a repeatable control, and it also blocks unapproved shadow AI tooling from creeping into the pipeline.
- Provenance recorded.Source master filename, capture date, operator, tool, model name, and scale factor logged in the asset record.
- Method appropriate to risk class.Generative models excluded from documents, evidence, identity imagery, and regulated claims.
- Single-pass confirmed.No asset carries more than one upscaling pass; multi-pass files re-run from the master.
- Text and numerals legible.Every glyph, SKU, serial, and legal mark inspected at 100% zoom against the source.
- Faces and hands verified.Symmetry, eye colour, skin texture, and jewellery detail compared to the original image; identity drift rejects the file.
- Texture integrity.No repeating background patterns, plastic skin, or smeared foliage and fabric.
- Edge artifacts.No halos or over-sharpening rings along high-contrast boundaries.
- Colour management intact.ICC profile preserved, with no unintended conversion during export.
- Effective resolution meets spec.300 DPI at final print size, or the platform-specific pixel spec for digital.
- Export format lossless or maximum quality.PNG, TIFF, WebP, or JPEG at quality 100; PDF presets checked for downsampling.
- Disclosure applied where required.Visible label, caption, or alt-text note for synthetically altered public-facing content.
- Two-person sign-off for brand-critical assets.Reviewer and approver names attached to the record.
Content Credentials, C2PA Provenance, and Audit Trails
For enterprise and regulated publishing, the enhancement itself is only half the deliverable. The other half is a machine-readable record of what happened to the pixels.
Photoshop supports Content Credentials, Adobe's implementation of the C2PA provenance standard. When enabled, the exported file carries a tamper-evident manifest describing the producing application, the AI models involved in generation or editing, and the sequence of edits. Practical implementation steps for a governed pipeline:
- Enable Content Credentials in the document before the enhancement step, so generative operations land in the manifest instead of being added retroactively.
- Attach producer identity where organizational policy requires attributable authorship.
- Export in a format that carries the manifest, then verify after export that the credential survived any downstream compression, CDN transform, or CMS re-encode. Many pipelines strip metadata silently.
- Retain the source master, the enhanced derivative, and the manifest together in the DAM record, so an auditor can reconstruct the transformation chain.
- Where credentials cannot survive the delivery channel, fall back to indirect disclosure: caption text, alt-text naming the tool and version, and an internal ledger entry.
Regulatory context reinforces the practice. Transparency provisions under the EU AI Act (Article 50) cover synthetic and manipulated images and expect outputs to be detectable as AI-generated or altered, with disclosure at first exposure. Public-sector and industry guidance goes further for audience-facing material: visible labelling or watermarking of AI-created visuals, plus an accessible caption or alt-text note identifying the tool, version, and the extent of human oversight. Partnership on AI's synthetic media framework recommends pairing that direct disclosure with indirect disclosure through metadata, provenance, and watermarking.
The practical governance test for product photography differs from the test for social media content. Product imagery is judged mainly on whether the enhancement materially misrepresents the goods, while social and editorial content carries the heavier transparency burden. Both tests are easier to pass when the manifest exists from the first save.
Photoshop AI Upscaler vs External AI Tools: Selection Guide
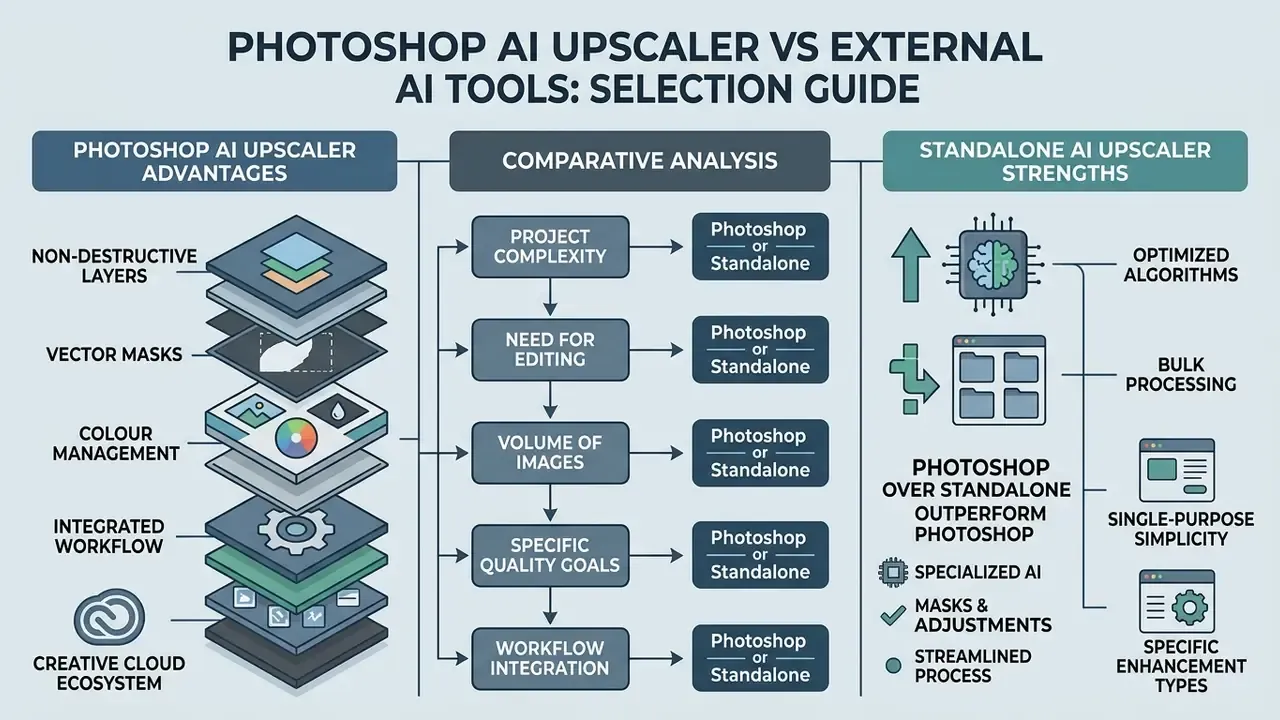
Adobe Photoshop combines AI upscaling with non-destructive layers, vector masks, and colour management inside Creative Cloud. Standalone tools such as Topaz Photo AI or Upscayl offer specialized batch processing but require separate file export workflows. Teams weighing whether to create new imagery instead of rescuing old files can also compare AI image generators on output quality and licensing.
If generation rather than enlargement turns out to be the cheaper route, the licensing terms differ sharply between platforms: stock-integrated options like the freepik ai image generator, multimodal assistants such as the gemini ai image toolset, infrastructure-level APIs including the gcore ai image service, and style-specific engines like the ghibli ai image generator all sit on different commercial terms. Check them before standardizing.
For strategic platform decisions, Hypeart AI Media Decision Support and the AI Media Glossary provide the vocabulary and the comparison frame.
Advantages of Photoshop Over Standalone AI Image Upscalers
Photoshop lets operators apply AI upscaling while preserving non-destructive adjustment layers, layer masks, and smart filters. Because masks hide rather than delete pixels, an operator can selectively reveal only the portions of an AI-enhanced layer that pass review. Keep a generatively restored background, mask out a hallucinated logo, restore that logo from the deterministic version. Generated outputs drop straight into complex multi-layer composites, Creative Cloud integration streamlines asset sharing across desktop and mobile, and Content Credentials support is something most standalone utilities still lack.
When Standalone AI Upscalers Outperform Photoshop
Standalone AI upscalers win on automated folder-based batch processing, local GPU performance optimization, and specialized print prepress pipelines. Comparative testing bears out the quality gap on difficult inputs:
Standalone applications such as Topaz Photo AI provide granular parameter tuning for specific noise types, batch import with Auto-Pilot and preset application across selected images, and optional cloud rendering for throughput. Open-source utilities like Upscayl offer zero-cost, folder-level batch upscaling for vector art and 3D renders with consistent model and scale settings across the batch. Adobe Firefly, by contrast, is positioned for enterprise creation of new commercial visuals rather than enlargement of existing masters.
Procurement teams comparing licensing models can review AI image upscalers for commercial use before standardizing on a vendor.
Comparative Analysis: Photoshop AI Upscaler vs External Tools
| Tool / Platform | Workflow Integration | Batch Processing Capability | Layer and Masking Support | Cost and Licensing Structure |
|---|---|---|---|---|
| Photoshop Generative Upscale | Native Creative Cloud app | Limited (Action-based) | Full layer mask integration | Included with CC subscription, uses credits |
| Photoshop Super Resolution | Native Camera Raw module | Multi-file filmstrip selection | Non-destructive DNG export | Included with CC subscription, 0 credits |
| Photoshop Preserve Details 2.0 | Native Image Size dialog | High (Actions, Image Processor) | Full layer and Smart Object support | Included with CC subscription, 0 credits |
| Topaz Photo AI (standalone) | External desktop software | Automated folder batching | No internal layer support | One-time licence purchase (~$199) |
| Upscayl (open-source) | Standalone local application | Folder-level batch processing | No layer or masking tools | Free, open-source (GPL-3.0) |
In short: Photoshop offers the best control surface when the upscale is one step inside a larger composite, while standalone tools win on unattended volume and per-degradation tuning. To explore further platform comparisons and tool benchmarks, see the overview.
Cost of Control: Credits, Licences, and Validation Overhead
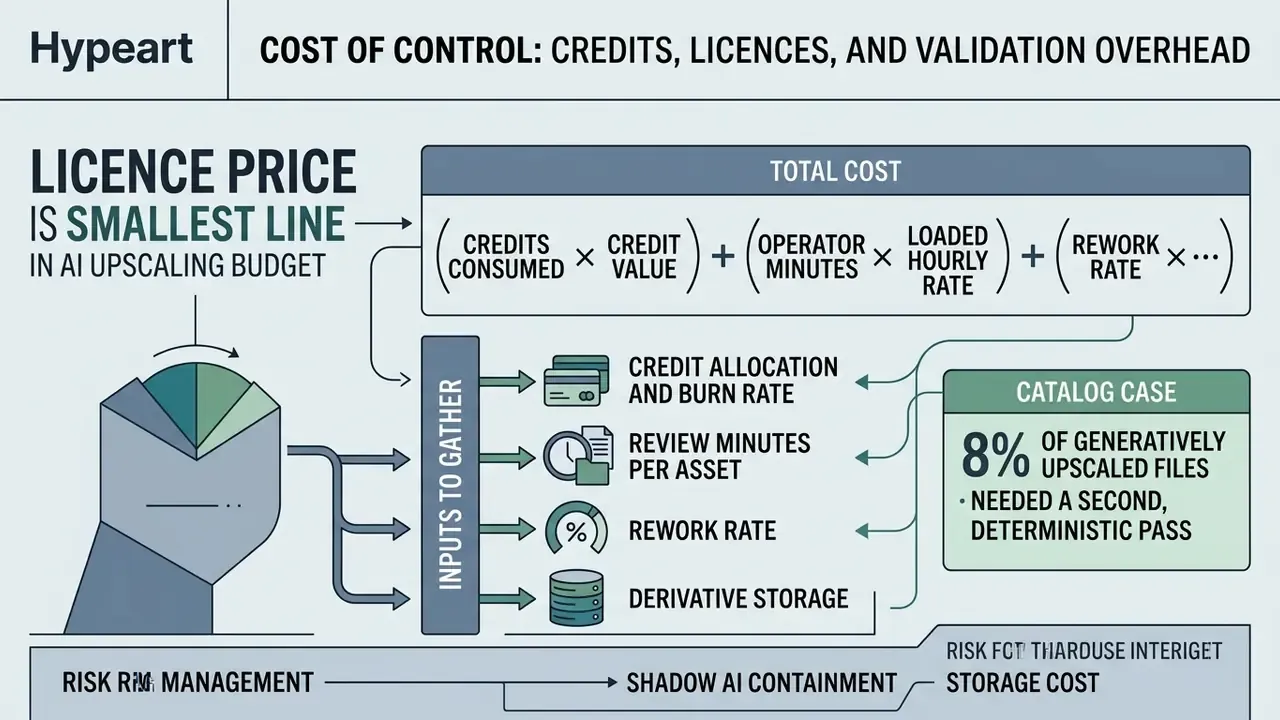
Licence price is the smallest line in an AI upscaling budget. The decisive variables are credit consumption on premium models and the human review time needed to keep hallucinated detail out of production.
A workable estimate for a batch of N assets:
Total cost = (credits consumed × credit value) + (operator minutes × loaded hourly rate) + (rework rate × re-processing cost) + storage cost of derivatives
Inputs to gather before committing to a method:
- Credit allocation and burn rate. Creative Cloud plans include a monthly generative credit allocation that renews on the billing date. Standard Photoshop generative operations typically consume one credit per generation, while premium AI models consume more, scaled by model and output size. Some Photoshop-only subscriptions include as few as 25 monthly credits, while higher Creative Cloud and Firefly tiers include 1,000 or 4,000, and certain plans grant unlimited standard generations. Super Resolution and Preserve Details 2.0 consume zero credits, which makes them the cheapest path at volume.
- Review minutes per asset. The QA checklist above takes roughly 1 to 3 minutes per image for deterministic output, and 3 to 8 minutes for generative output with text, faces, or fine product detail. At 450 assets, that difference alone can exceed the annual cost of a standalone licence.
- Rework rate. In the catalog case above, 8% of generatively upscaled files needed a second, deterministic pass. Budget the rework rather than assuming a clean run.
- Derivative storage. Linear DNGs at up to 10x source size, plus new documents from Generative Upscale, multiply DAM footprint and backup cost.
- Shadow AI containment. Restrict approved tooling to an allow-list, disable unapproved browser upscalers on managed devices, and require that every delivered asset carry a provenance record. An asset without a manifest and a logged method should fail intake by default.
One honest limitation: none of these figures are universal. Credit pricing, model ceilings, and plan inclusions change between releases, so re-run the estimate at each renewal rather than treating last year's number as settled.
FAQ About AI Enhance Image Photoshop
Is a Creative Cloud Subscription Required for AI Enhance Image in Photoshop?
Yes. Accessing Generative Upscale and Firefly-powered AI tools in Adobe Photoshop requires an active Creative Cloud subscription or a valid trial account. Generative features process operations on Adobe cloud servers and draw on the monthly generative credits included in standard subscription tiers (Adobe Help Center, 2026, https://helpx.adobe.com/creative-cloud/apps/generative-ai/generative-credits-faq.html). Offline perpetual versions such as CS6 do not support AI upscaling at all. Organizations that cannot justify a subscription for occasional enlargement work should compare capable free photo editors and open-source upscalers, keeping their export limits and provenance gaps in mind.
Can You Use AI Upscaling for Commercial Product Photos and Social Media?
Yes. Non-beta AI outputs generated in Adobe Photoshop with official Firefly models are cleared for commercial use, including product photography, print advertising, and social media campaigns (Adobe Firefly Legal Terms, 2026). Outputs produced by features explicitly labelled beta may be restricted to personal use where Adobe states so, which makes build labelling part of the compliance check. Under emerging international regulation such as the EU AI Act (Article 50), digital content that has been synthetically generated or significantly altered may require machine-readable provenance metadata or visible disclosure on publication.
Why Is Super Resolution Greyed Out or Missing in My Camera Raw?
Almost always because the file was opened through the Camera Raw Filter inside Photoshop instead of the Camera Raw processor. Open the asset from Adobe Bridge with Open in Camera Raw, or configure Edit > Preferences > Camera Raw > File Handling so supported JPEG and TIFF files open in Camera Raw automatically. Updating Camera Raw to the current release resolves most of the remaining cases.
How Large Will My Files Become After Super Resolution?
Expect an uncompressed linear DNG up to ten times the size of the source file, on top of the fourfold increase in pixel count. Provision NVMe scratch space and DAM capacity before running a batch, not halfway through it.
Can I Run Generative Upscale Twice to Reach 8x?
Technically yes, since the output is a new document that can be re-processed. Artifacts stack with each pass, though. Return to the original master and scale once at the largest factor the chosen ai model supports.
Which Method Should a Regulated Team Use by Default?
Preserve Details 2.0 for arbitrary target dimensions, and Super Resolution for a fixed 2x on camera originals. Both are non-generative, credit-free, and keep pixel lineage auditable. Reserve generative models for creative and marketing assets, with disclosure applied.
Does an Upscaled Image Belong in an Asset or Model Inventory?
Treat the method as a model and the asset as its output. Log the tool, model name, version, scale factor, operator, and reviewer. In a financial-services context that entry is what lets internal audit answer a simple question later: who changed these pixels, and under whose authority?
Appendix A: Corrected Attributions and Editorial Notes