Visual precision in executive presentations requires controlled, reproducible workflows. Masking images into clean circular frames removes visual clutter and focuses viewer attention directly on the key subject: a face, a logo, or a single product detail. Three clicks, and a busy rectangle turns into something that looks deliberate.
Three Steps to a Circular Image
Everything else in this guide (borders, shadows, X/Y positioning, brightness correction, animation, Master Slides templates, Canva transparent PNGs, background removal) builds on those three steps.
- Insert and select—
Insert→Image→ upload, then click the picture once so the blue handles appear around its edges. - Open the mask menu— click the down arrow next to the Crop icon (or press
Ctrl + Shift + F/Cmd + Shift + Fto enter crop mode first), then chooseShapes→Oval. - Lock the geometry— hold
Shiftwhile dragging a corner handle, or tickLock aspect ratioinFormat options→Size & Rotation, so the circle never stretches into an oval.
Can You Make an Image a Circle in Google Slides?
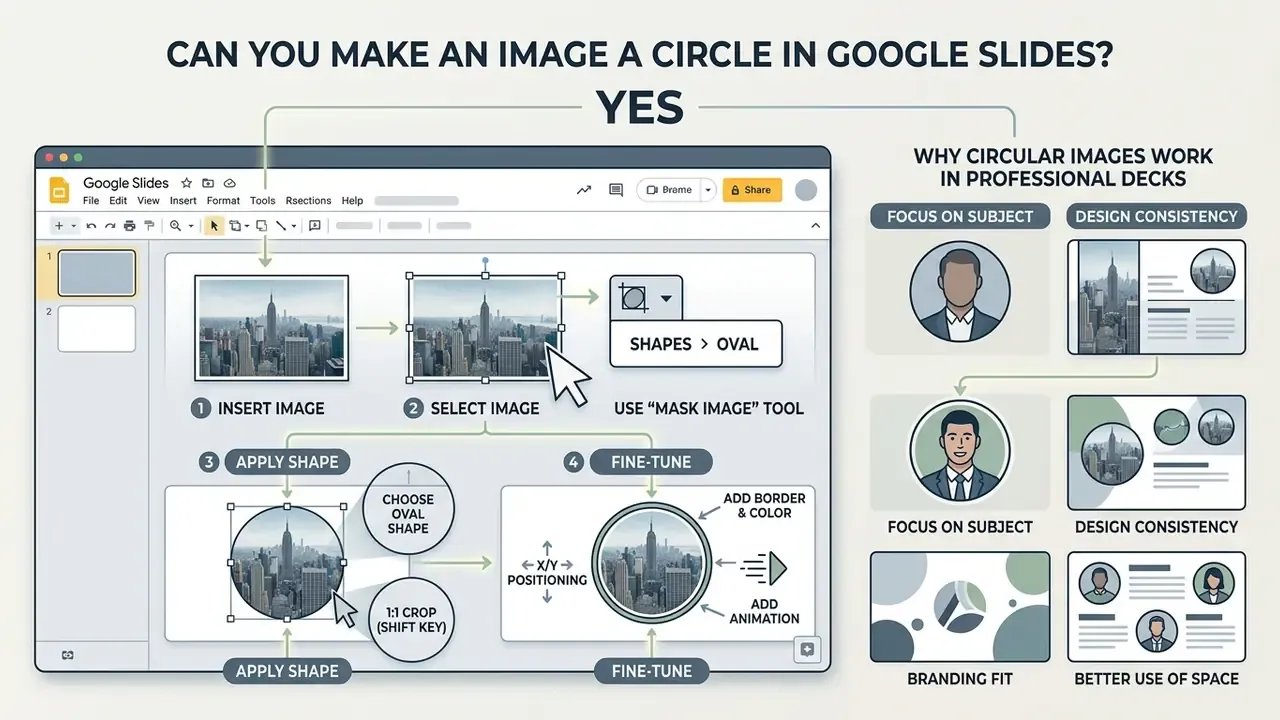
Yes, you can make an image a circle in Google Slides directly in your web browser using the native Mask Image tool. You do not need third-party photo editing software or specialized browser extensions to achieve a clean round crop.
Google Slides includes a shape-based masking feature built into the Crop tool on the main toolbar. When you select an image and apply the Oval shape mask, the editor non-destructively clips the picture into a circular frame. Nothing is deleted.
«Click the image you want to mask. At the top, next to Crop, click the Down arrow… click the shape you want, your shape will mask your image.»
Unlike simple rectangular trimming, shape masking hides unwanted outer pixels while leaving the original source image fully intact for future adjustments. One clarification worth making early: masking an image is not the same as drawing an oval and dropping a photo behind it. The second approach looks similar on screen but breaks the moment anyone resizes the slide. If you are comparing formatting tools across platforms, reviewing an AI Media Comparison can help evaluate automated layout features against manual presentation controls.
Why Circular Images Work in Professional Decks
Round frames are not only decorative. They strip away distracting rectangular backgrounds, improve the use of white space, and align with brand systems that already rely on circular avatars and badges. They also read as friendlier and more polished.
«Rounded interface elements produce higher perceived warmth and aesthetic quality, increasing user satisfaction and perceived ease of use.»
Practical benefits in a slide layout:




How to Make an Image a Circle in Google Slides Step by Step
To turn a standard rectangular photo into a circular image, select the picture on your slide, click the arrow next to the Crop icon, and choose the Oval shape. The editor immediately clips the image inside a circular boundary. That is the whole simple trick, and most of the remaining work is about making it look intentional.
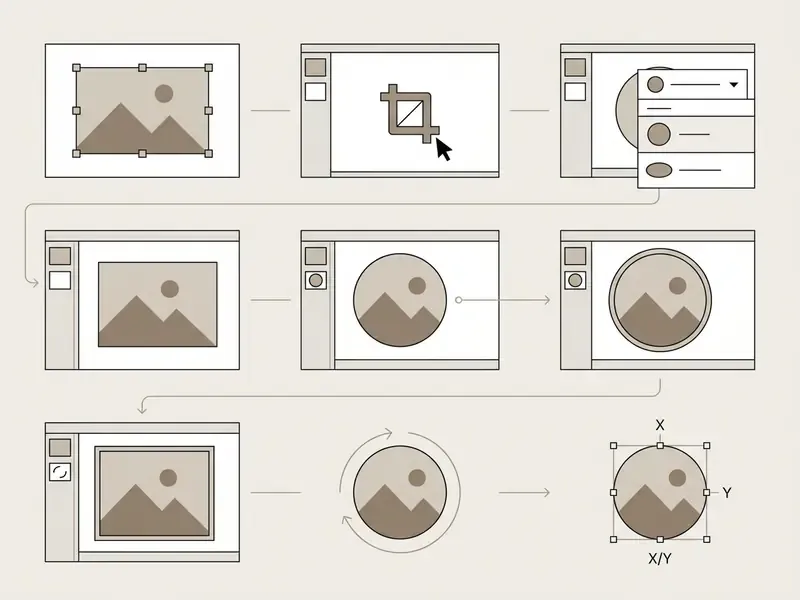
Insert and Select the Image
To insert a picture, click Insert in the top menu, select Image, and upload your file from your computer, Google Drive, Google Photos, a URL, or a web search. Google Drive is usually the safer source in a shared deck, because the asset stays inside one tenancy instead of living on someone's desktop.
Click the image once to select it so that blue bounding handles appear around its perimeter. The masking controls only show up on the toolbar while an image is actively selected, and that is the single most common reason people report that "Mask image is missing."
Open Mask Image and Choose the Circle Shape
Locate the Crop icon on the main toolbar and click the small down arrow directly beside it. Hover over the Shapes category in the flyout menu, then click the Oval icon to set your mask geometry. The circle shape lives in the first group, near the rectangle and the rounded rectangle.
Shortcut tip: you can switch a selected image into crop mode instantly by pressing Ctrl + Shift + F on Windows or Cmd + Shift + F on Mac, then clicking the drop-arrow next to the Crop icon to pick the Oval mask. Press Enter or click outside the object to commit the crop without touching the mouse again.
Apply the Circular Crop
Selecting the Oval option converts your image frame into a circular mask on the slide canvas. The masked object stays fully editable and keeps its resolution and position properties inside your presentation workflow. Because the mask is a live clipping frame rather than a destructive edit, you can revisit it at any point in the review cycle, including two weeks later when legal asks for a different portrait.
How to Adjust the Image for a Perfect Circle
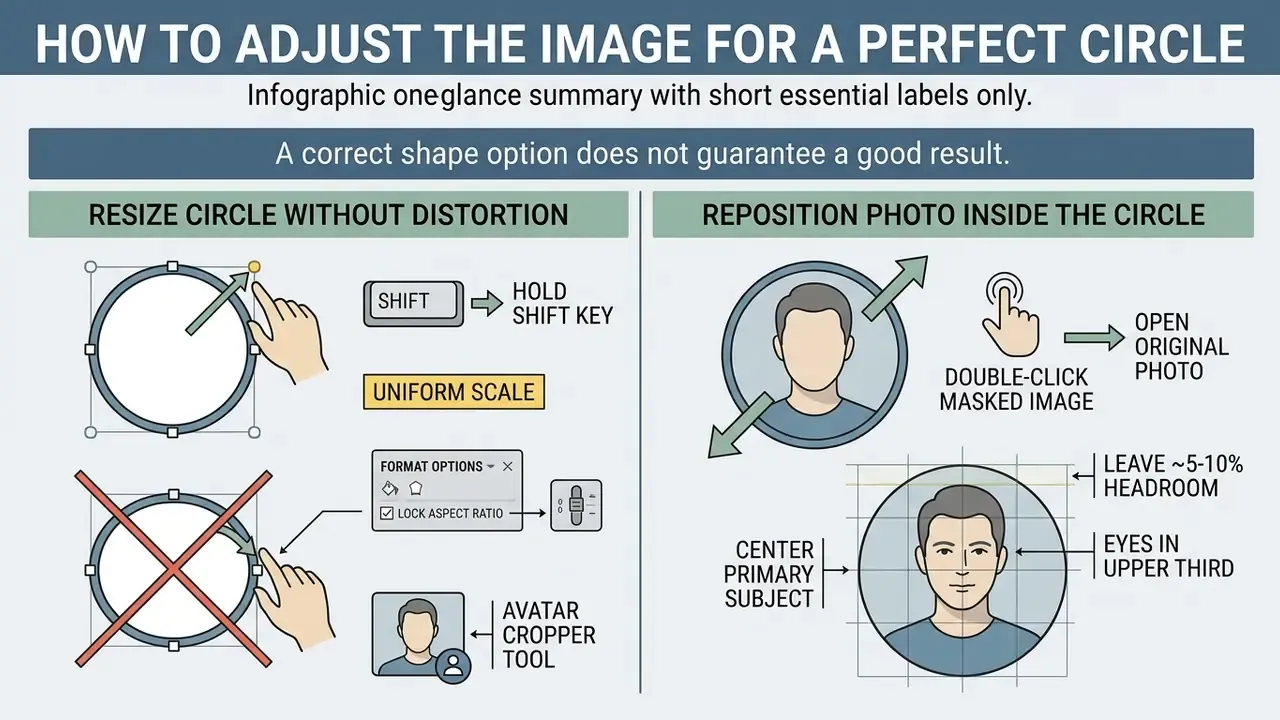
A correct shape option does not guarantee a good result. Two things decide whether the frame reads as a perfect circle: proportional scaling, and where the subject sits inside the mask.
Resize the Circle Without Distorting It
To resize your circular image without turning it into an oval, hold down the Shift key while dragging any corner handle. Holding the Shift key constrains the aspect ratio to 1:1, preserving equal width and height.
If you scale an image using side handles instead of corner handles, the circular frame stretches into an ellipse.
«Dragging the corner handles resizes width and height proportionally; side handles change only one dimension and distort the image.»
You can also lock the aspect ratio numerically by opening Format options on the top toolbar and checking Lock aspect ratio under the Size & Rotation tab. This is the safer route when several editors share the same deck, because the lock persists between sessions.
When you prepare professional headshots across multiple slides, a dedicated avatar cropper streamlines batch formatting before you import assets into the presentation. Comparable batch behaviour is common in modern AI photo editors too. One illustrative case: during a corporate slide redesign, an analyst had to format 12 executive headshots into identical 1:1 circular frames. By locking the aspect ratio in Format options and holding Shift during corner scaling, every portrait kept exact circular geometry across the deck. Roughly twenty minutes of work, instead of an afternoon of nudging.
Reposition the Photo Inside the Circle
To change what part of the photo shows inside the circle, double-click the masked image to open the underlying crop workspace. Drag the image, or its black handles, until your main subject is centered within the frame.
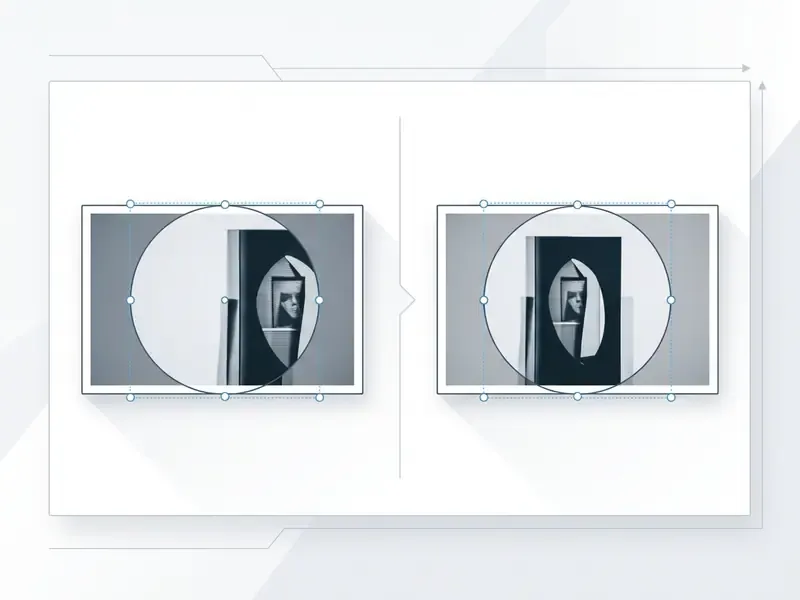
Centering the primary subject, keeping the eyes in the upper third of a portrait and leaving roughly 5 to 10% padding above the head, prevents awkward compositions and edge clipping. A workable rule for headshots: the face should occupy about 60 to 70% of the circle, with the nose close to the vertical center line.
«Masking hides pixels outside the shape while leaving the original rectangular bitmap untouched for later adjustment.»
Click outside the object or press Enter to lock the repositioned photo in place.
Add a Border and Visual Effects to a Circular Image
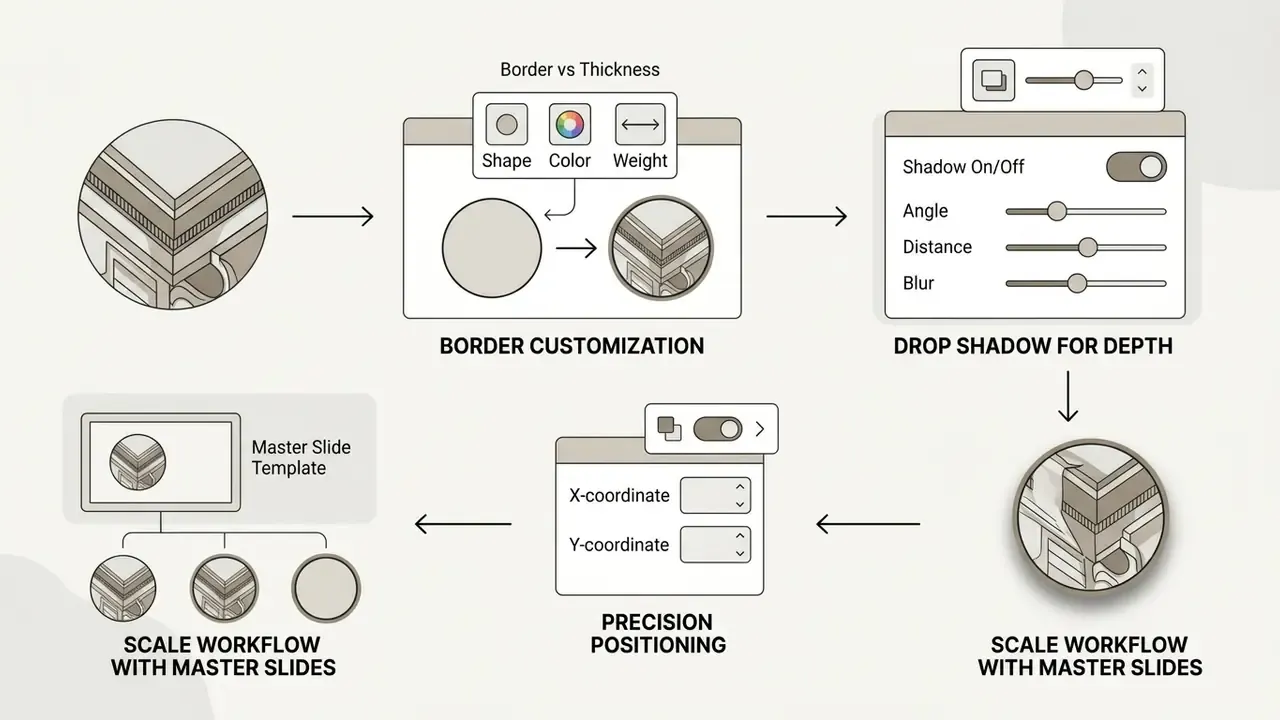
You can strengthen a circular image in Google Slides with custom border outlines and subtle drop shadows, using the top toolbar and the Format options panel. Visual boundaries help a round image stand out against light or dark slide backgrounds, and preparing the source file in one of the many online photo editors beforehand makes those edges cleaner still.
Change the Border Color and Weight
To add an outline around your circular photo, click the Border color pencil icon on the toolbar and select your preferred color. Next to it, click Border weight to adjust the line thickness from 1px up to 24px. The third control, Border dash, switches the outline between solid, dashed, and dotted styles, which is handy for placeholder frames in draft decks. Keep the stroke thin: a 1 to 2px ring reads as premium, while a heavy outline looks accidental.
Use Drop Shadow for Depth
To give your circular photo a three-dimensional appearance, select the image, click Format options on the toolbar, and expand the Drop shadow tab. Check the box to enable the shadow, then adjust transparency, blur radius, distance, and angle sliders to separate the circle from the slide background. A shadow at roughly 60% transparency, low distance, and generous blur keeps the effect subtle rather than cartoonish. More than that, and the portrait starts to float like a 2009 web button.
Adjust Precision Positioning and Color Controls
For exact alignment on your slide layout, select the circular image, open Format options, and expand Position. Enter numerical values for X and Y position to align multiple headshots down to the pixel. This is indispensable when six portraits must sit on a single baseline in a board deck.
Under the Adjustments tab, use the Opacity, Brightness, and Contrast sliders to balance lighting across photos sourced from different cameras, agencies, or LinkedIn exports. The Recolor menu applies a single tint or artistic filter across every portrait, which is the fastest way to unify mismatched photography into one brand palette. Finally, expand Reflection to add a soft mirrored surface under the circle if your template uses a glossy style. Use it sparingly, or not at all.
Scale the Workflow with Master Slides Templates
If dozens of speakers, analysts, or team members need identical circular photos, do not mask each image by hand. Set the geometry once in the template:
This converts a repetitive manual task into a one-time template decision and keeps every quarterly report visually identical. If you want to sanity-check spacing before you commit, our calculators are useful for working out even gutters between circles of a fixed diameter.
- Open
View→Theme builder(Slide Master) and pick the layout you use for bios or team slides. - Insert a placeholder image, apply
Shapes→Oval, and set exact width, height, X, and Y values inFormat optionsso the frame is a true 1:1 circle. - Duplicate the masked placeholder for each position on the layout, aligning by numeric X/Y rather than by eye.
- Close the theme builder. On any slide built from that layout, right-click a circular placeholder and choose
Replace image, and the new photo inherits the circular mask, size, and position automatically.
How to Reset or Change a Circular Crop in Google Slides
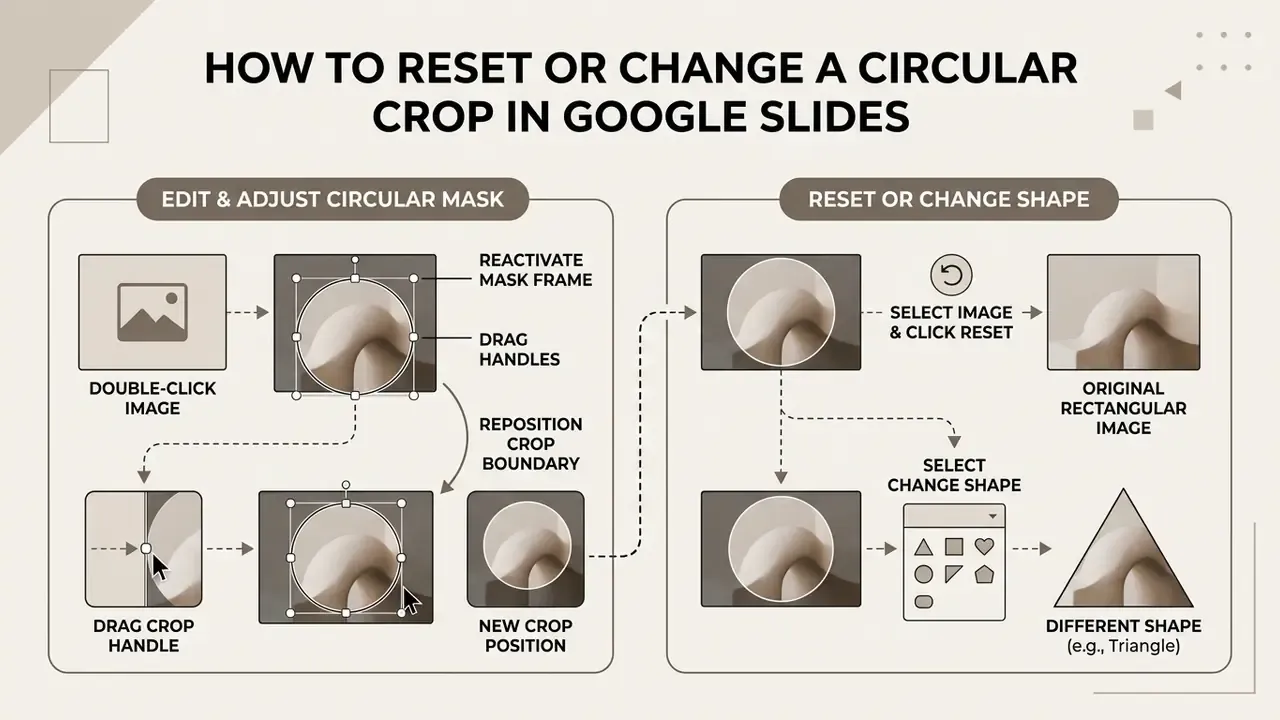
Circular masks in Google Slides are non-destructive, which means you can readjust the crop boundary, swap to a different shape, or revert to the original rectangular image at any time.
«Reset image removes cropping and masking, restoring the photo's original rectangular appearance.»
Edit the Crop Frame After Applying the Mask
If you need to modify an existing circular crop, double-click the image to reactivate the mask frame. Drag the black crop handles to expand or contract the mask area without deleting the original source photo. To change framing rather than size, drag the photo itself inside the frame, then press Enter to exit edit mode. Ctrl + Z still works if you overshoot.
Undo the Circular Shape or Restore the Original Image
To remove the circular mask entirely, select the image and click the Reset image button on the main toolbar. Alternatively, open the Mask Image menu again and select the standard Rectangle shape to restore the default framing. Google's documentation does not impose an order between resetting and re-masking, so you can switch shape options directly without resetting first. In practice I reset first, because it makes the next crop easier to judge.
Alternative Methods: Transparent PNGs and Background Removal
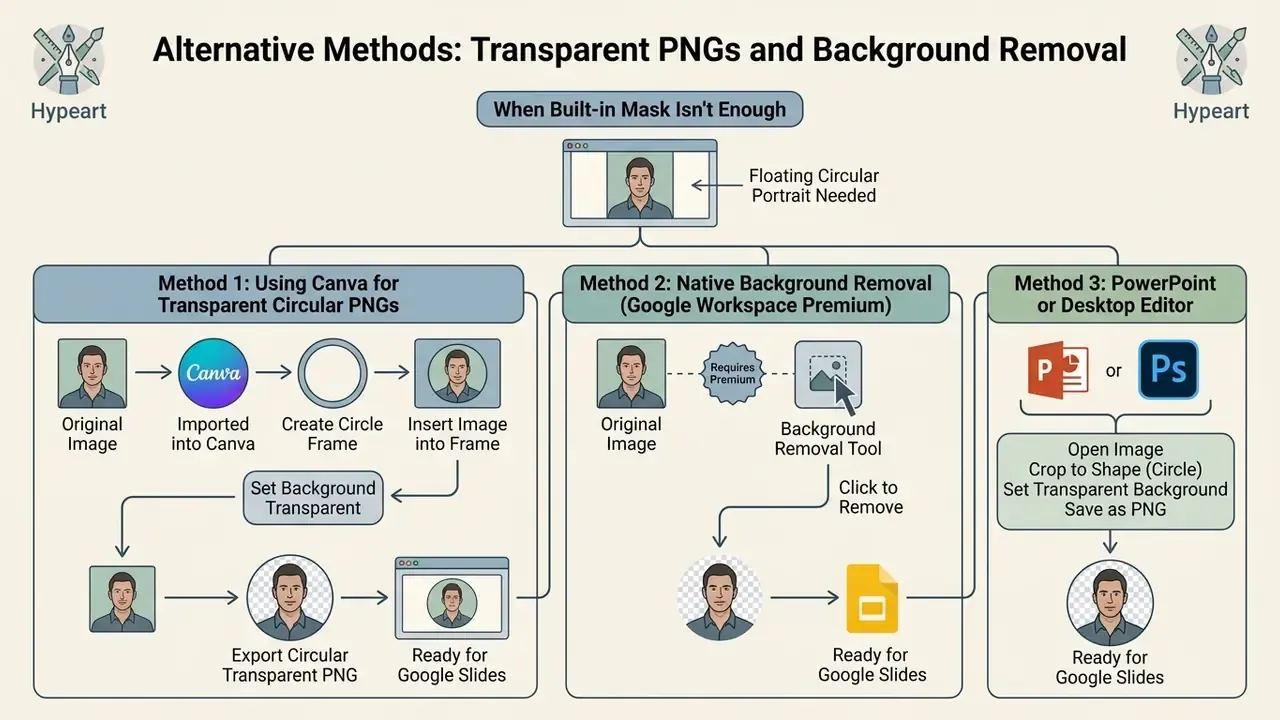
When the built-in mask is not enough, for example when you need a floating circular portrait with no background at all, two or three alternative routes cover almost every edge case.
Method 1: Using Canva for Transparent Circular PNGs
- Upload your photo to Canva and navigate to
Elements→Frames, then select the Circle Frame. - Drag your photo from the
Uploadspanel into the frame. Canva fits it automatically, and you can double-click to re-center or zoom. - Optionally remove the background and apply filters inside Canva before exporting.
- Click
Share→Download→ choosePNGand tickTransparent background. - Import the downloaded PNG into Google Slides via
Insert→Image→Upload from computer.
Because the PNG already carries a transparent corner area, the circle sits cleanly on gradients, photos, or dark backgrounds without a visible square edge. A broader look at the platform's capabilities and export tiers is covered in our Canva AI generator overview.
Method 3: PowerPoint or a Desktop Editor
You can also build the circle in PowerPoint via Picture Format → Crop → Crop to Shape, or add an oval picture frame from Picture Styles, then upload the file to Google Slides or save the circular image and insert it. Advanced editors such as Photoshop, Inkscape, or CorelDRAW are the right tool only when you need multiple masks applied to different parts of one image, which Slides cannot do. Teams that prepare hundreds of assets per month usually automate the crop step through an api instead of repeating it in any editor.
Common Problems When Making an Image Circular in Google Slides
Most technical issues with circular masking happen when an image is not selected properly, when aspect ratios are unlocked, or when low-resolution source files get scaled up. That last case is often fixable with AI image upscalers before import.
| Problem | Probable Cause | Recommended Solution |
|---|---|---|
| Mask Image option is missing | Image is not selected on the slide canvas | Click directly on the image to highlight it and reveal the Crop dropdown on the toolbar. |
| Circle appears as an oval | Non-uniform scaling via side handles | Drag corner handles while holding the Shift key, or check Lock aspect ratio in Format options. |
| Subject is cut off inside frame | Subject is off-center relative to mask | Double-click the image to re-enter crop mode, then drag the photo to center the subject. |
| Image appears blurry after crop | Low source resolution or excessive scaling | Replace with a higher-resolution image file before applying the circular mask. |
| Circles look uneven in a row | Manual drag-positioning of each image | Enter identical width/height and stepped X/Y values in Format options → Size & Rotation and Position. |
| Photos look mismatched in tone | Sources shot with different cameras or lighting | Use Format options → Adjustments to balance brightness and contrast, or Recolor for one shared tint. |
| Mask option hard to find on phone | Mobile toolbars differ from the web editor | Tap the image, open Crop, then Mask, and pick the oval. Use the desktop editor for animation and precise sizing. |
Consistent geometry pays off perceptually, not only aesthetically:
«When cards are aligned in a row, rounded corners make it easier to count them: visible edges help the eye recognise visual differences.»
Pre-Publication Geometry Checklist
Checklist0 / 7
Reviewing verified performance benchmarks on the AI Media Benchmarks and Review Proof page adds context on asset optimization standards, especially if you are testing AI tools against manual prep.
Data Handling Note for Enterprise Users
Masking, cropping, resizing, and Remove background all run inside Google Slides under your organisation's existing Google Workspace agreement. Confidential imagery, think board portraits or unreleased product shots, does not need to be uploaded to third-party converters.
If you do choose an external editor such as Canva or an online circle-crop site, treat it as a separate vendor. Check whether the tool is approved by your IT function before uploading personnel photos, since unsanctioned web utilities are a classic shadow-IT and data-residency risk. The decision is small; the exposure is not.
This section is general guidance on tooling practices, not legal or compliance advice. Confirm any workflow involving personal data with your own privacy, security, and legal teams.
FAQ About Circular Images in Google Slides
Can You Crop an Image Into Shapes Other Than a Circle?
Yes, Google Slides supports over 40 built-in shape masks across four categories: Shapes, Arrows, Callouts, and Equations.
«Click the arrow next to Crop and select the shape you want, the shape immediately masks the image; arrows, callouts and equations are available.» — San José State University IT Tips, Google Slides Masking. https://www.sjsu.edu/it/
You can mask photos into rounded rectangles, stars, triangles, or speech bubbles using the same Mask Image dropdown menu. Only one mask can be applied per image. For multiple masks on different regions of a single photo, use a dedicated image editor first.
Can You Animate a Circular Image in Google Slides?
Yes. Right-click the circular masked image and select Animate, or go to Insert → Animation. In the Motion panel on the right, choose an entrance effect such as Fade in or Zoom in, set the trigger event (On click or After previous), and adjust the speed slider. A masked image animates exactly like any other image object. Note that animation controls are only available in the desktop browser version of Google Slides, not in the mobile apps.
How Do You Create a Curved or Teardrop Image Frame?
Google Slides does not include a manual path-warping or freeform curve tool. You can still create curved image frames by selecting your photo, opening the mask menu next to Crop → Shapes, and choosing non-standard geometries such as Teardrop, Rounded Corner Rectangle, or Arc. For a true warp effect, bend the image in an external editor and import the result as a PNG.
Can You Make an Image Circular in Google Slides on Mobile?
Yes, with caveats. On iPhone and iPad, Google's help documents the flow explicitly: tap the image, open Crop, tap Mask, and select the oval shape, then drag the border to adjust. Google's Android help page currently documents only basic cropping steps, though the Mask option does appear in the app under Crop Image once an image is selected. If the option is not visible, confirm that an image is actually selected and that the app is up to date. Fine control over exact sizes, X/Y coordinates, and animation stays desktop-only, so finish precision work in the web editor.
Does a Circular Crop Affect Image Quality?
No, applying a circular mask does not degrade or resample the source file's resolution.
«The mask only hides pixels outside the shape, the original rectangular bitmap stays fully intact for later edits.» — Google Docs Editors Help, Crop & adjust images (2026). https://support.google.com/docs/answer/4600160
However, images inserted above roughly 1600×1600 pixels may be downsampled on upload, and if the initial file was smaller than that, scaling the circle up significantly can reveal underlying pixelation. Improving the source with AI image enhancers or generating clean portraits through AI headshot generators solves the problem at the root rather than in the slide.
Can You Change the Background Behind a Circular Image?
Yes. The circle itself sits on the slide, so you change what is behind it through Slide → Change background, or by switching the theme or layout. For a cut-out subject with no rectangular backdrop at all, use Edit image → Remove background (Workspace premium) or import a transparent PNG prepared in Canva.
Can Circular Images Be Used in Diagrams and Collages?
Yes, and this is where masking earns its keep. Once photos are circular, they slot naturally into team grids, process timelines, donut-style diagrams, Venn overlaps, and picture collages. Combine identical 1:1 circles with numeric X/Y positioning to build symmetrical layouts that survive edits by other collaborators.
The same circular assets travel well beyond slides. Speaker avatars reused as video thumbnails pair nicely with an ai youtube title draft, a vertical cut built in an ai youtube shorts generator, or a longer explainer assembled as an ai youtube video. If you are naming a new internal series, an ai youtube channel name tool can shorten that debate too. Teams building interactive training decks can pair static circular graphics with AI Avatar Training materials for a mixed static-and-motion module. Before distributing a deck externally, confirm asset rights by reviewing our AI Media Commercial-Use resources.
Final Notes
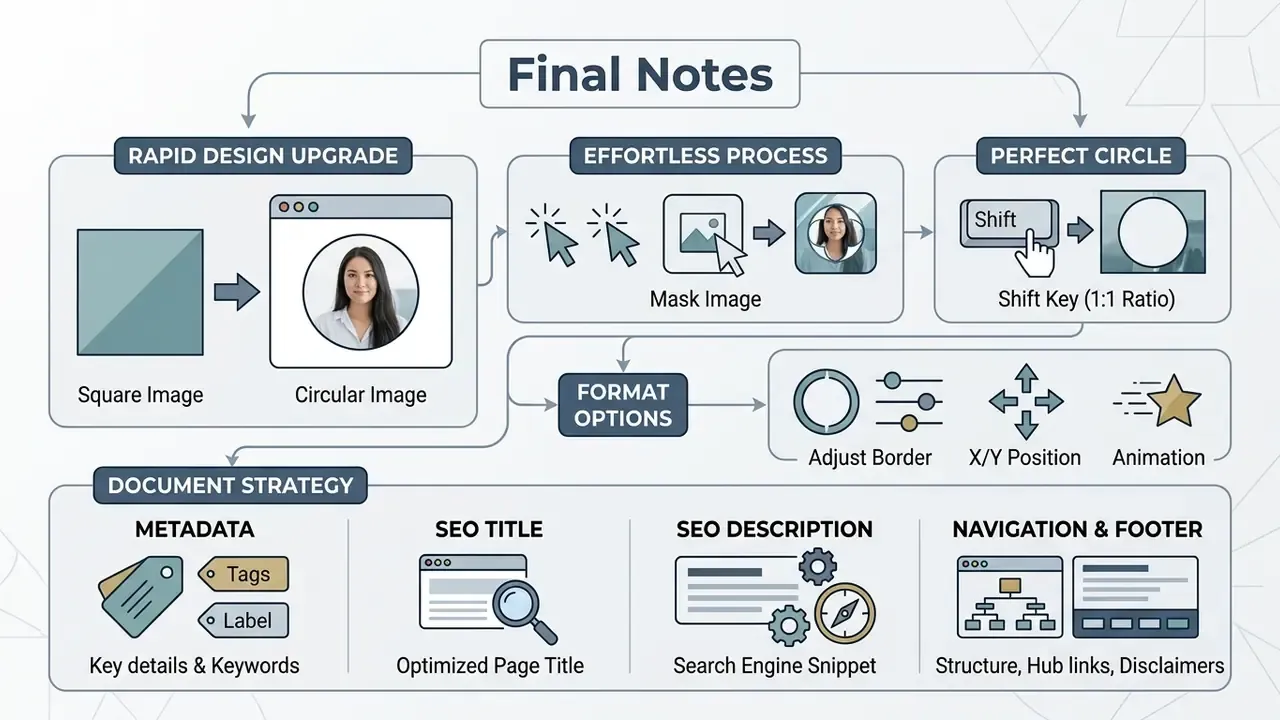
Circular images are one of the fastest upgrades available in Google Slides: three clicks to apply, one key (Shift) to keep the geometry honest, and a handful of Format options controls to make a row of portraits look designed rather than assembled.
Build the mask into your Master Slides layout once, keep source files above 1600×1600 pixels, and reserve external tools for the two jobs Slides cannot do natively: true warping and multi-region masking. Do that, and the next deck costs you minutes.
Metadata