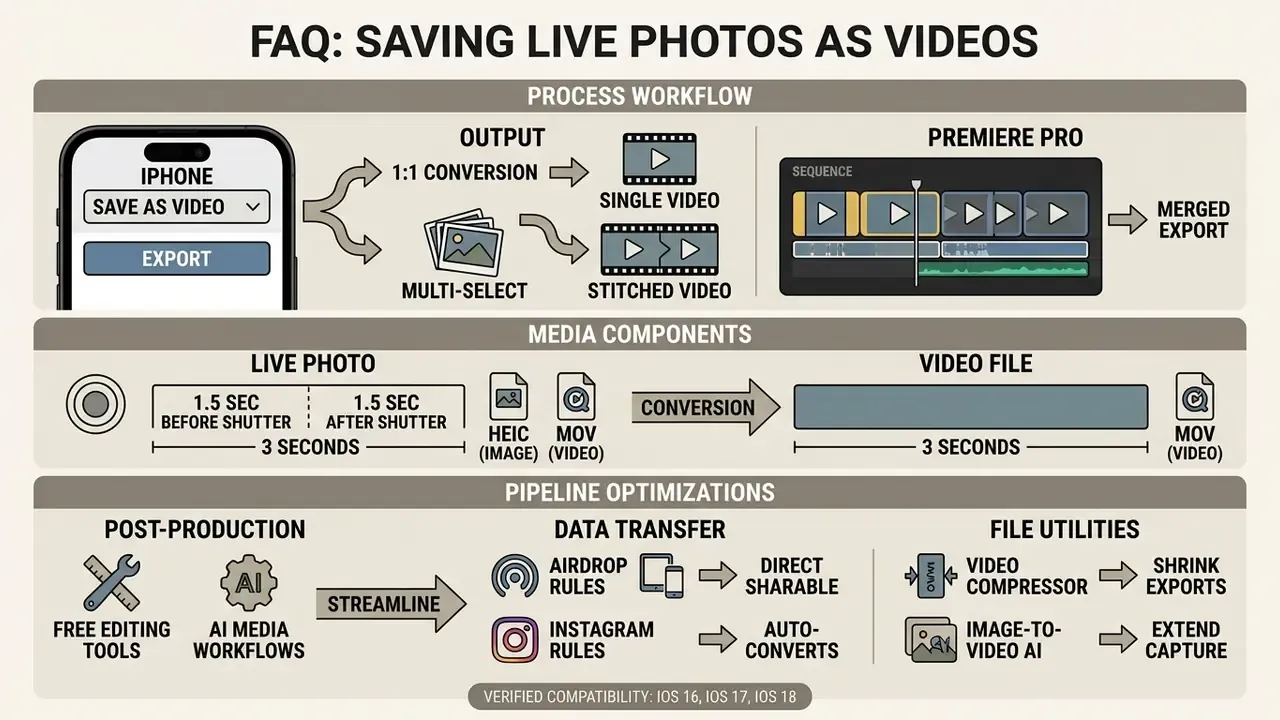
Tested on iPhone running iOS 16, iOS 17 and iOS 18 · Last updated: 2026
Before you start, three things worth knowing
- Version floor. The "Save as Video" command exists on iOS 13 and newer. On anything older you are stuck with screen recording or an App Store utility.
- Storage headroom. Every conversion writes a second file. A batch of 200 clips can eat a couple of gigabytes, so check free space first.
- The export is one-way. The video you get is flattened. You cannot turn it back into the same paired Live Photo asset, so keep the original if you might re-edit it later.
Apple Live Photos capture a brief moment of motion and sound around a still picture, creating a dynamic three-second recording. When you need to export or publish that clip outside the Apple ecosystem, knowing how to save live photo as video keeps your content fully animated across devices and web platforms. Native iOS controls in the Photos app let you export these motion assets into standard video files without leaning on unverified external utilities.
What Happens When You Convert a Live Photo to Video
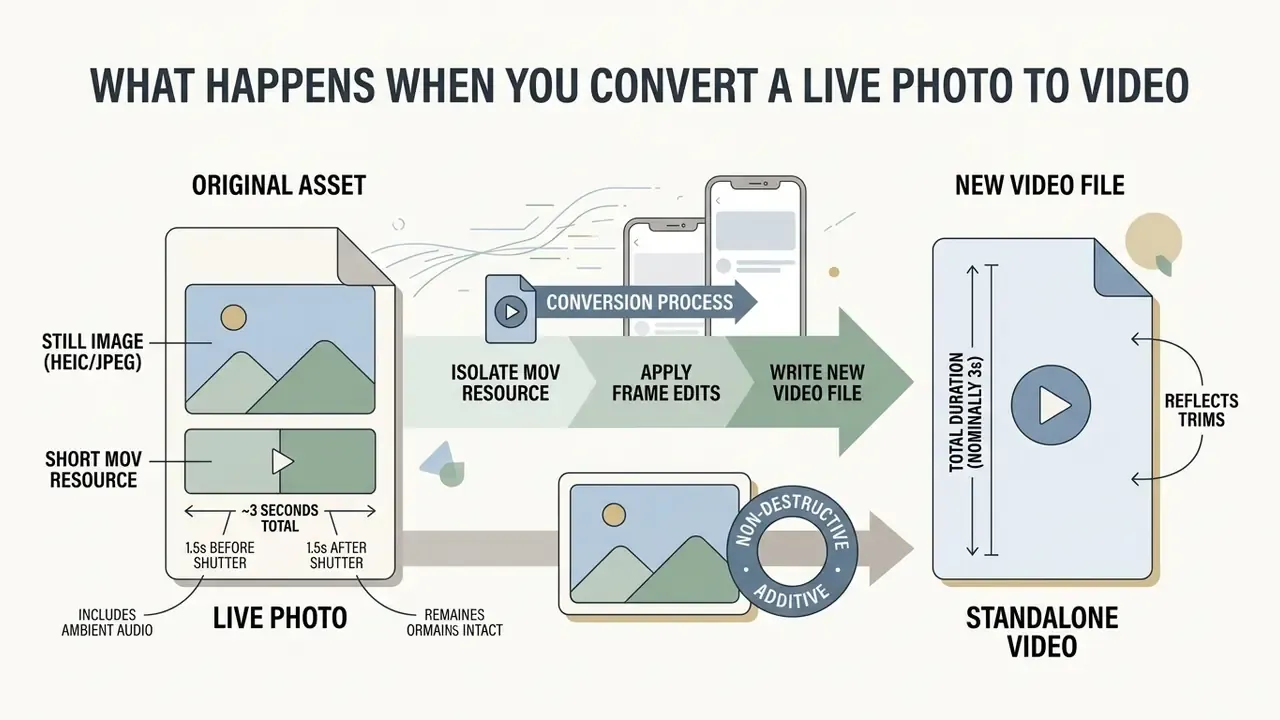
Converting a Live Photo to video creates a brand-new, standalone video file in your library and leaves the original Live Photo alone. iOS extracts the embedded motion segment from the hybrid container and renders it into a standard video format. Nothing is overwritten. You end up with two assets: the source pair in your Camera Roll and a versatile clip ready for cross-platform playback.
Under the hood, Apple stores a Live Photo as a paired asset: a still image (HEIC or JPEG) plus a short QuickTime video file (MOV), linked by a shared asset identifier (Stack Overflow Developer Discussions, 2017). Apple's own desktop documentation confirms this two-part architecture about as plainly as possible:
«A Live Photo is exported as two separate files: a still-image file and a video file.»
When you run a conversion, iOS isolates the MOV resource, applies any pending frame edits, and writes a separate video file straight to device storage.
How Long Is a Live Photo Video?
A Live Photo video is nominally three seconds long: roughly 1.5 seconds of motion before the shutter press and 1.5 seconds after it.
«Live Photos records what happens 1.5 seconds before and after you take the picture, including the sound.»
The camera system records that sequence together with ambient background audio. Frame rate is often reported as roughly 15 frames per second by secondary technical sources, but Apple does not publish an official figure in its support or developer documentation. Treat 15 fps as an approximation, not a specification. In practice the exported file inherits whatever frame timing the capturing device used, which is why the same Live Photo can look marginally smoother on newer iPhone models.
Trim the playback window inside the editing menu before export, and the resulting video file reflects that exact shortened duration. Apply a repeating effect such as Loop or Bounce, and playback structure changes while the source still draws from the same three-second capture buffer (Apple Support, 2026).
Does Saving as Video Keep the Original Live Photo?
Yes. Saving a Live Photo as a video is additive and non-destructive: your original Live Photo stays intact inside the library. The system generates a duplicate video asset alongside the primary image instead of overwriting or flattening the source.
The new video inherits useful metadata from the original asset, including date, timestamp, and GPS location coordinates (Digital Trends, 2026).
«The new video appears in your Recently Saved album, and the Live Photo remains available in your Live Photos album.»
Because the source Live Photo is unchanged in your Camera Roll, you can still swap its key photo or undo earlier edits with Edit → Revert to Original. One asymmetry matters, though: the exported video is a flattened clip, not a reversible Live Photo pair. Effects, key-frame choices, and trims are baked in the moment you export.
How to Save a Live Photo as a Video in the Photos App
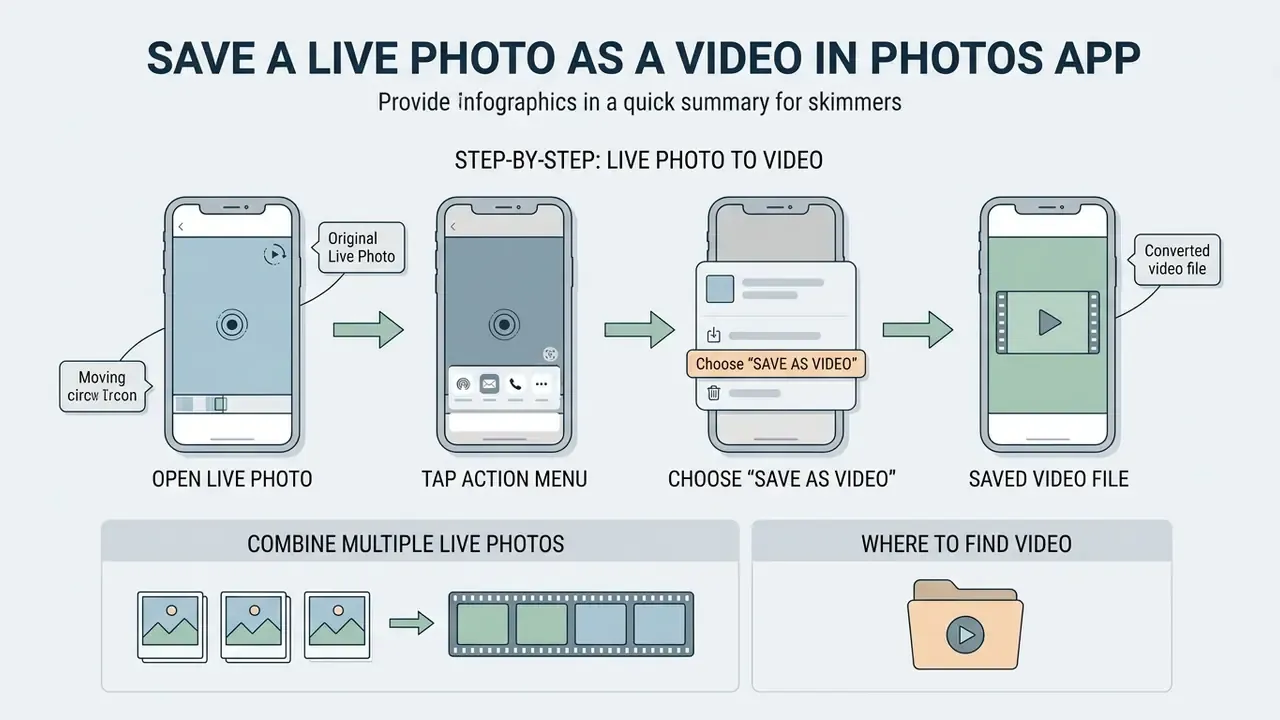
You can save a Live Photo as a video in the native Photos app by opening the photo, tapping the action menu, and choosing Save as Video. This built-in iOS mechanism needs no external install and finishes in seconds.
For anyone building automated content pipelines or managing broader AI Media Workflows, the native conversion path is the baseline for consistent asset preparation. Learn it once and the rest of the pipeline gets predictable.
Alt text for the screenshot series: "how to save live photo as video on iphone step by step guide".
Step-by-Step: Save Live Photo as Video on iPhone
To run a single conversion or a batch on your iPhone, follow these validated steps inside the Photos app:
- Open the Photos app on your iPhone.
- Scroll down to Media Types and select Live Photos.
- Tap the specific photo you want to convert.
- Tap the More button (three dots in a circle) or the Share button in the top-right corner.
- Choose Save as Video from the pop-up context menu.
To convert several files at once, tap Select in the top-right corner of the Live Photos album, highlight the items you want, tap the More button in the bottom-right corner, and choose Save as Video (Apple Support, 2026).
Field note from our editorial testing: while migrating an archive of roughly 1,200 Live Photos from an old iPhone library into a standard MP4 archive, we used only this native multi-select path, no third-party utility at all. Batch selection kept file naming, capture dates, and orientation consistent, which removed the import errors we had previously hit when uploading HEIC-based Live Photo pairs to cloud storage. Processing time depends on device generation, storage headroom, and clip count, so treat large batches as a background task rather than an instant operation, and keep the Photos app in the foreground until the progress indicator finishes. One more habit that saved us trouble: run a test batch of ten before committing to a thousand.
How to Combine Multiple Live Photos into a Single Video
Want to merge several Live Photos into one continuous clip without a third-party editor? iOS has a native stitching feature right inside the Photos app:
- Open the Photos app and go to Media Types > Live Photos.
- Tap Select in the top-right corner.
- Tap each Live Photo you want to combine. They are appended in chronological capture order, not tap order.
- Tap the More button (three dots in a circle) in the bottom-right corner.
- Select Save as Video.
iOS processes the sequence and generates a single continuous video file from all selected captures. The compiled video goes straight into your Videos and Recents albums, preserving spatial alignment and ambient audio across the joins. This is the fastest way to build a 9 to 15 second montage out of several three-second moments: four Live Photos from the same event become one clean clip ready for Reels or Shorts. Need crossfades, luma wipes, or music between segments? Export the combined file first, then finish it in a dedicated editor.
Where to Find the Saved Video File
Your exported video file shows up immediately in Recents, Recently Saved, and Videos inside the Photos app. The source image stays stored separately in the Live Photos album (Apple Support, 2026).
You can tell the converted video apart from the original Live Photo by its thumbnail indicators, and from there hand the clip off to dedicated video editing tools for trimming, captions, or colour work:
Edit a Live Photo Before You Turn It into a Video
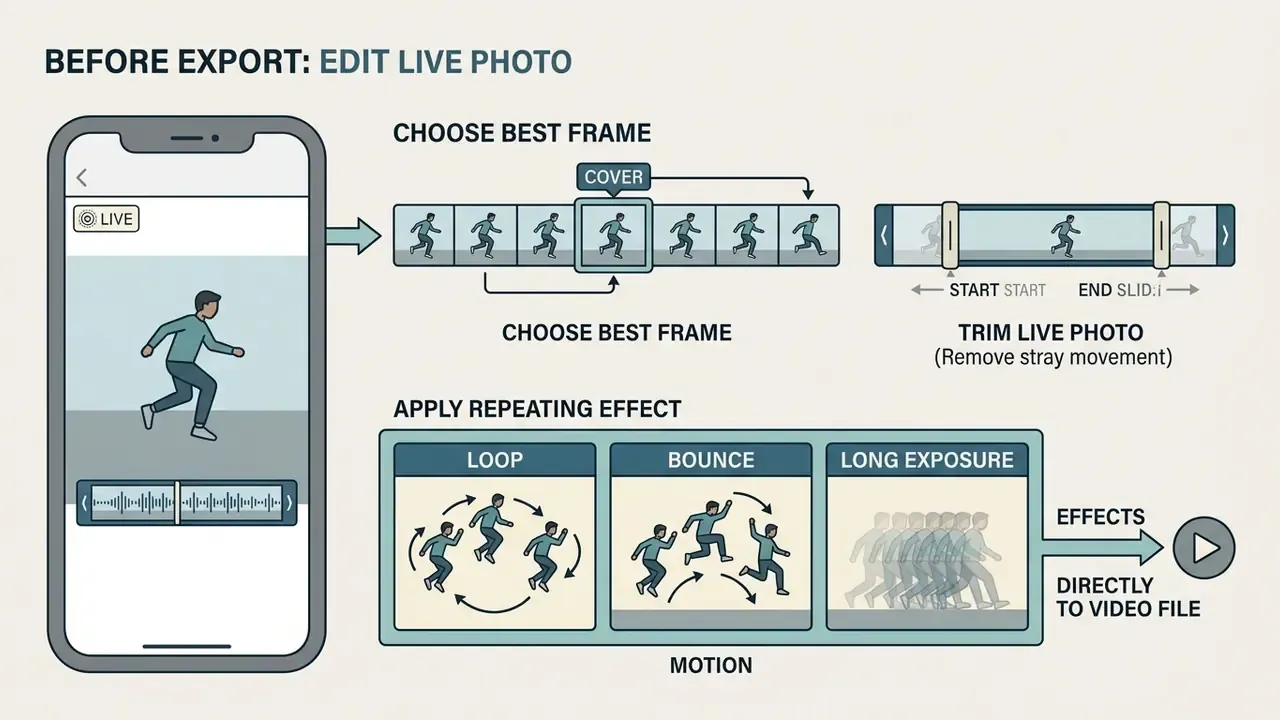
Editing a Live Photo before export lets you set the cover frame, trim stray movement, or apply a continuous loop effect that carries directly into the final video file. Since the export is flattened, every adjustment here is permanent inside the resulting clip. That is exactly why it pays to edit first and export second. If you plan to keep polishing afterwards, compare options for free video editing software before committing to a paid subscription.
Tuning these settings before you turn live photos into standard video clips raises production value and gives cleaner transitions. When you convert static assets or dynamic frames into video streams, understanding how motion behaves also helps with how to make a video from a photo and how to make a video a live photo.
Choose the Best Frame and Trim the Live Photo
Before converting, pick the primary still thumbnail and shave camera shake off the start or end of the recording:
- Open the target Live Photo and tap Edit.
- Tap the Live button (concentric circles icon) at the bottom of the screen.
- Slide the white frame marker along the timeline to your preferred key frame.
- Tap Make Key Photo to set the primary thumbnail. If that frame needs more work (exposure, crop, blemish removal), a dedicated photo editor gives finer control than the stock sliders.
- Drag the yellow handles at either end of the timeline to trim unwanted motion.
- Tap Done to save your adjustments.
Practical example: when we prepared dynamic visuals for a web form that accepts short video uploads, the raw Live Photo captures opened with visible handling shake as the phone settled in the shooter's hand. Moving the key-frame slider two frames forward and trimming about half a second of that handling noise produced a cleaner first frame and a steadier opening motion. The benefit is qualitative but immediate: the thumbnail platforms auto-generate now shows the subject instead of a blurred pan, which cuts down on re-uploads and manual frame corrections. Small fix, disproportionate payoff.
Use Loop or Bounce for a Repeating Video Effect
Apple's motion effects change how the temporal buffer plays back before you run the export command:
- Loop repeats the three-second action continuously in a seamless playback sequence.
- Bounce plays the captured action forward, then rewinds it, creating a back-and-forth clip. If you want to push a still frame far beyond a three-second buffer, image-to-video AI tools can generate longer synthetic motion from a single photograph.
- Long Exposure blends the frames into one smoothed still, handy for water and light trails, though the output is an image rather than an animated clip.
To apply an effect, tap the Live menu in the top-left corner of the photo view, select Loop or Bounce, then choose Save as Video from the upper menu. One caveat to plan around: Loop and Bounce variants are stored without the original ambient audio. If the soundtrack matters, export the unmodified Live Photo and add music later.
Research into short-video artifacts suggests temporal redundancy in multi-frame captures improves visual clarity and scene recognition compared with static single-frame shots:
«Live Photos and Motion Photos outperform single still frames in object classification and VideoQA tasks for blind and low-vision users.»
How to Share a Live Photo Video After Saving
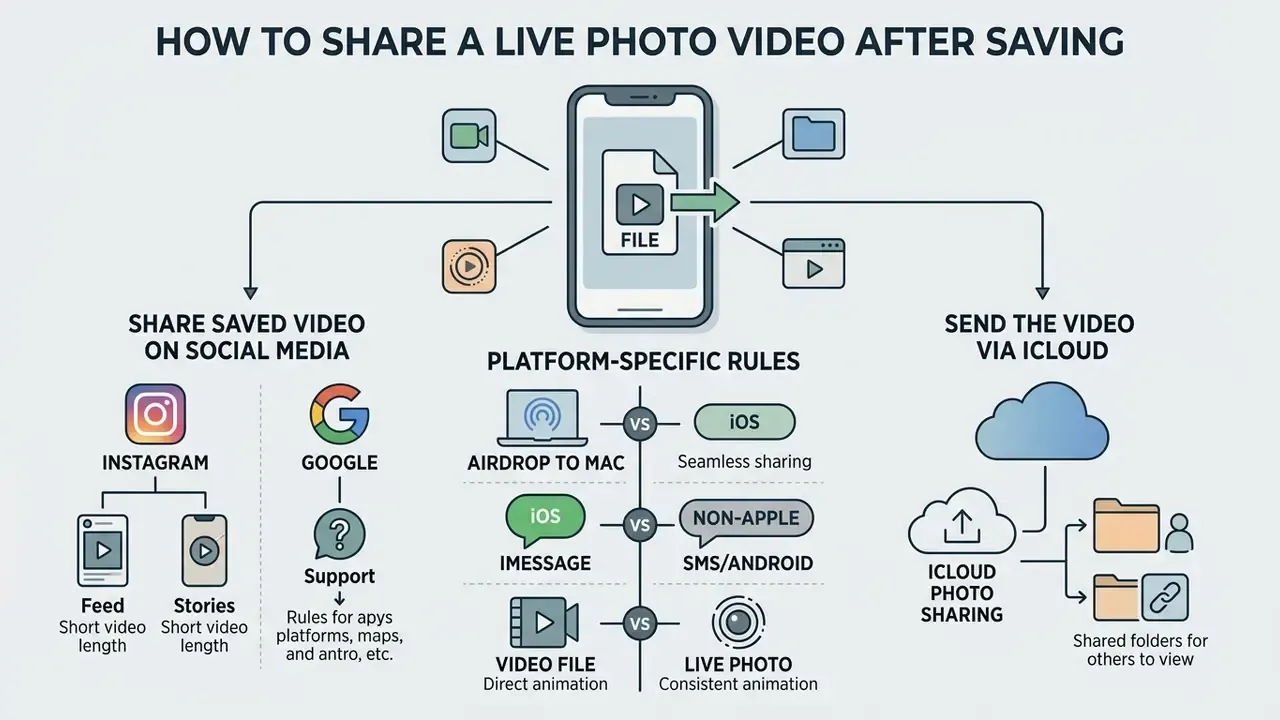
Once you convert a Live Photo to a standard video file, you can send it to non-Apple devices, email clients, and messaging platforms without losing animation. Standard video files bypass the device restrictions that flatten native Live Photos into stills. Attach a Live Photo to an ordinary email and it arrives as one frozen frame; an exported MOV or MP4 plays for everyone.
If converted media is heading into corporate communications or external video assets, review structured guides on how to make a video presentation and check the AI Media Commercial-Use guidelines first.
Platform-Specific Sharing Rules and Workarounds
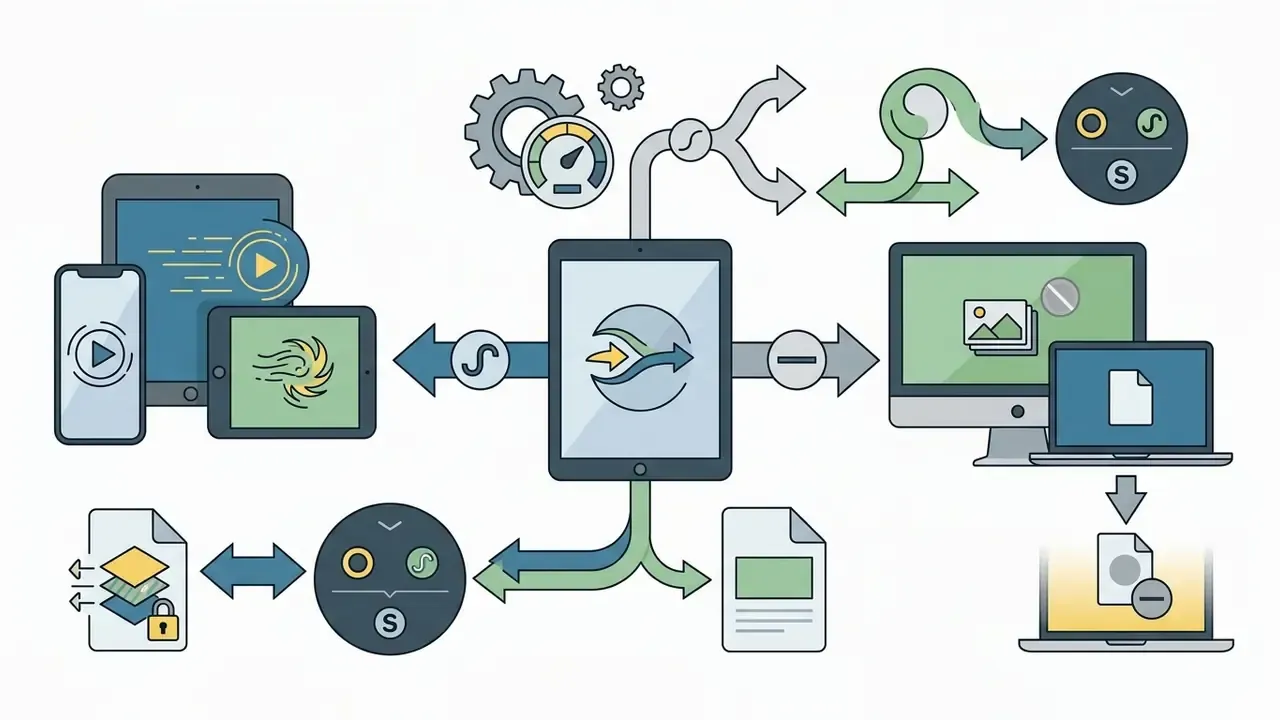
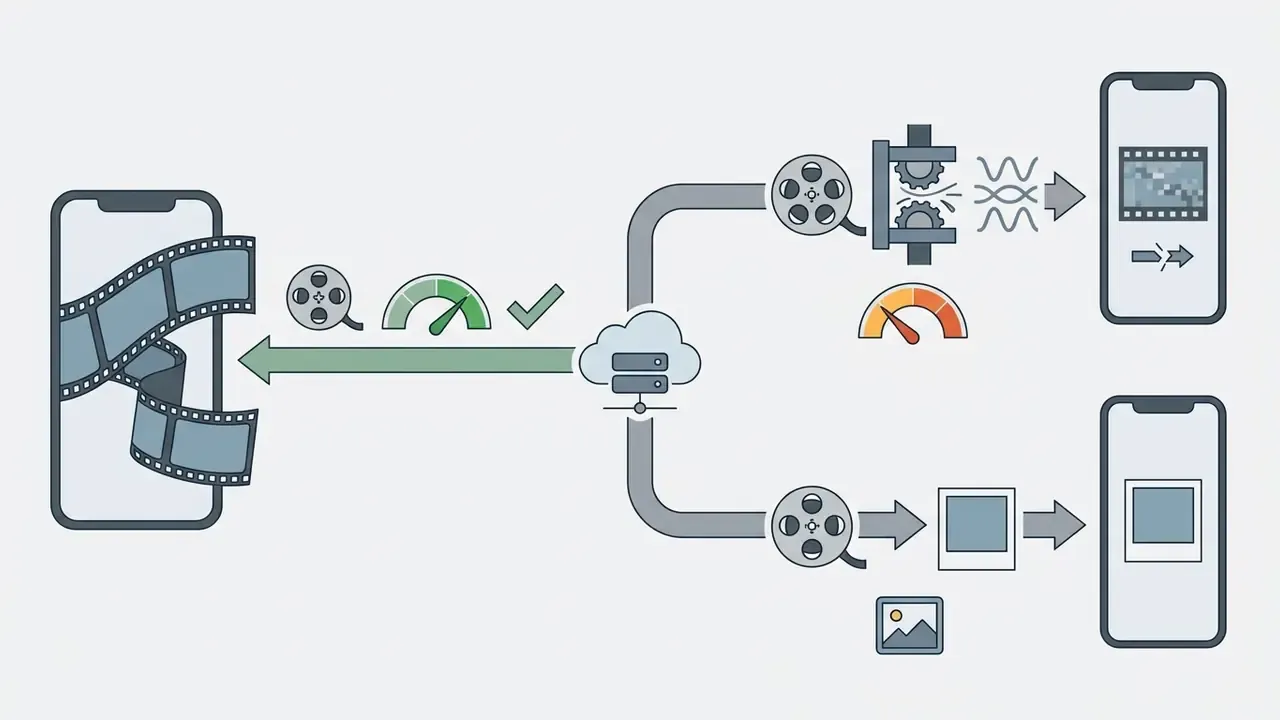
Exporting a Live Photo as a video solves most compatibility problems, yet specific network protocols and platforms still enforce strict media rules. These three edge cases account for most failed or flattened uploads:
Send the Video Through iCloud Photo Sharing
You can move your converted clip across Apple devices, or generate web links for non-Apple recipients, through iCloud Photo Sharing:
- Open the converted video in the Photos app.
- Tap the Share button.
- Select AirDrop for instant local transfer to a nearby Mac or iPad (Apple Support, 2026). If the recipient sees nothing, have them open Settings > General > AirDrop and allow receiving from Contacts or Everyone.
- Tap Options at the top of the share sheet and select iCloud Link to generate a web-accessible URL for cross-platform sharing. If the file has to travel through a size-limited channel instead, a video compressor trims the payload before you send it.
- To post the clip into a shared album, choose Add to Shared Album, pick the album, add an optional comment, and tap Post. Shared albums accept exported videos, Loop and Bounce clips, and original Live Photos alike.
When to Use a Third-Party App or Online Live Photo to Video Converter
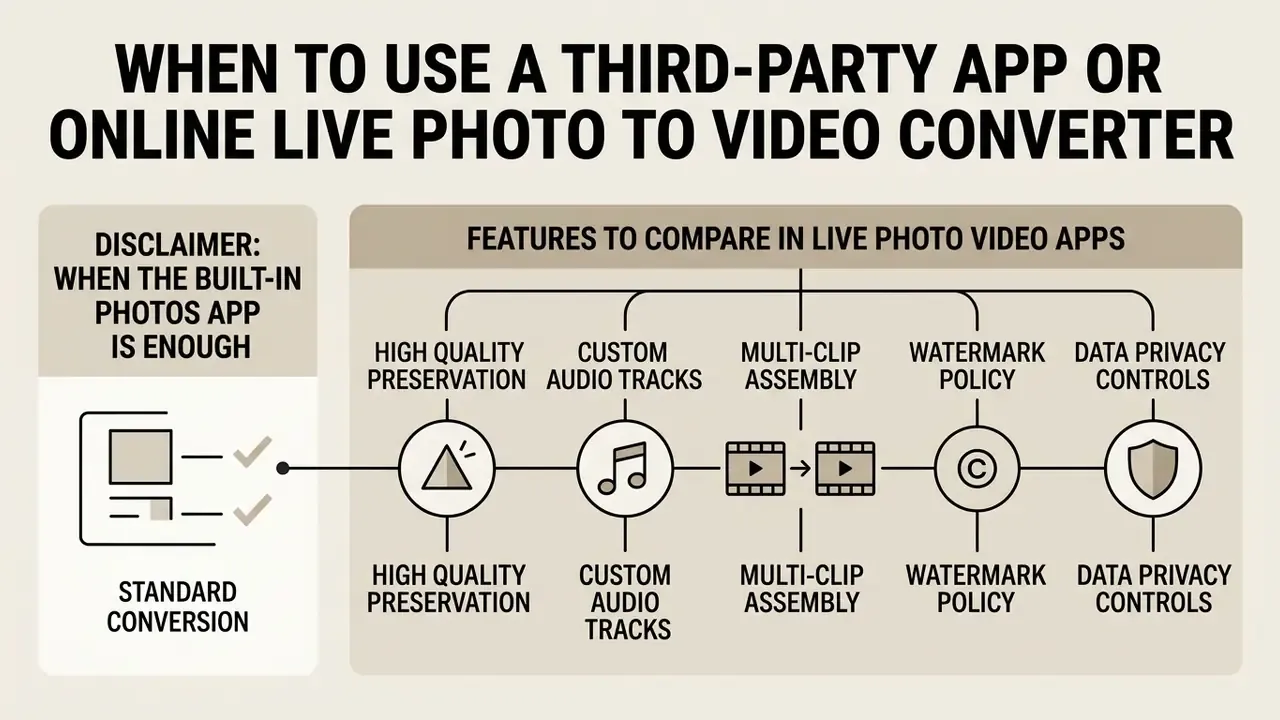
The native Photos app covers standard conversion. Third-party App Store utilities or web tools earn their place when the workflow needs more: custom audio overlays, multi-clip merging with transitions, text captions, GIF export with adjustable FPS, or precise target compression.
When you weigh third-party tools against native utilities, an AI Media Comparison breakdown or a quick pass through our media calculators helps you judge file size and compression trade-offs. Teams handling high-volume media ingestion can also check benchmarks or wire things up through the AI Media API Guides.
| Feature / Capability | Native Photos App (iOS/macOS) | App Store Third-Party App | Online Web Converter |
|---|---|---|---|
| Installation required | No (built-in) | Yes (via App Store) | No (browser-based) |
| Export quality | High (native original) | Configurable (high / custom) | Variable (depends on bandwidth) |
| File size control | Limited (standard export) | Advanced compression tools | Custom target size limits |
| Audio editing | Mute / keep original | Add music / custom tracks | Basic audio removal |
| Text and overlay support | None | Full text / filter overlays | Basic watermark or text options |
| Transitions / multi-clip | Sequential stitch only | Crossfade, zoom, luma, pixelate | Basic concatenation |
| GIF export | Loop/Bounce on iOS; Export GIF on Mac | Adjustable FPS, size, auto-reverse | Yes, quality varies |
| Watermark | None | Free tiers may add one (removable for a fee) | Frequently present |
| Data privacy | 100% on-device | On-device (subject to app policy) | Requires cloud file upload |
Note: the comparison above reflects general architectural differences between local OS processing, dedicated mobile software, and cloud-based web converters. The short version: native export wins on privacy and fidelity, apps win on editing depth, web tools win only on convenience.
When the Built-In Photos App Is Enough
The native Photos app is entirely sufficient if your goal is to save live photo as video iphone assets for personal messaging, ordinary social media posting, or basic archiving. Native export preserves original colour accuracy and resolution, and it never exposes private media to external servers or ad-supported software. In short: if you need the motion clip as a normal file, a key frame swap, a trim, a mute, or a Loop/Bounce variant, stop here. Installing anything else adds risk without adding capability.
Features to Compare in Live Photo Video Apps
If your project genuinely needs more than native export, judge third-party tools on these operational metrics:
- High quality preservationconfirm the tool exports at native resolution (1080p or 4K) without forcing aggressive compression. Check whether it exposes bitrate, codec (H.264 vs HEVC), and frame-rate controls, or silently re-encodes at a fixed low bitrate.
- Custom audio trackslook for tools that strip background environmental noise, substitute licensed audio, and keep sound in sync after trimming.
- Multi-clip assemblyverify that the app can concatenate several Live Photos into one cohesive sequence with adjustable transition duration.
- Watermark policycheck whether the free tier stamps exports. Several popular Live Photo utilities watermark GIF output and remove it for a small one-time purchase.
- Data privacy controlsconfirm that processing happens locally on your device rather than uploading sensitive media to external cloud servers.
«Processing files on-device avoids transmitting personal media to external servers.»
Third-Party Apps Commonly Used for Live Photo Conversion
For readers who really do need more than the stock workflow, these are the categories and named tools currently dominating this niche:
Housekeeping tip: every conversion adds a second file to your library. A Live Photo already weighs roughly two to three times a standard still, since it bundles a full-resolution image plus a MOV with audio, so batch-exporting hundreds of clips burns through gigabytes fast. Sweep Recently Saved now and then and delete duplicates you no longer need.




How to Convert a Live Photo to Video on Mac
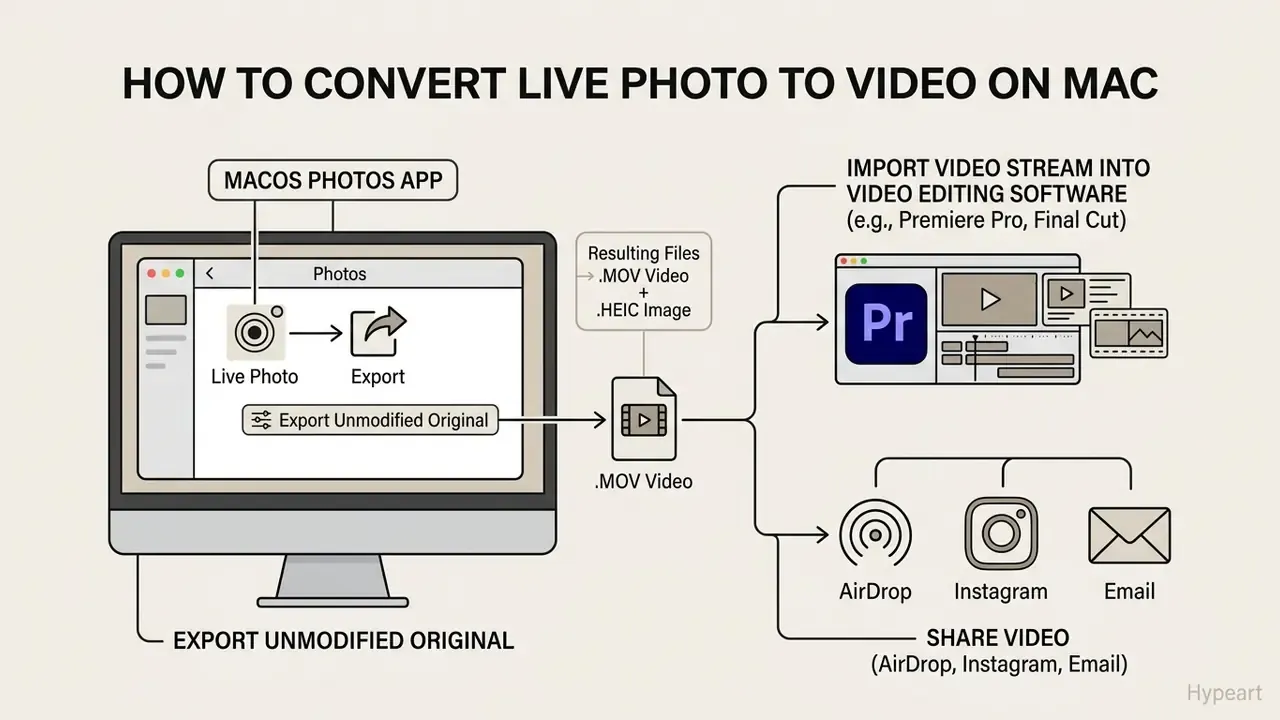
On macOS you convert a Live Photo to video through the desktop Photos app by exporting the asset's unmodified original resources. Because macOS exposes the underlying file structure, the export hands you both the still image and the QuickTime video file in your target folder. Contrary to a claim that circulates a lot, macOS does not require a third-party converter for this.
Export the Original Live Photo from Photos on Mac
To extract the video component of a Live Photo on a Mac:
- Open the Photos app on your Mac.
- Select the target Live Photo.
- Click File in the top menu bar.
- Choose Export > Export Unmodified Original for 1 Photo.
- Pick your output folder and click Export.
Photos writes two distinct files into the chosen folder: a static image (.HEIC or .JPG) and a standalone movie file (.MOV) holding the full three-second capture sequence (Apple Support, 2026). Keep the .MOV for editing or publishing, and delete the static file if you no longer need it.
Note the difference between the two export paths. Standard Export (File > Export > Export 1 Photo) renders a processed copy at a chosen movie quality, while Export Unmodified Original gives you the untouched source components exactly as captured. For editorial or archival work, always take the unmodified original.
Importing Live Photo Video Streams into Adobe Premiere Pro or Final Cut
For editors who need raw media components on a professional desktop timeline:
- Enable iCloud Photos on your Mac, or open iCloud.com in a browser. iCloud Photos for Windows behaves the same way.
- Find the target Live Photo in the library. Each item consists of an image (
.HEIC) and a video (.MOV). - Hold the Option key on macOS and drag the asset into a local Finder folder to extract both components.
- The system writes two discrete files: a static image (
.HEICor.JPG) and a video track (.MOV). - Import the
.MOVinto your Adobe Premiere Pro or Final Cut Pro media bin. It arrives as an 8-bit or 10-bit H.264/HEVC QuickTime clip at the capturing device's native frame rate.
Because that native frame rate rarely matches a 24p or 25p sequence, set your sequence frame rate first and let the NLE conform the clip, or interpret the footage manually. Skip that step and the three-second segment will judder against conventional footage.
How to Convert a Video Back into a Live Photo
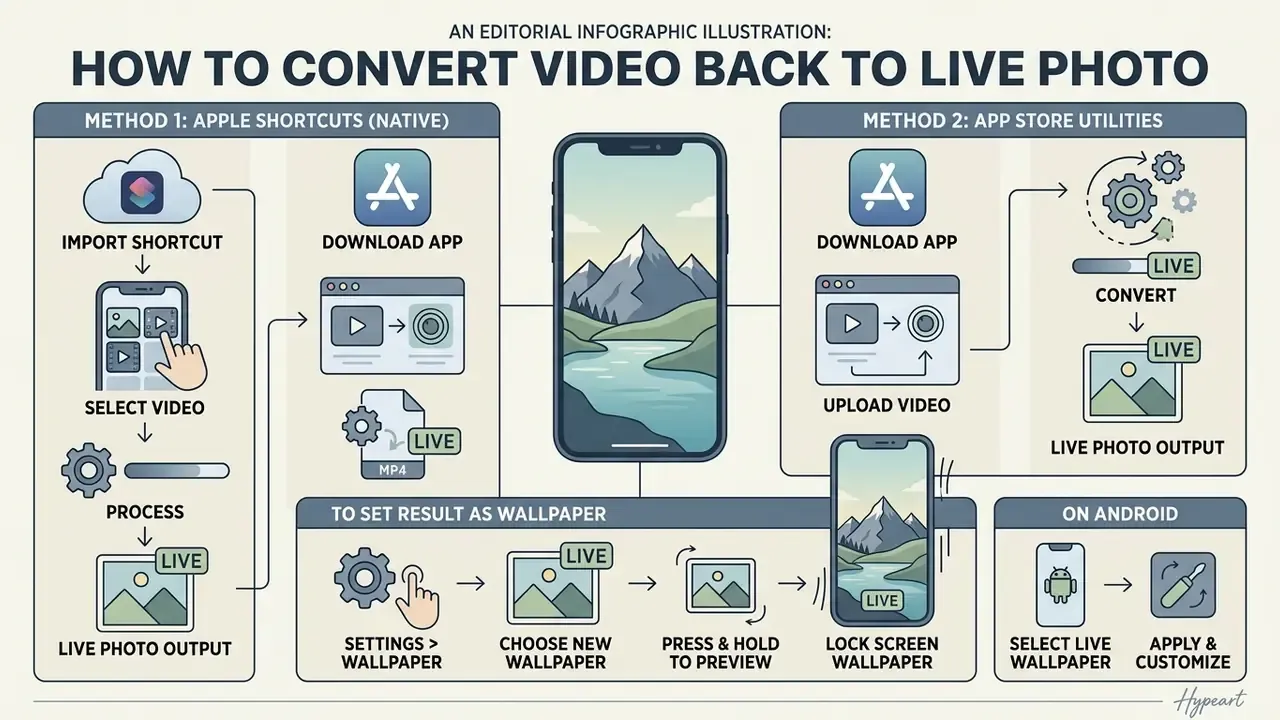
To run the process in reverse and turn a standard MP4 or MOV into an animated Live Photo, usually for dynamic Lock Screen wallpaper, iOS relies on an automated shortcut or a dedicated helper tool.
Method 1: Using Apple Shortcuts (Native and Free)
- Open the native Shortcuts app on your iPhone.
- Tap the + icon to create a new shortcut.
- Add the Make Live Photo action to the workflow.
- Pass your selected video file into the action and set the output to Save to Photo Album.
- Run the shortcut to convert a short clip (keep it under about five seconds) into a native Live Photo asset.
Method 2: Using App Store Utilities
If you need custom key-frame selection during reverse conversion, utilities such as intoLive or GIPHY let you import an MP4, trim it, choose a primary frame, set a repeat count, and export straight to the Camera Roll as a working Live Photo. Keep source clips in the 5 to 15 second range and use MOV or MP4 masters for the cleanest result.
To set the result as wallpaper: open Photos > Media Types > Live Photos, select the new item, tap Share > Use as Wallpaper, confirm Live Photo mode is on, adjust the framing, then tap Add. Animation plays on the Lock Screen only; the Home Screen stays static. If nothing moves, check that Low Power Mode is off and Reduce Motion is disabled.
On Android: the equivalent format is a Motion Photo, pairing a still with roughly 1.5 to 3 seconds of motion and sound. Motion Photos are created at capture time, and Android does not natively convert existing videos into them, so Play Store utilities that build looping clips are the closest substitute. For generative alternatives, see our guide on how to make a live wallpaper.
Troubleshooting Table: Why Motion Disappears
| Symptom | Most likely cause | Fix |
|---|---|---|
| Live Photo looks frozen in Photos | You have not pressed and held the image | Press and hold the photo to play the motion buffer |
| No animation anywhere in iOS | Reduce Motion is enabled | Settings > Accessibility > Motion > switch Reduce Motion off |
| Animation stops when the battery drops | Low Power Mode is active | Settings > Battery > turn Low Power Mode off |
| "Save as Video" is greyed out | The Live attribute was disabled during a previous edit | Edit > tap the Live icon until it is highlighted yellow > Done |
| Recipient on Mac sees a still image | AirDrop sent a flattened HEIC | Share > Options > enable All Photos Data, format Current |
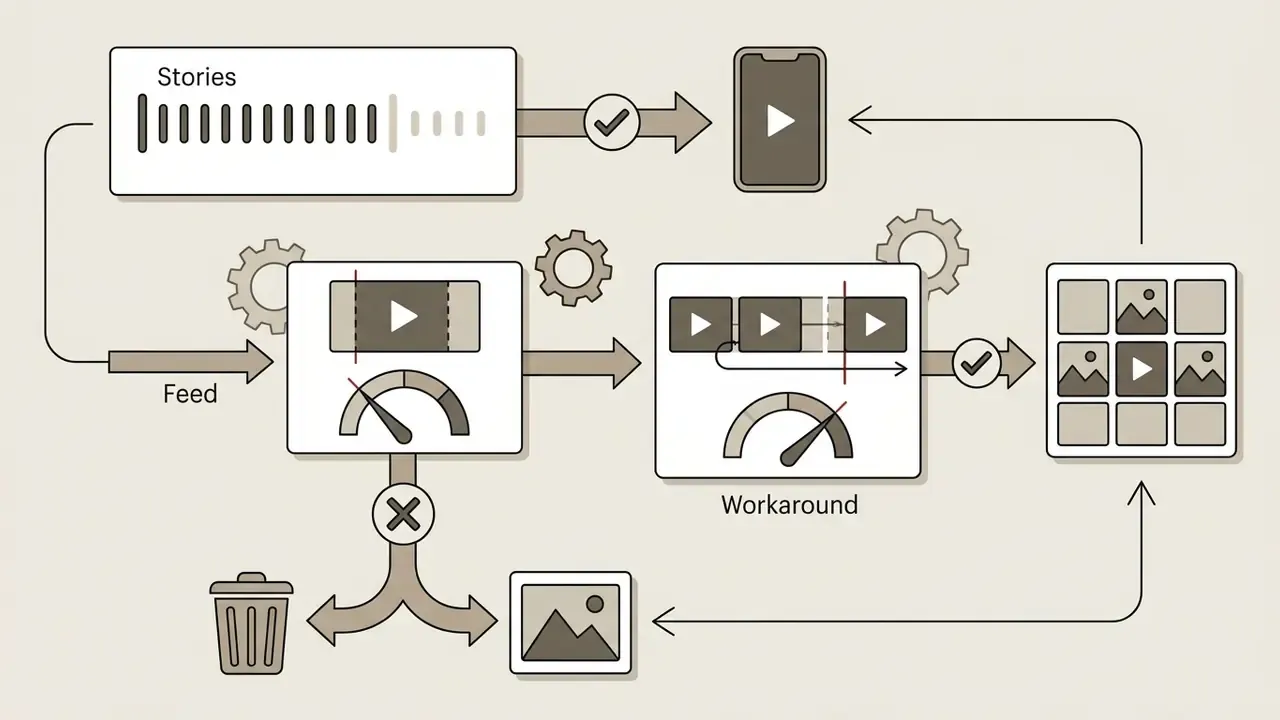
| Instagram feed rejects the clip | Under the 3-second minimum | Stitch several Live Photos, or post via Stories with Boomerang |
| Emailed Live Photo arrives static | Mail attaches the still component only | Export as video first, then attach the MOV or MP4 |
| Exported GIF plays at the wrong speed | GIF stores per-frame delays, not a fixed frame rate, and players read them differently | Re-export with a fixed delay, or distribute as video instead |
FAQ About Saving Live Photos as Videos
Why Can't I See the Live Photo Animation or the "Save as Video" Option?
A Live Photo can look frozen, or refuse to offer the "Save as Video" option, for three main system reasons:
- Reduce Motion is active. Open Settings > Accessibility > Motion and confirm Reduce Motion is off. Active motion reduction disables auto-playback of dynamic assets across iOS.
- Low Power Mode is enabled. With Low Power Mode on (Settings > Battery), iOS suspends visual effects and background rendering to save power. Turn it off to restore playback.
- The Live toggle was disabled during editing. Open the photo, tap Edit, tap the Live icon at the top, and make sure the Live attribute is enabled (highlighted yellow). If the asset was flattened into a still photo in an earlier edit, native video export stays unavailable until you re-enable Live. Two more cases explain most of the rest. Live Photos in the Photos app play when you press and hold the screen, so a quick tap only shows the key frame. And a Live Photo delivered as a plain email attachment arrives as an ordinary photo. If you are checking asset authenticity rather than playback, our technical guide on how to identify modified image buffers is the better starting point.
Can I Turn a Live Photo into a GIF Instead of a Video?
Yes, and you do not need a third-party app. On iPhone, swipe up on a Live Photo or tap the Live menu and select Loop or Bounce to apply continuous animation; the result files itself in the Animated album. On Mac, select a Live Photo with the Loop effect applied and click File > Export > Export GIF. If that option is missing, Apple's Photos help notes that Export Unmodified Original saves the Live Photo as a short video instead (Apple Support macOS Guide, 2026). Mind the trade-offs: GIFs carry no audio, use a limited palette at lower resolution, and store per-frame delay values rather than a true frame rate, so playback speed varies between apps and browsers. For quality and reach, video is the better container. If you want animated assets as custom phone backgrounds, see how to make a live wallpaper or how to make a video your lock screen wallpaper.
Do I Need an App to Save a Live Photo as Video?
No. Modern iPhones on iOS 13 or later include built-in "Save as Video" functionality inside the native Photos app. Third-party software is optional, and only worth installing if you need advanced editing, multitrack audio mixing, transitions between clips, or specialised format conversion.
Does the Exported Video Keep the Sound?
Yes. A standard "Save as Video" export retains the ambient audio recorded during the three-second capture. Loop and Bounce variants, however, are silent by design. To deliver a silent clip deliberately, mute the Live Photo in Edit before exporting.
Can I Do This on iPad?
Yes, and the workflow is identical: open the Photos app, open the Live Photo, tap the menu in the top-right corner, then choose Save as Video. The same Loop, Bounce, and Long Exposure effects are available in iPadOS.
Why Do Live Photos Take Up So Much Storage?
Each Live Photo stores a full-resolution still plus a short MOV with audio, which makes it roughly two to three times the size of an ordinary photo. Converting to video adds another file on top of the original pair, so periodic cleanup of Recently Saved and duplicate captures keeps storage under control. You can also make a Live Photo permanently static by switching the Live toggle off in Edit once the motion no longer matters.
Can I Recover the Live Photo from an Exported Video?
Not directly. The export is a flattened video, and the paired-asset relationship plus the shared asset identifier cannot be rebuilt from the MOV alone. Keep the original Live Photo in your library if there is any chance you will want to change the key frame or the effect later.
Editorial Verification and OS Compatibility
https://support.apple.com/guide/iphone/edit-live-photos-iphd8dbb3291/ios