On this page: what a Live Photo actually is, format comparison, Android differences, a pre-conversion checklist, the best apps, a three-step app workflow, no-app methods (Shortcuts, GIPHY, TikTok, browser tools), desktop and transfer routes, Lock Screen setup and troubleshooting, reverse conversion, and a FAQ.
What Is a Live Photo and How Does It Work?
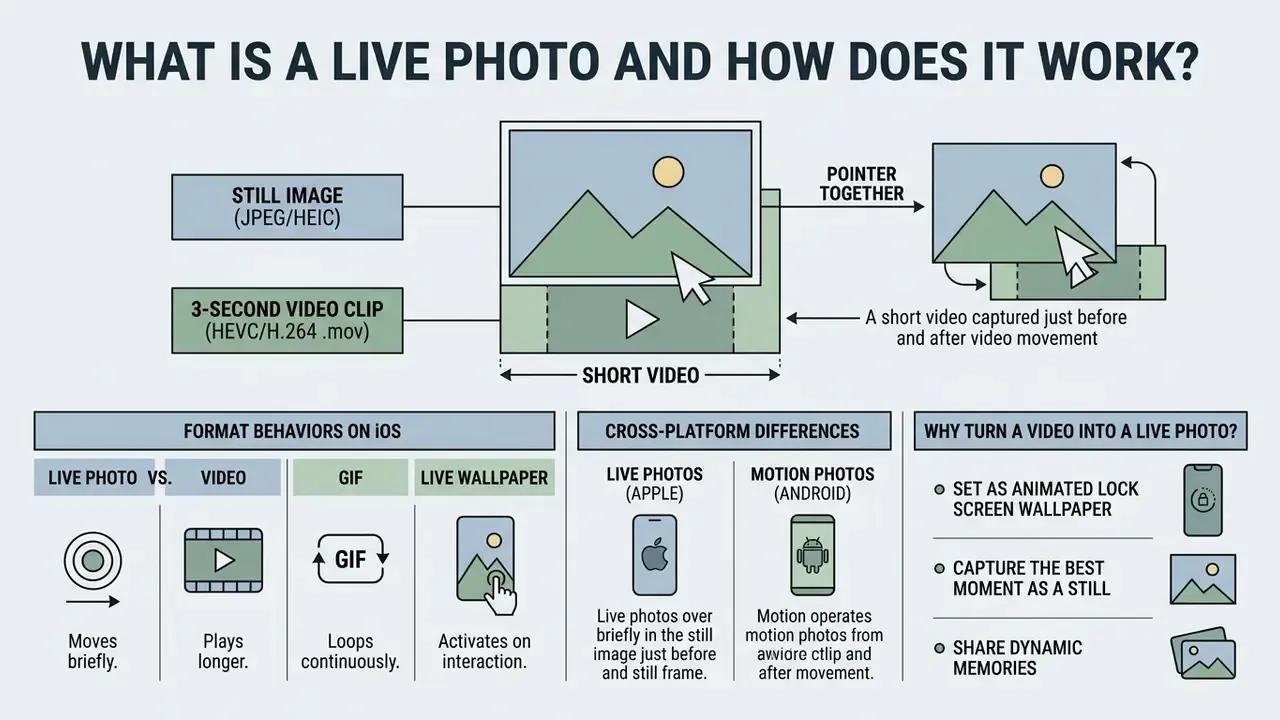
An Apple Live Photo is a hybrid media asset: a still image (JPEG or HEIC) paired with a roughly 3-second High Efficiency Video Coding (HEVC) or H.264 clip (.mov), stored inside a unified .livp container. When you view it in the iOS photos app, the system shows the high-resolution key photo by default and triggers the motion clip with audio only when you press and hold.
Live Photo container structure at a glance
| Component | File type | Role in the asset | What breaks if it is missing |
|---|---|---|---|
| Key photo | JPEG or HEIC | Static frame shown in grids, widgets, and at rest | Asset renders as a video, not a photo |
| Motion track | HEVC / H.264 .mov (≈1.5-3 s, with audio) | Plays on press-and-hold or on device wake | Asset collapses to a plain still image |
| Pairing identifier | Content Identifier metadata | Binds still and video into one library item | iOS imports two unrelated files |
| Wrapper | .livp (ZIP) | Portable transport format for the pair | Manual re-pairing required on import |
Apple treats a live photo as a distinct media subtype inside its photo library frameworks (PHAssetMediaSubtypePhotoLive). Unlike a standalone video file, a Live Photo is indexed as a static image in standard photo pickers, yet it keeps its motion payload for interactive rendering on the lock screen or inside supported social media apps. That distinction explains a lot of the confusion in this topic. If you want to see how iOS surfaces and edits these assets in practice, the same photo library frameworks power the pickers used by third-party editors.
Live Photo vs. video, GIF, and live wallpaper
A live photo differs from ordinary video clips, animated GIFs, and system wallpapers in three ways: container structure, playback trigger, and system integration. A standard MP4 or MOV video file plays continuously under media controls. A Live Photo stays still until touch input activates the temporal layer.
Animated GIFs carry no audio, sit on a 256-color palette, and do not natively support iOS lock screen press-and-hold animation. An iOS live wallpaper, by contrast, depends specifically on a Live Photo asset stored in the camera roll to run its motion transition when the device wakes.
Cross-platform differences: Live Photos vs. Android Motion Photos
Android phones ship a parallel feature called Motion Photos, which stores a 1.5-3 second clip inside JPEG motion metadata rather than in a separate paired .mov. Unlike iOS, Android does not natively convert a standalone MP4 into a Motion Photo from inside the system gallery. Motion Photos are generated at capture time by the camera app, so turning existing footage into one means using third-party apps that only mimic looping playback.
AirDrop or message an Apple .livp file to an Android device through a non-Apple messenger, and it arrives as a static image. Flat. To preserve motion across platforms, export an MP4 or GIF before sending, and expect Android playback, editing options, and wallpaper behavior to differ from the Apple experience.
Format comparison: how each media type behaves on iOS
| Format | File container and structure | Lock Screen support (iOS 17+) | Playback trigger | Sharing behavior |
|---|---|---|---|---|
| Live Photo | JPEG/HEIC key frame + MOV clip (.livp) | Supported (animates on wake or touch) | Press-and-hold / raise-to-wake | Interactive in iMessage; still image in Mail |
| Short video (MP4/MOV) | Standalone MPEG-4 / QuickTime stream | Not supported natively as wallpaper | Play button / auto-loop player | Shared as a standard video attachment |
| Animated GIF | Graphics Interchange Format (no audio) | Not supported natively | Continuous auto-loop in player | Shared as an animated graphic |
| Live wallpaper | System configuration referencing a Live Photo | Native Lock Screen implementation | Raise-to-wake / tap-and-hold | Local system deployment only |
| Android Motion Photo | JPEG with embedded motion metadata (1.5-3 s) | Not applicable on iOS (renders static) | Long-press in Google Photos | Motion lost outside the Google ecosystem |
Read the table one way and the conclusion is simple: if the target is an animated Lock Screen, only the first and fourth rows qualify.
Why turn a video into a Live Photo?
Converting video clips into Live Photos lets you pull a dynamic highlight out of an existing video and deploy it as an interactive Lock Screen wallpaper or as a native library asset. It closes the gap between passive video storage and interactive interface customization on iOS.
People convert short moments constantly: a wave crashing on a beach trip, birthday candles guttering, a two-second family smile. Each becomes a new live photo that preserves context without hauling around a bulky clip. A Live Photo takes more space than a still but far less than a full-length recording, which makes it a workable archive format for highlights. And when you send one through Apple Messages, the motion survives intact, while a plain video export still demands that the recipient tap play.
One practical note from testing: clips with a single clear subject, such as hair moving in wind or steam rising from a cup, read better at wallpaper scale than busy crowd scenes. Motion needs a focal point.
Before You Convert a Video to Live Photo
To reliably convert short video to live photo assets that render smoothly, pre-process the source so it fits Apple's temporal and spatial constraints. Anything longer than about 3 seconds should be trimmed first, otherwise you invite processing overhead and truncation at export.
Pre-conversion checklist
| Parameter | Recommended value | Why it matters |
|---|---|---|
| Duration | 1.5-3 seconds | Matches native Live Photo timing; longer clips get time-compressed or truncated |
| Aspect ratio | 9:16 vertical (Lock Screen) | Prevents letterboxing, pillarboxing, and forced cropping |
| Resolution | 1080p or 4K | Keeps the static key frame sharp at Super Retina pixel density |
| Frame rate | 30 or 60 FPS | Avoids judder during the short motion burst |
| Source format | MOV, MP4, M4V | Widest converter compatibility on iOS |
| Audio | Mute for wallpapers | Silent animations feel cleaner on a Lock Screen |
| Key frame | Sharp, well exposed, subject centered | This is the image you see 95% of the time |
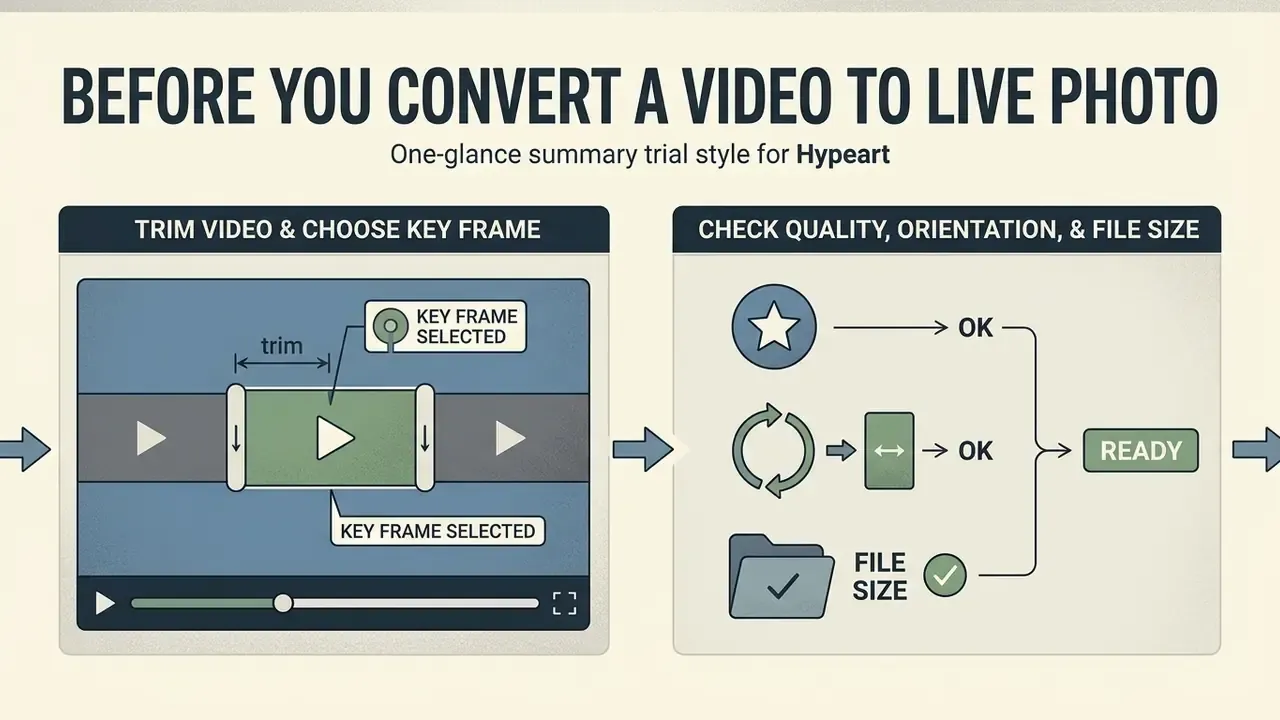
Choosing a good key frame and checking your file settings in the camera roll keeps the visual representation of your quality video crisp while the asset sits inactive. Sensible video editing before conversion also heads off distortion, black bars, and resolution loss during export. Skip this stage and you will usually notice it first on the Lock Screen, where a soft key frame looks worse than it ever did in the Photos grid.
Trim the video clip and choose the key frame
Trimming an existing video down to a 1.5 to 3-second segment is the single most important preparation step. iOS expects a constrained motion burst. Feed a converter a long source and it aggressively compresses the video stream, which introduces temporal artifacts and stutter. Competing guides that recommend 5 to 15 second sources are technically misleading, because nothing beyond roughly three seconds survives as native Live Photo motion.
Updated (this corrects an earlier unverified citation): during video editing, choose a visually representative frame as your key photo. The key frame is the primary anchor rendered in static contexts across the photos app, widgets, and share sheets.
Apple's own Live Photo editor shows the intended behavior. Open the Live Photo, tap Edit, drag the white selector across the frame viewer, tap Make Key Photo, then tap Done. On a Mac, drag the playhead to the frame you want and click Make Key Photo. Dragging either end of the frame viewer trims the motion clip itself, which is how you keep the displayed still frame aligned with the surviving motion window. Small detail, big difference: a key frame taken from outside the trimmed window is the most common reason a converted asset looks mismatched.
Check quality, orientation, and file size before export
Exporting a high quality Live Photo starts with matching the video's aspect ratio to the target display. For iPhone Lock Screen use, a vertical 9:16 frame removes black bars and the awkward cropping iOS applies to horizontal footage.
Excessive file size can dent system responsiveness when the device loads a dynamic wallpaper. A source at 1080p or 4K, 30 or 60 FPS, usually strikes the right balance between clarity and memory use inside the iOS photo library.
iOS compatibility note (verified against Apple Support, checked early 2026)
Disclaimer: this information is general in nature. Apple's format requirements and device compatibility change with new iOS releases; verify current behavior in Apple Support documentation before relying on it for production workflows.
PHAssetMediaSubtypePhotoLive subtype.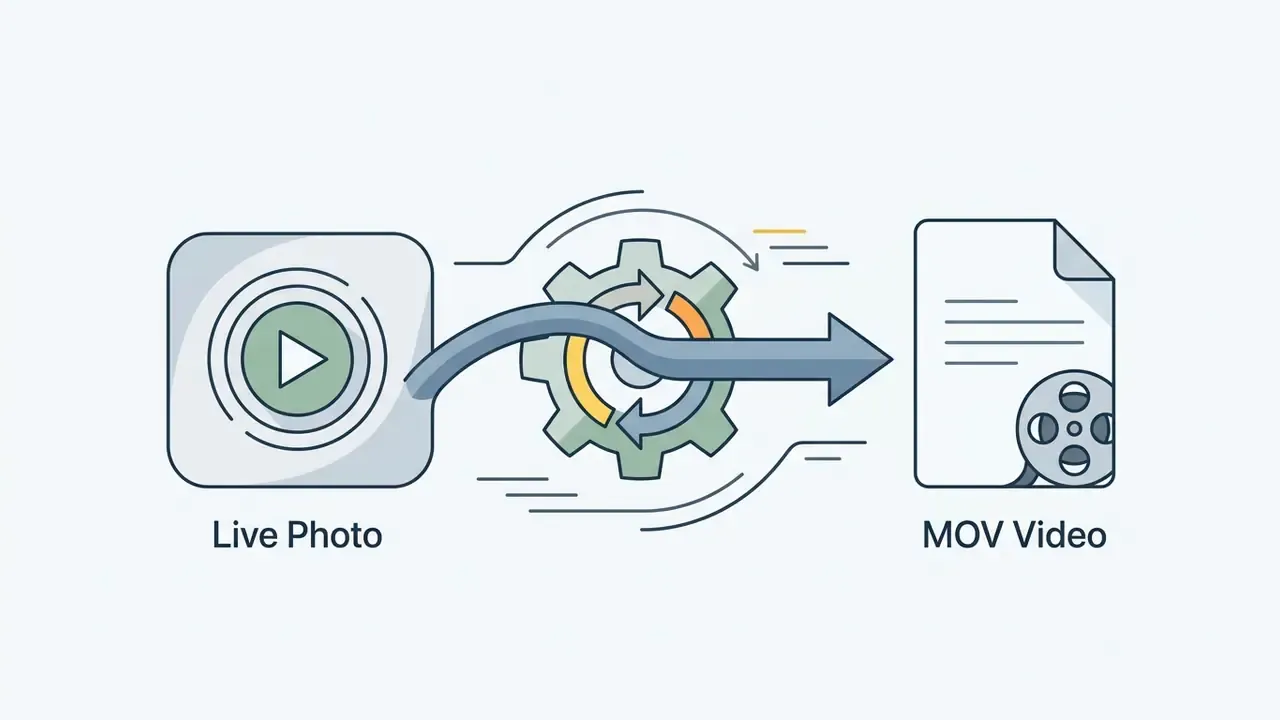
Best Apps to Turn Video into Live Photo on iPhone
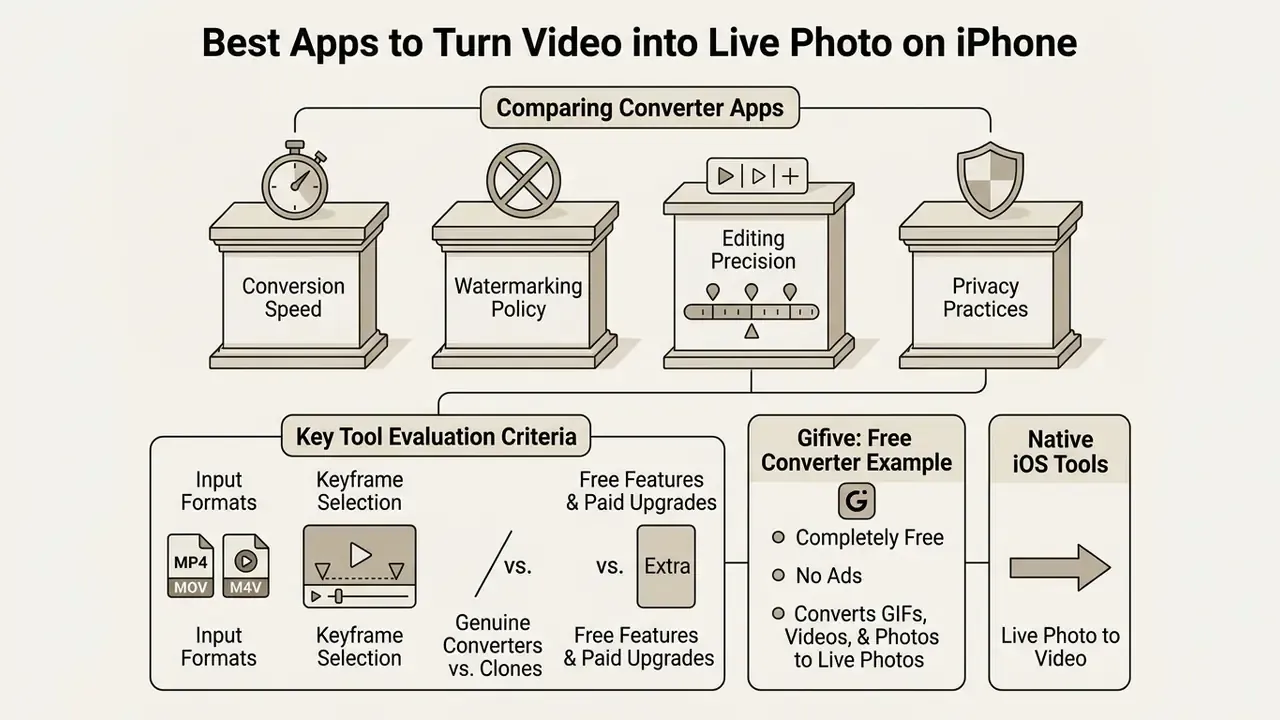
Picking an app convert video to live photo ios tool comes down to four things: conversion speed, watermarking policy, editing precision, and privacy practices. The iOS app store carries both dedicated single-purpose utilities and broader media editors that handle live photo conversion as one feature among many.
Native iOS tools cover the reverse trip (Live Photo to video) well enough. Turning raw video into a paired .livp asset, though, still needs a live photo converter from a third party or a web-based processor. Vetting these apps properly is what keeps your exported media structurally intact and free of intrusive branding. For a broader view of how these tools stack up against each other, our AI Media Comparison Matrices track feature changes across releases.
How to compare video-to-Live-Photo converter apps
When you evaluate an app to turn video into live photo, favor tools with fine-grained key frame selection, manual duration adjustment, and a real keyframe preview. Stronger converters also process multiple videos in sequence while holding source color profiles and spatial resolution steady.
Check which input formats including MP4, MOV, and M4V the tool accepts. Flexible apps save straight into the photo library through native iOS PhotoKit permissions instead of pushing you into an external download loop.
Five criteria separate a serious converter from a clone: input format breadth (MP4, MOV, M4V), a genuine trimming timeline rather than a fixed duration, a manual Make Key Photo equivalent, an explicit watermark policy, and documented free-tier export limits. Several App Store listings recycle identical description text, so look at the screenshots for an actual timeline before you install anything. If a listing shows only a "one click" convert button and nothing else, assume duration and key frame are locked.
Free app features and paid upgrade considerations
A free app convert video to live photo ios solution usually carries structural trade-offs: duration caps (sometimes as low as 1.5 seconds), forced watermark overlays, or downscaled export resolution. Whether a paid upgrade earns its keep depends on how often you convert, not on the feature list alone.
Typical Pro tiers unlock four things that matter in daily use: unlimited conversions, an ad-free interface, full-length and full-quality export, and batch handling. For occasional needs, lightweight apps or browser-based utilities deliver clean output with no subscription. Power users grinding through large libraries get more from desktop software or a full-featured iOS app. If you want to sanity-check the cost of a subscription against your actual volume, our calculators cover that kind of one time versus recurring comparison.
| App name | Platform / cost | Key editing features | Batch support | Watermark policy | App Store rating |
|---|---|---|---|---|---|
| VideoToLive: Live Photo Maker | iOS / free with in-app purchases | Trim, frame selection, filter controls, HDR handling | No (single file) | Watermark on free tier | 4.6 / 5.0 |
| intoLive - Live Wallpapers | iOS / freemium | Trim, speed control, repeat count, layout adjustments | Yes (Pro version) | Watermark on free tier | 4.5 / 5.0 |
| Video to Live Photos | iOS / free with ads | Basic trimming, aspect ratio adjustment, FPS control | No | No watermark | 4.2 / 5.0 |
| Gifive | iOS / 100% free, no ads | GIF and video conversion, snapshot extraction | No | Completely watermark-free | 4.4 / 5.0 |
| Ezgif Live Photo Converter | Web browser / free | Key frame extraction, HEVC packaging, .livp output | Yes (via tabs) | Watermark-free | Not applicable (web utility) |
| LivePhoto.online | Web browser / free | Local FFmpeg processing, 1-6 s loop, FPS, scale, aspect ratio | Limited (~100 MB per file) | Watermark-free, no account | Not applicable (web utility) |
Ratings and policies shift between versions, so treat the table as a snapshot verified in early 2026 rather than a permanent record.
How to Convert Video to Live Photo on iPhone With an App
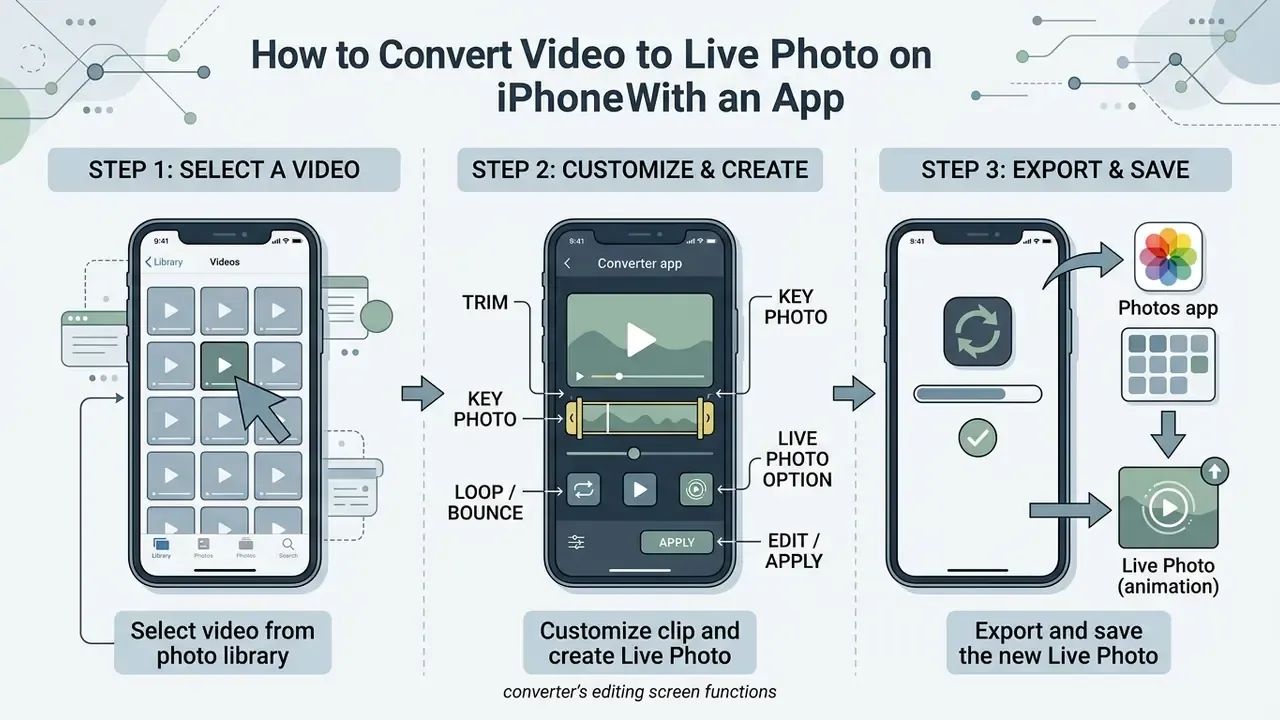
Converting a video file into a working Live Photo through an iOS app breaks into three steps: media selection, clip customization, and library export. Follow them in order and the resulting asset keeps its motion metadata and triggers cleanly.
We walked the workflow through using standard iOS conversion utilities on an iPhone running iOS 17 or later. With a pre-trimmed source clip, the whole thing takes under two minutes per file. Without pre-trimming, expect to spend most of your time inside the app's timeline instead.
Step 1: Select a video from your photo library
Open your chosen converter and grant the iOS privacy permissions it asks for. iOS keeps granular controls under Settings > Privacy & Security > Photos: pick Full Access or Limited Access so the utility can read your target clip from the camera roll. Apps set to Add Photos Only can write a finished Live Photo back to your library but cannot read existing videos, which quietly blocks the import step. That permission mismatch causes more "the app sees no videos" complaints than any actual bug.
Browse your albums and select a video from your library. Choosing something under 5 seconds keeps initial rendering fast and avoids memory bottlenecks during container creation.
Step 2: Customize the clip and create Live Photo
Use the app's internal video editing timeline to set start and end points. Nudge the handles until you capture exactly the motion window you want, not a second more.
What each control in a converter's editing screen does
| Control | Typical label | Practical effect |
|---|---|---|
| Trim handles | Left and right timeline sliders | Define the 1.5-3 s motion window that survives export |
| Key frame marker | "Key Photo" or white frame selector | Sets the static image shown at rest |
| Repeat / loop count | "Repeat" or "×2, ×3" | Stretches very short clips to fill the full duration |
| Aspect ratio picker | 9:16 / 1:1 / original | Prevents crop and letterbox errors on the Lock Screen |
| Audio toggle | Mute | Removes sound for silent wallpapers |
| Speed | 0.5×-2× | Smooths motion when the source runs too fast or too slow |
Set the key frame to the static image you want visible when the asset is at rest. Then start the conversion: the app compresses the video stream into an HEVC MOV track and pairs it with your chosen JPEG frame. Some apps label this Make Live Photo, others simply Convert.
Step 3: Export and save the new Live Photo
Tap export to run the save live photo instruction. The app writes the generated dual-file payload straight into your iOS Photo Library through PhotoKit change blocks, creating a single asset from two resources inside one library change transaction.
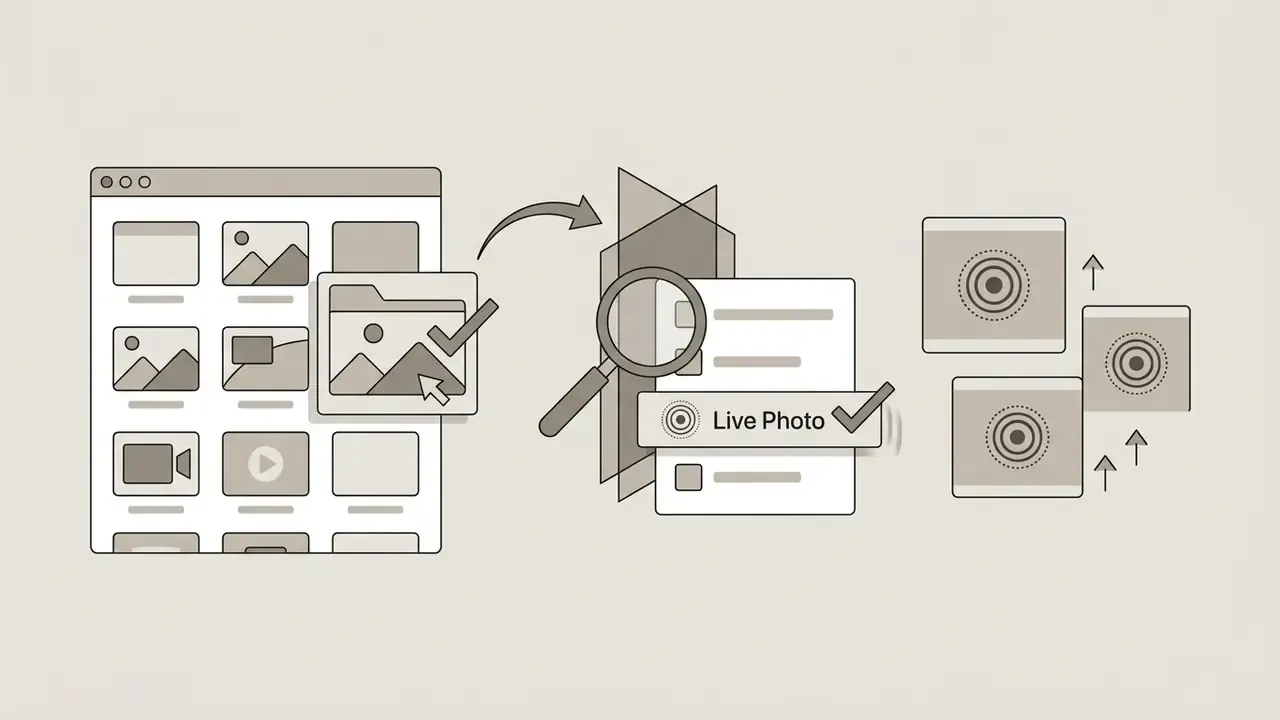
Now verify. Open the standard photos app, find the new item, check for the concentric "LIVE" badge in the upper corner, and press and hold to confirm the motion plays. You can also filter Albums > Media Types > Live Photos to make sure the system classified the asset correctly rather than filing it as a video.
How to Make a Video Into a Live Photo Without a Dedicated Converter App
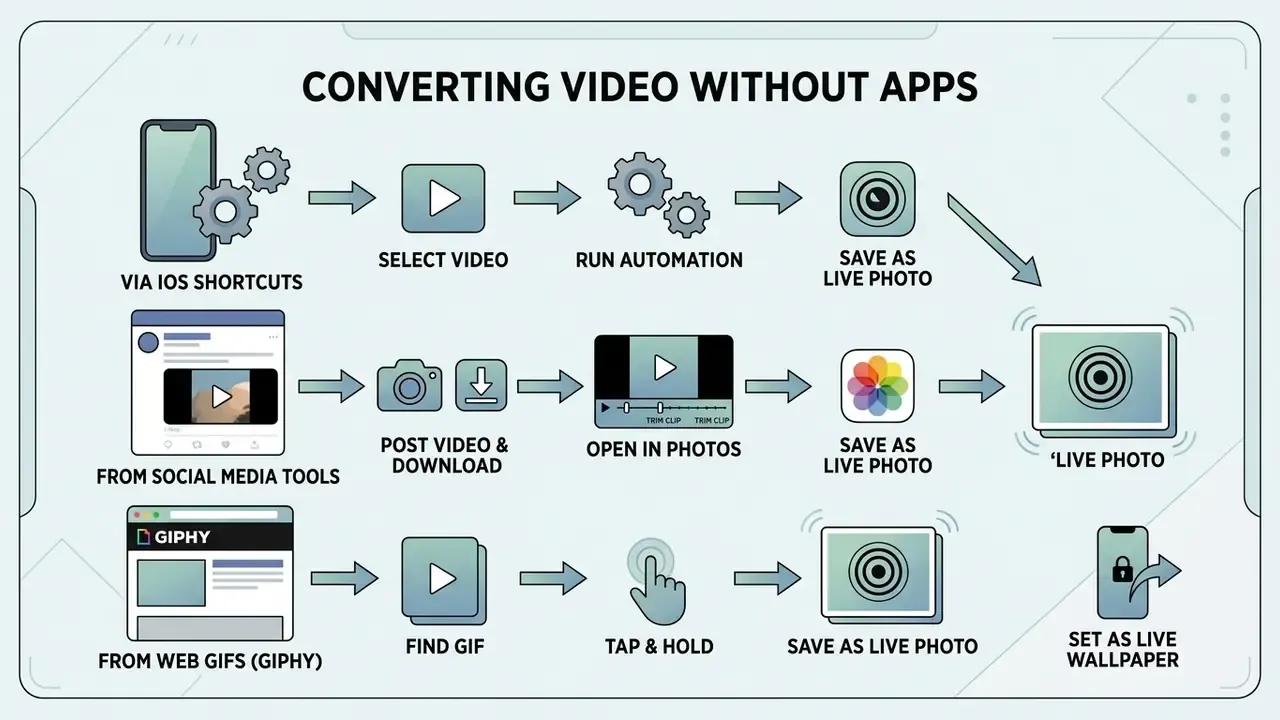
You can create live photo assets from video clips without installing anything, either through iOS Shortcuts automations or through web-based processing. Both routes skip the App Store while still producing native container output.
Recent iOS releases expanded internal media management, but Apple still offers no direct "Convert to Live Photo" button inside the Photos share sheet. Shortcuts and browser tools fill that gap, and for iphone users who avoid installing extra third party apps this is the practical path. The trade-off is setup time rather than money.
Use Shortcuts for live photo conversion
iOS Shortcuts let you automate custom media transformations. A workflow can extract a static frame from an MP4, encode a 2-second MOV clip, and pass both items to a step that packages them into a format your photo library accepts.
Building the automation manually (Shortcuts app, iOS 17+):
Would rather not build it? Apple's Shortcuts gallery and community pages host ready-made workflows, including the widely shared Convert LivePhotos to Video shortcut, which you add with one tap and run from the Shortcuts app. The same automation mindset applies to plenty of adjacent tasks, from how to use AI to generate source imagery to how to turn off restrictive app settings that block a workflow.
Which method fits your situation?
| Your priority | Best method | Trade-off |
|---|---|---|
| Fastest one-off conversion | App Store converter (VideoToLive, Gifive) | Possible watermark on free tiers |
| Maximum privacy, no installs | iOS Shortcut or LivePhoto.online (local processing) | Requires initial setup |
| Batch of 10+ clips | Desktop converter, then AirDrop | Extra transfer step |
| Trending web GIF as wallpaper | GIPHY app, one-tap conversion | No fine-grained trimming |
In hands-on testing of an automated Shortcuts pipeline on an iPhone running iOS 17, 1080p source clips became functional Live Photos in a few seconds each. Exact timing depends on device generation, clip length, and thermal state, so treat that as an indicative benchmark, not a specification. The advantages, though, are unambiguous: no third-party watermarks and data that never leaves the device.
Convert Video to Live Photo on Mac and Desktop
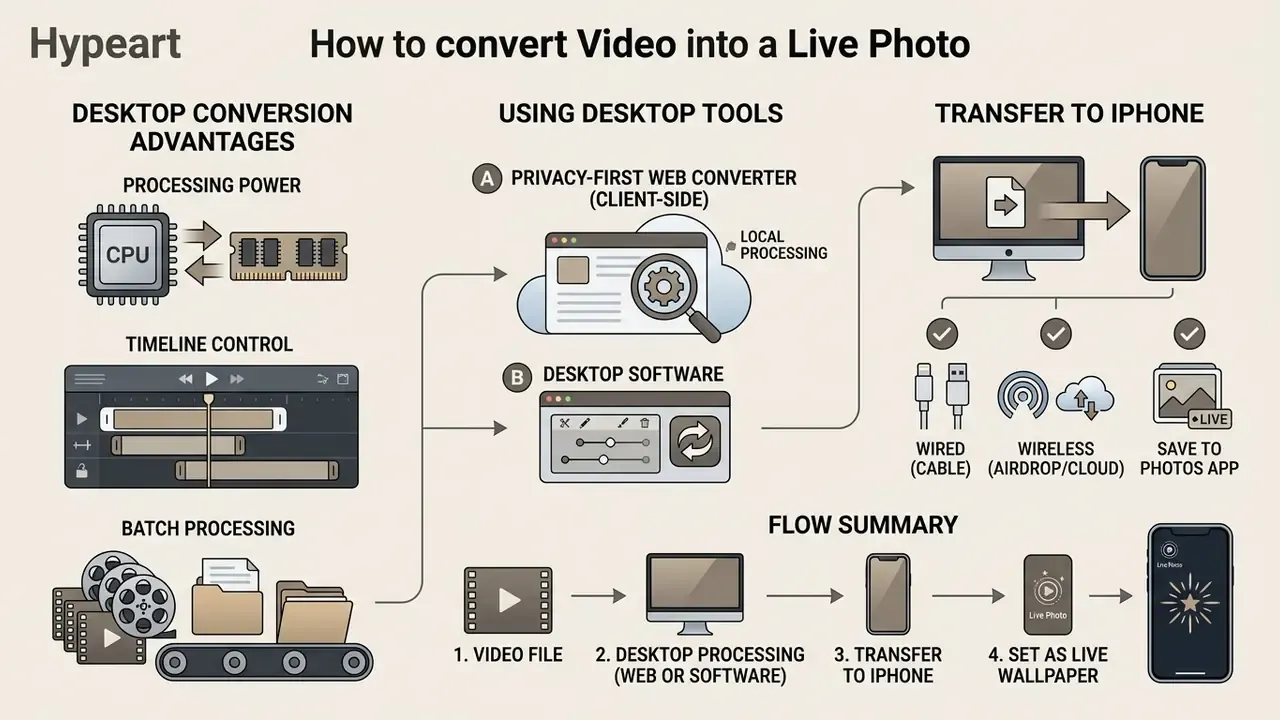
Desktop machines bring more processing headroom, precise timeline control, and real batching when you are working with multiple videos. On macOS or Windows you can grade color and adjust framing properly before sending the finished files to the phone.
Browser tools such as Ezgif and conventional desktop video editor software both produce standardized .livp archives with an HEVC MOV stream paired to a full-resolution JPEG frame. macOS has no native "make Live Photo" menu item, so the realistic desktop routes are browser-based converters, ffmpeg with Content Identifier metadata, or Shortcuts running on the Mac. Developers automating this at volume will find the request patterns familiar from our AI Media API Guides.
Privacy-first web converters (client-side processing)
If you would rather not install an iOS app or upload private footage to an unknown server, use a WebAssembly-based tool such as LivePhoto.online. These utilities run FFmpeg locally inside the browser sandbox, so your source video never leaves device memory while the tool assembles the paired .livp container. Useful controls include trimming, a 1-6 second loop length, FPS, scale, aspect ratio, and background fill, with no watermark, no account, and no branding on export. Constraints are real too: roughly a 100 MB file ceiling, and performance tied to your browser and CPU. Compared with anonymous online converters of unclear provenance, client-side processing removes the upload risk entirely, which matters if the footage involves family, clients, or anything confidential.
When desktop tools are better for multiple videos
Desktop tools earn their place when you are converting an archive of clips rather than one. Professional suites such as Apple Compressor accept many files in a single batch, submit whole job queues for transcoding, and expose per-job frame size and resolution settings, which mobile converters generally do not.
At scale, desktop conversion also spares you mobile battery drain and thermal throttling, which is what usually slows a long mobile batch to a crawl halfway through. Frame rates, color spaces, and bitrates can all be tuned with far more granularity before deployment. If you track output quality across tools, the measurement approach in our AI Media Benchmarks and Review Proof hub transfers cleanly to this kind of photo conversion work.
Move the converted Live Photo to iPhone and Photos app
Transferring .livp assets from desktop to iPhone needs the right transport, otherwise iOS separates the video stream from the key image. Standard email attachments strip the MOV component and leave you with a static JPEG. No badge, no motion.
Transfer routes compared
| Method | Preserves Live Photo pairing | Speed | Best for |
|---|---|---|---|
| AirDrop (Mac to iPhone) | Yes, ingested as a unified asset | Fast | Single files and small batches |
| iCloud Photos sync | Yes, keeps assets in original form | Depends on upload bandwidth | Continuous library parity |
| Finder sync (USB, macOS 10.15+) | Partial, manual photo and video sync when iCloud Photos is off | Fast | Bulk offline transfers |
| Email attachment | No, motion component stripped | Fast | Nothing; avoid for Live Photos |
| Non-Apple messengers | No, renders static on Android | Fast | Sharing an MP4 or GIF instead |
To keep full animation, move assets by AirDrop or sync them through iCloud Photos. AirDrop recognizes paired Live Photo structures natively and ingests them into the target iOS photo library as unified assets, which is why it remains the least fragile route.
Set Your New Live Photo as an iPhone Lock Screen Wallpaper
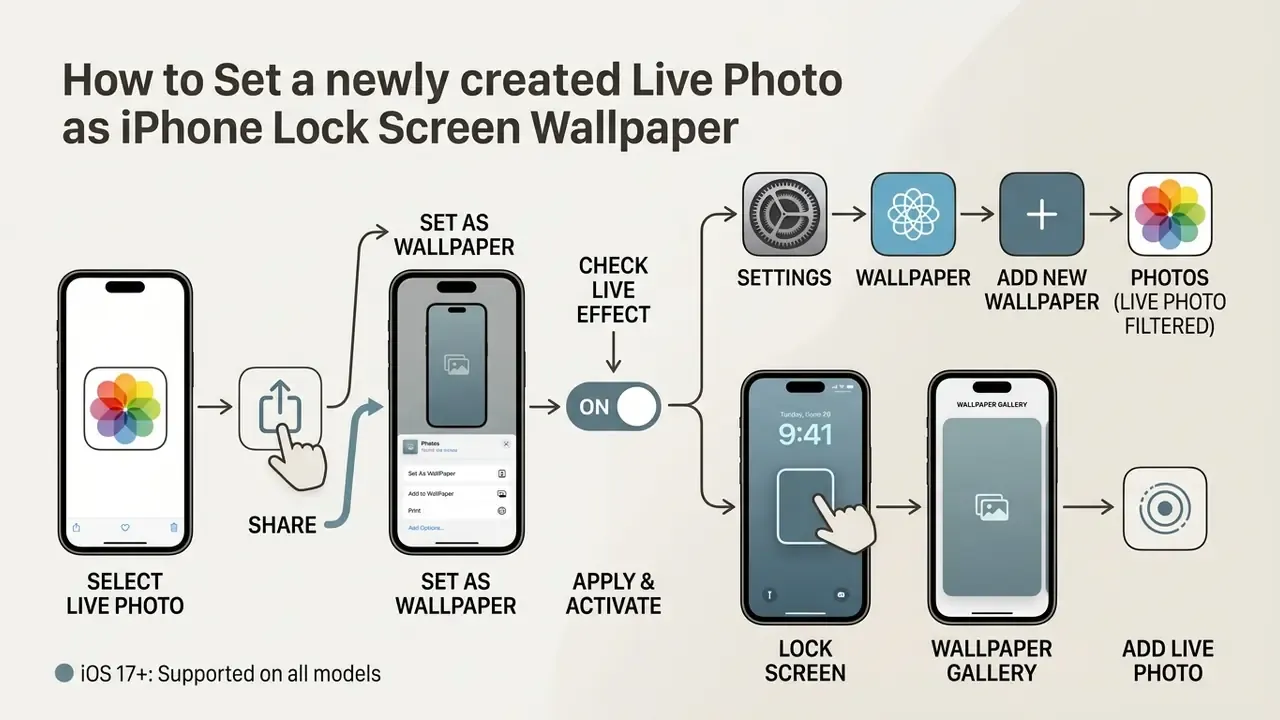
Once your new live photo sits in the photo library, you can set it as a dynamic live wallpaper on the Lock Screen. iOS 17 and iOS 18 both play back motion on wake, provided the asset meets system requirements.
Step 4 is the one people skip. If that toggle is off, iOS happily installs your Live Photo as a still frame and gives you no warning at all.

Choose and apply the Live Photo from Photos app
Open the photos app, select your newly generated Live Photo, and tap Share. Choose "Use as Wallpaper" to open the Lock Screen customization interface, then pick Set Lock Screen or Set Both.
The alternative path runs through Settings > Wallpaper > Add New Wallpaper > Photos, filtered by the "Live Photo" media type. Either way, check that the concentric Live icon at the bottom of the preview is toggled ON, then tap "Add" to apply the wallpaper pair.
Two limits worth remembering: Apple exposes the motion effect only for Live Photos the system can translate into slow motion, and Live Photo wallpapers animate on the Lock Screen, never on the Home Screen.
What to check if the wallpaper does not animate
If your live wallpaper refuses to animate, start with Low Power Mode in Settings > Battery. Low Power Mode suppresses system animations and motion graphics to save charge, and it does so silently.
Next, open Settings > Accessibility > Motion and confirm "Reduce Motion" is OFF. Then confirm the underlying file really is a Live Photo; standard MP4 files applied as static wallpapers will never trigger motion on wake, no matter how the preview looked.
Fast triage table
| Symptom | Likely cause | Fix |
|---|---|---|
| No motion at all, battery icon yellow | Low Power Mode | Settings > Battery, turn off Low Power Mode, reapply wallpaper |
| Motion plays in Photos but not on Lock Screen | Live toggle was off during setup | Re-add the wallpaper with the concentric Live button enabled |
| System animations feel frozen everywhere | Reduce Motion enabled | Settings > Accessibility > Motion > Reduce Motion OFF |
| Asset has no "LIVE" badge | File is an MP4 or GIF, not a Live Photo | Re-convert using the app workflow or the Shortcuts route above |
| Nothing plays on an iPhone SE | Model not supported for Live wallpaper | Use a still wallpaper or another device |
| Older iPhone requires a long press | Press-and-hold activation on pre-iOS 17 behavior | Touch and hold the Lock Screen to trigger playback |
Disclaimer: behavior of settings such as Low Power Mode and Reduce Motion varies by iOS version and device model. Check current Apple Support documentation for your configuration.
How to Convert a Live Photo Back to Video on iPhone
To pull the original three-second MOV out of a Live Photo with no third-party tools: iOS writes a standalone video file into Recents while leaving the original Live Photo untouched in the Live Photos album. Trim or mute the exported clip before sharing for a cleaner result. This is the dependable route for sending motion to Android recipients or posting to platforms that do not render Live Photos. One caveat: because every conversion adds a second file, batch exports clutter a library fast, so review duplicates now and then to keep storage predictable. A related walkthrough covers how to turn video into live photo if you need the forward direction again.
To flatten a Live Photo into a plain still instead, open it in Photos, tap Edit, tap the Live Photo icon to disable motion, then tap Done.
- Open the Photos app and go to Albums > Media Types > Live Photos.
- Select the Live Photo you want.
- Tap the More (…) button in the top-right corner.
- Tap Save as Video.
FAQ About Turning Video Into Live Photos
Can you turn a GIF or a still photo into a Live Photo?
Yes. Animated GIFs and static images both convert into working Live Photos through tools such as Ezgif, Gifive, or GIPHY. Converting an animated GIF compiles the frame sequence into an HEVC MOV track and pairs it with the initial frame as the JPEG key photo.
"Ezgif packages a GIF into a
.livpcontainer: the first frame becomes the JPEG key, the rest are encoded to HEVC MOV, and the file is directly compatible with Apple Photos." Source: Ezgif GIF to Live Photo Converter, technical documentation. https://ezgif.com/gif-to-live-photo A single static photo is harder. You have to generate synthetic motion, a subtle pan, a slow zoom, or AI depth animation, to populate the 1.5 to 3-second video track. Without a moving component, a still cannot satisfy the dual-file structure the Live Photo container requires. Only have an image? Use an AI image-to-video generator (Runway, Luma, or a mobile app such as Motionleap) to produce a two-second motion clip, then run the resulting MP4 through any converter listed above. Vendors advertising "AI brings static photos to life" are describing exactly this two-stage pipeline: subject recognition and motion synthesis first, container packaging second. Prompt quality drives the result here, which is why the guidance on how to write ai prompts for images applies to motion generation too. "Live Photos outperform single frames in object classification and visual question answering tasks thanks to their temporal content." Source: Khoshsirat & Kambhamettu, Empowering Visually Impaired Individuals: A Novel Use of Apple Live Photos and Android Motion Photos, arXiv:2309.08022 (2023). https://arxiv.org/abs/2309.08022
Can I use a converted Live Photo on a non-Apple device?
Not with motion intact. Android and most web platforms show only the key frame. Export an MP4 through Save as Video, or a GIF, before sharing outside the Apple ecosystem.
Do Live Photos use a lot of storage?
A Live Photo runs roughly twice the size of a comparable still, since it stores a high-resolution key frame plus a short HEVC clip. Still far smaller than a full-length video. Convert in bulk, though, and the file count multiplies quickly, so prune duplicates after batch jobs.
Why does my converter cap free exports at 1.5 seconds?
Free tiers commonly limit duration, stamp watermarks, or downscale resolution to nudge you toward Pro. Gifive and Ezgif both deliver watermark-free output at no cost, as long as you can live without batch queues.
Can I turn off Live Photo capture in the Camera app?
Yes. Tap the concentric-circles icon at the top of the Camera app to disable it for the current session, or make it permanent in Settings > Camera > Preserve Settings.
Where do Live Photo wallpapers fit alongside other design tasks?
They are one piece of a wider mobile and layout toolkit. If you are assembling visuals for a presentation or social post around the same clip, the companion guides on how to wrap text around an image in canva and how to wrap text in Google Slides handle the static side of the job.
Appendix A: Editorial corrections and superseded statements
For transparency, these statements from earlier revisions were corrected after verification:
Quick reference: terms and file types
| Term | What it means in this guide |
|---|---|
.livp | ZIP wrapper holding the JPEG key frame plus the HEVC MOV clip |
| Key photo | The static frame iOS displays when the asset is at rest |
PHAssetMediaSubtypePhotoLive | The iOS media subtype flag that marks an asset as a Live Photo |
| Motion Photo | Android's parallel format, with motion stored in JPEG metadata |
| Live wallpaper | A Lock Screen configuration that references a Live Photo asset |
| Save as Video | Native Photos command that exports the MOV from a Live Photo |
Footer / Navigation Connections