Clean graphic layouts often demand that copy sit right next to a visual, not below it. When you build marketing materials or social media posts, text around image placement carries the visual balance, and it quietly decides whether a reader keeps going.
Here is the part most tutorials skip. Canva does not ship an automated, object-aware text wrap engine. Treat it like InDesign and your layout breaks, so manual text box control and geometric alignment stay the only reliable production methods. The three techniques below reproduce a professional wrap effect using text box resizing, the Curve effect, and temporary shape guides.
Quick Answer: Three Ways to Fake Text Wrap in 30 Seconds
- Multiple text boxes.Split the paragraph into separate blocks above, beside, and below a rectangular image, then drag the white pill handles on each box to control line breaks. Hold Alt (Windows) or Option (Mac) to resize evenly from both sides.
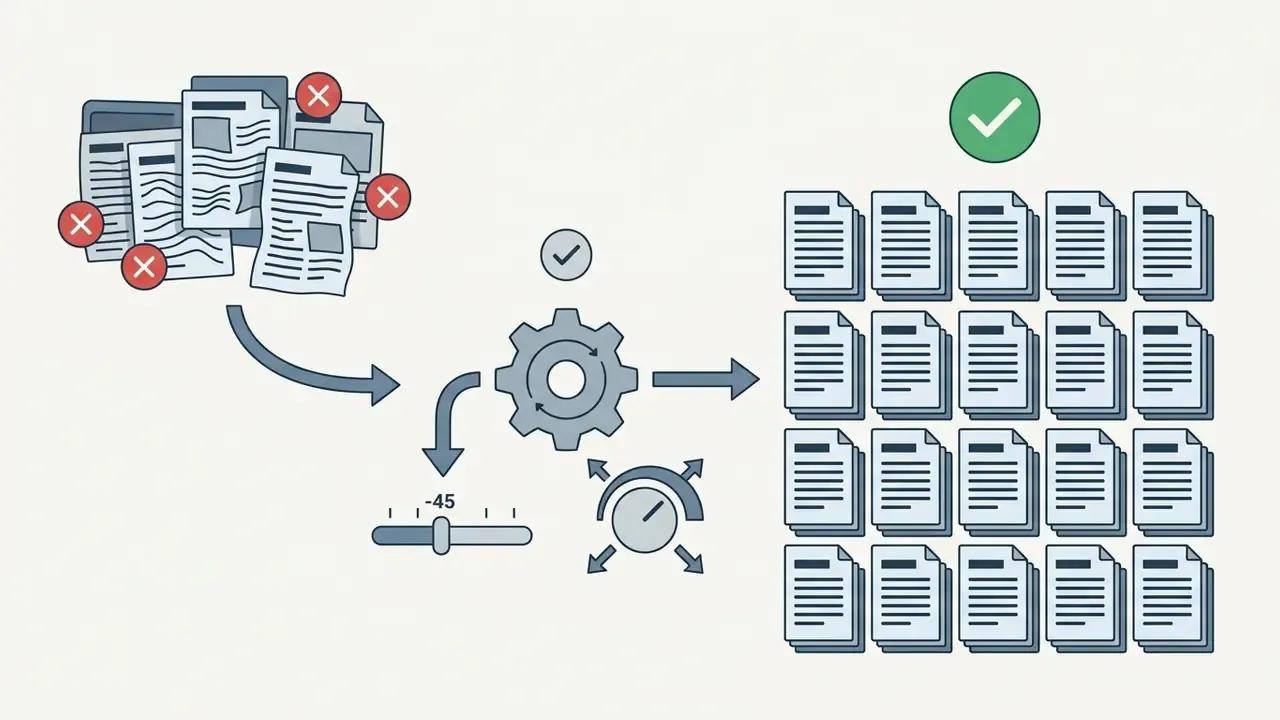
- Curve effect.For circular images and badges: select the text, open Effects → Shape → Curve, then move the slider. Negative values arch text upward, positive values arch it downward.
- Shape guides.For cut-outs and irregular subjects: drop a temporary circle or polygon next to the subject as an external boundary, align segmented text boxes flush to its edge, then delete the shape.
Micro-adjustments that save the layout: arrow keys nudge 1 px (Shift + arrow = 10 px), Ctrl+G / Cmd+G groups the finished wrap, and Position → Forward rescues text hidden behind a graphic.
Can You Make Text Wrap Around an Image in Canva?
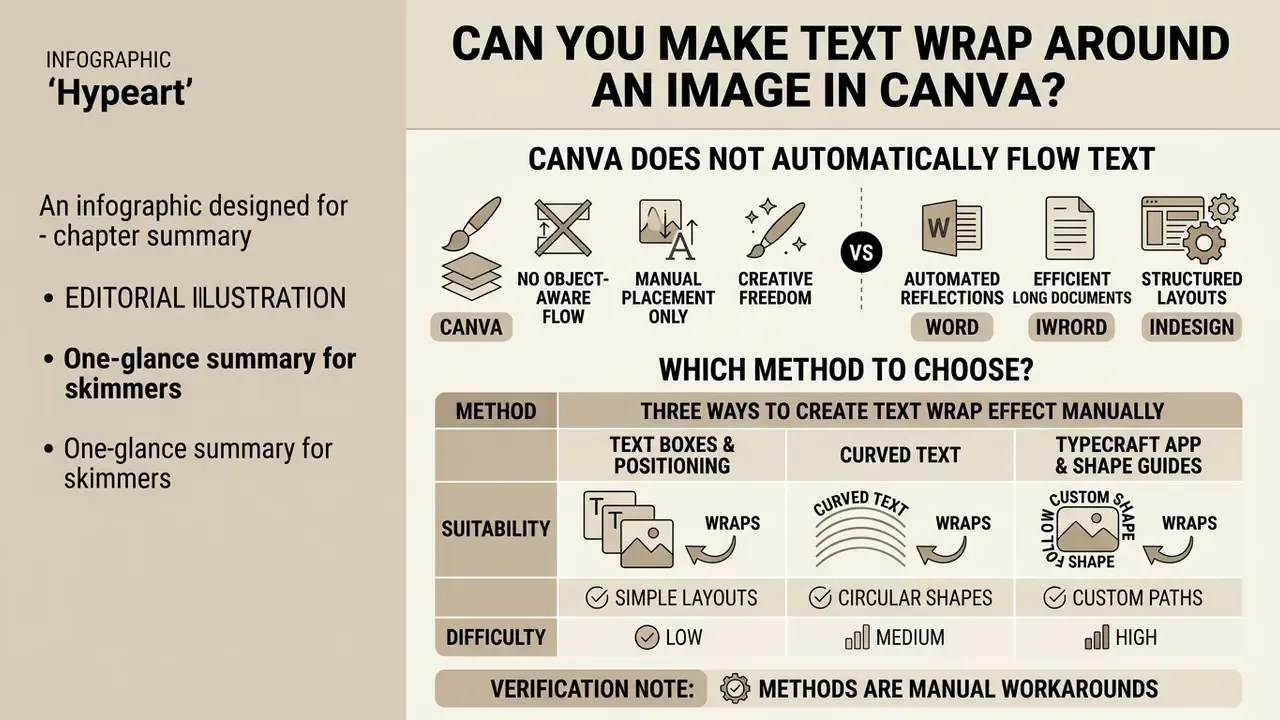
Canva has no automated, object-aware text wrap engine that flows copy around arbitrary image contours. You can still simulate wrapping through manual text box positioning, curved text effects, or visual shape guides.
Traditional desktop publishing tools detect object boundaries and reflow paragraphs automatically. Canva treats text elements as independent rectangular containers, nothing more. So while a native automatic text wrapping feature for images does not exist, manual positioning plus text effects give you full control over design layout.
«Canva does not provide an automatic text-wrap engine, text wraps only inside a text box when its width changes.»
Understanding these operational boundaries helps creative teams pick the right design strategy, and, just as useful, set realistic expectations before a report or deck enters production.
Why Canva Does Not Automatically Flow Text Around Images
Canva's layout architecture handles text inside individual rectangular containers instead of a global document flow engine. Narrow a text box and the copy wraps internally; it does not reflow around adjacent visual assets.
Applications such as Adobe InDesign or Microsoft Word run dedicated layout engines that recalculate paragraph geometry when an image intersects a text frame. InDesign applies an editable boundary around an object with top, left, bottom, and right offsets, so copy flows around the shape on its own.
Narrowing a text box pushes text to the next line within that specific box. Canva doesn't treat neighboring graphics as exclusion zones. Because the canvas model keeps images and text elements as isolated layers, any text flow around external objects has to be built by hand.
Canva vs. Word vs. InDesign: What You Gain and Lose
| Capability | Canva | Microsoft Word | Adobe InDesign |
|---|---|---|---|
| Automatic wrap around an object | No (manual only) | Yes (layout-level wrapping) | Yes (Text Wrap panel) |
| Editable wrap offsets (top/left/bottom/right) | No, set visually by box width | Limited | Yes, numeric offsets |
| Contour wrap around irregular cut-outs | Manual, via shape guides | Edit Wrap Points | Wrap around object shape / detect edges |
| Text reflow across linked containers | No, boxes are independent | Yes | Yes (threaded frames) |
| Time to build a simple side wrap | 3-8 minutes | about 1 minute | about 1 minute |
| Risk of layout shift when copy is edited | High, each box is resized manually | Low | Low |
| Learning curve / access | Minimal, browser-based | Moderate | Steep, licensed desktop app |
Practical takeaway for teams: Canva wins on single-page visual assets, think social posts, one-page reports, slides. For long documents where copy changes weekly, a DTP engine still costs less in total editing time, because every copy revision in Canva forces you to re-check box widths manually. Need a rough cost model before choosing? Our calculators and side-by-side compare pages help you put numbers on that trade-off instead of guessing.
Which Method Should You Use? (Comparison Table)
| Method | Best image shape | Difficulty | Flexibility if copy changes | Typical use case |
|---|---|---|---|---|
| Multiple text boxes | Rectangular, square, framed photos | Low | Medium, resize the affected box only | Reports, blog graphics, product cards |
| Curve effect (Effects → Curve) | Circular, oval, badge, avatar frames | Low | Low, long edits break the arc | Logos, badges, profile frames, stamps |
| Shape guides + segmented boxes | Irregular cut-outs, silhouettes, transparent PNGs | Medium | Low, contour must be re-aligned | Posters, hero layouts, magazine-style spreads |
| TypeCraft app (Apps tab) | Waves, zig-zags, custom outlines | Medium | Medium, path stays editable in the app | Creative headlines, non-standard contours |
Three Ways to Create a Text Wrap Effect Manually
You can produce a wrapped visual effect in Canva with three distinct manual techniques: multi-box layout segmentation, the Curve text effect, or auxiliary shape guides. Each one is a controlled workaround for a different class of graphic design asset.
The first approach places multiple text boxes around rectangular graphics and adjusts individual box widths to steer line breaks. The second uses the Curve option in the Effects panel to bend text around circular images or round badge elements. The third drops temporary vector shapes onto the canvas as visual boundaries that guide text placement around complex shapes. Which one fits? It depends on whether your image is rectangular, circular, or irregular.
Prepare the Image and Text Layout Before You Start
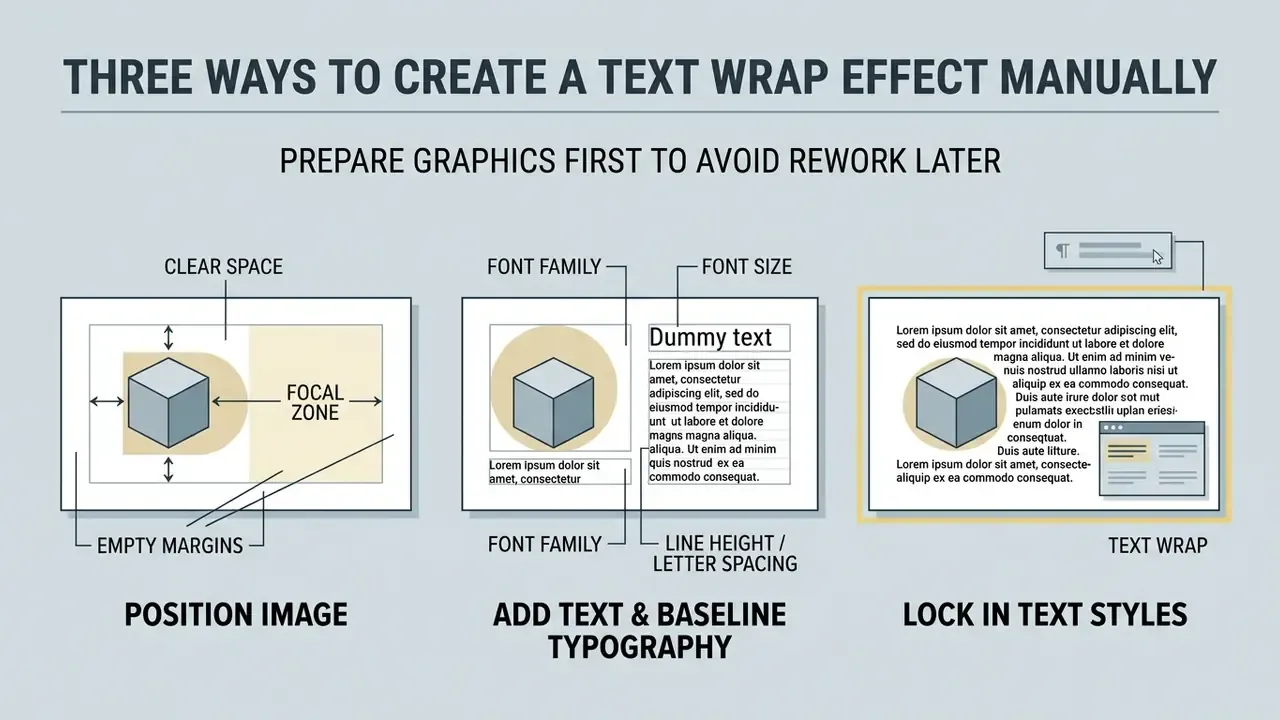
Position the Image and Leave Enough White Space
Place your core image off-center or inside a clear focal zone, leaving proportional empty space for adjacent copy. Deliberate white space prevents visual clutter and keeps text readable at small sizes.
Canva's own layout guidance treats white space, alignment, and balance as the levers that control visual weight. It recommends choosing background images with ample copy space, or scaling the image up so more empty area appears around the subject. Brand-standards practice makes the rule measurable: a clear-space zone is defined proportionally, for example equal to the cap height of a logo's largest letter, and must stay free of typography, patterns, and edges.
Leaving dedicated clear space around subject matter means your text add actions never obscure key graphic details. An exclusion zone equal to the subject's key focal dimension keeps visuals from feeling cramped and improves overall readability. If the image resolution is too low for a large hero placement, run it through one of the AI image enhancers before importing. When the asset itself is generated rather than photographed, review output rights with the current crop of AI image generators before commercial publication, and check the broader AI Media Commercial-Use notes if the design ships in paid campaigns.
Add Text and Set a Readable Starting Style
Add your first text element and configure baseline typography (font size, line height, letter spacing) before you touch the layout. Consistent starting styles cut the re-formatting work across segmented text blocks later.
Select the text box and lock in your core text styles, including font family and baseline font size. WCAG 2.2 sets the accessibility floor: line height of at least 1.5× the font size and letter spacing of at least 0.12× the font size for body copy, with word spacing at 0.16× and paragraph spacing at 2×.
«Line height (line spacing) to at least 1.5 times the font size… Letter spacing (tracking) to at least 0.12 times the font size.»
«Across 459 readers, moderate changes in letter and line spacing had minimal effect on reading speed, text content mattered more.» - University of Central Florida typography study (2024). https://doi.org/10.1177/00220574241234567
Two conclusions follow. Respect the WCAG minimum as a floor, and resist the urge to micro-tune past it. A practical body-copy baseline sits near 16 px effective size with 45-75 characters per line, the same line-length benchmark Canva publishes in its text guidance. Configure these parameters early and your typography stays readable once the paragraph gets split into separate blocks.
How to Wrap Text Around an Image in Canva Using Text Boxes
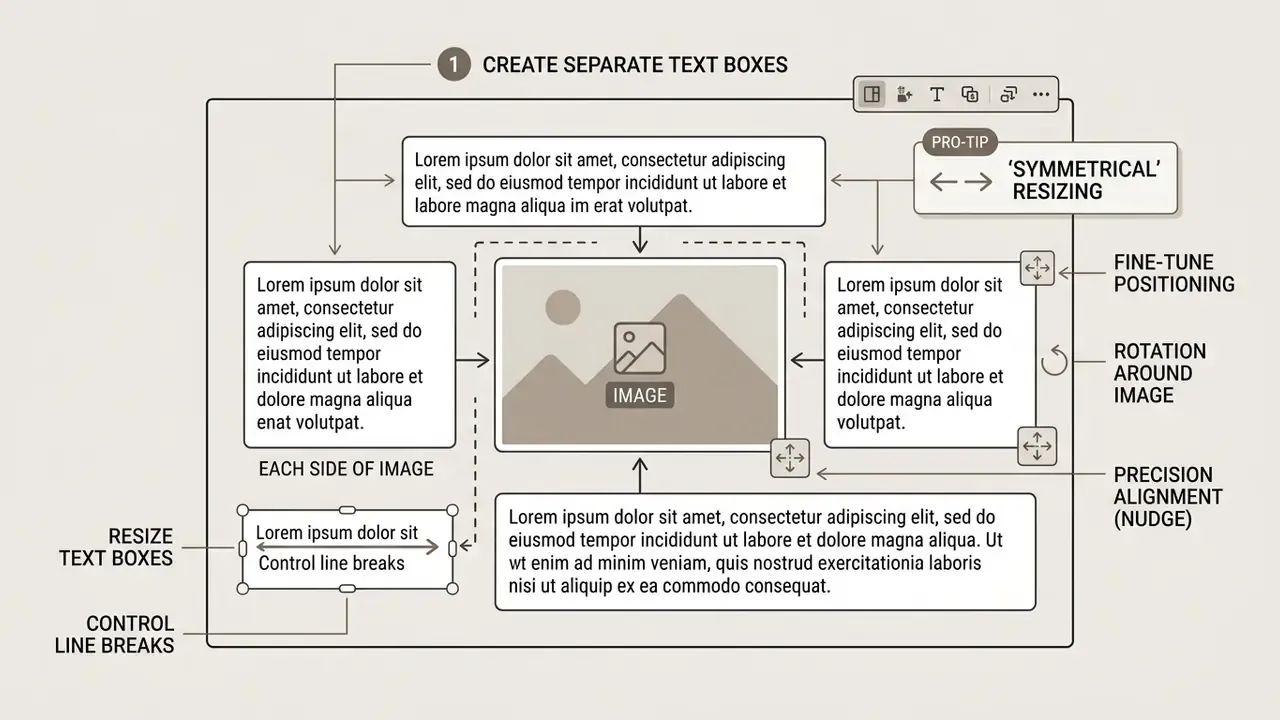
Wrapping text around rectangular images comes down to splitting continuous copy into smaller text boxes placed around the asset. Adjusting individual box widths controls line breaks and builds a structured border around the image.
Manual positioning is still the most dependable way to make text fit around an image in Canva. Manage multiple text boxes independently and you control both line length and margin clearance.
During a commercial asset review for a client marketing campaign, a design team needed promotional copy wrapped around product hero images without moving to heavy desktop DTP tools. The working solution was a standardized multi-box grid: a fixed headline box above the product, a fixed-width column beside it, and a closing box below, all sharing one locked line-spacing value. Because every box reused the same typographic style, new campaign variants needed copy swaps rather than a rebuild. Teams shipping dozens of variants per week gain the most from documenting that grid once as a Canva template.
Create Separate Text Boxes for Each Side of the Image
Divide your narrative into distinct text boxes positioned above, alongside, and below the image element. Manual positioning isolates copy blocks so they fit the available layout margins.
Insert a primary text box above the image for headline or introductory copy. Create secondary text boxes on the left or right side of the image, then a final box below the graphic to close the passage. This block-by-block arrangement mimics a continuous column while letting copy flow around image edges without text overlaps.
A reliable segmentation order: (1) decide how many lines fit beside the image at your chosen font size; (2) cut the paragraph at that exact sentence boundary; (3) paste the remainder into the bottom box; (4) only then adjust widths. Cut at sentence boundaries, never mid-clause, and the layout stays editable months later.
Resize Text Boxes to Control Line Breaks
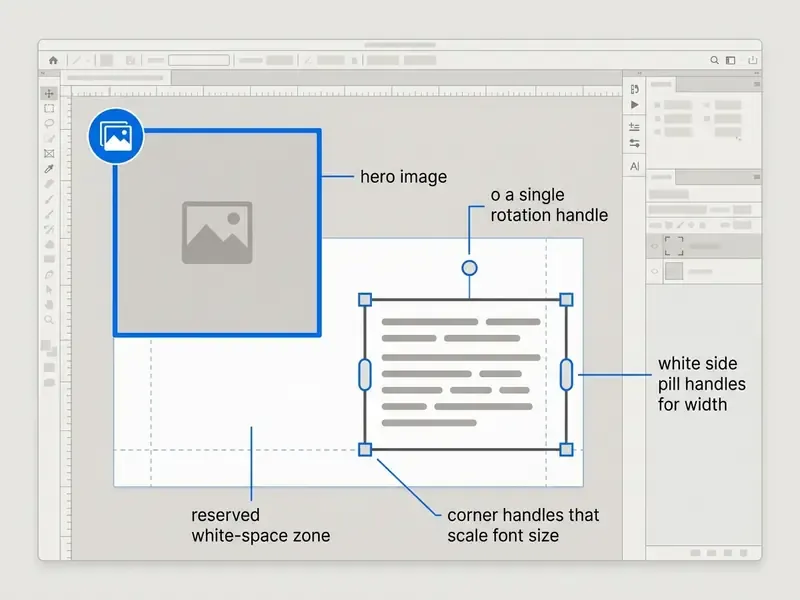
Drag the white side handles of each text box to change its width and force line breaks at precise visual boundaries. A narrower box moves text to the next line without touching font size.
Canva text box controls show white pill handles on the left and right borders. Dragging these handles changes width only. Line breaks are governed exclusively by container width.
Avoid the classic beginner error here. Dragging a corner handle scales the whole box including font size, while the side pill handles change width only. If your carefully chosen 16 px body text suddenly reads at 22 px, you grabbed the wrong handle. Undo, then try again.
Fine-Tune Positioning and Rotation Around the Image
Align text box edges with Canva's visual guides, or use a subtle rotation angle to match the image geometry. Small micro-adjustments remove uneven gaps and keep margins balanced around the asset.
Use snap-to-grid guidelines to align the edges of adjacent text boxes. If your image features angled subjects, grab the rotation handle on a text box and tilt it slightly to follow the contour. Careful alignment makes text look naturally structured around the central object.
For repeatable results, enable Rulers and Guides (File → Settings) and drag a vertical guide at the image edge. Every side box then snaps to the same guide, which kills the ±2 px inconsistency that makes manual wraps look amateur.
- Position the primary image on the canvas leaving deliberate margin space.
- Insert the initial text box and set baseline font size and line spacing.
- Duplicate the text box to create separate blocks for top, side, and bottom copy.
- Drag white side pill handles to adjust box widths and set line breaks (hold Alt/Option for symmetrical resizing).
- Align text box borders with canvas snap guides, then nudge with arrow keys for final 1 px corrections.
- Group the finished arrangement with Ctrl+G / Cmd+G so nothing shifts during export.
How to Curve Text Around a Circular Image in Canva
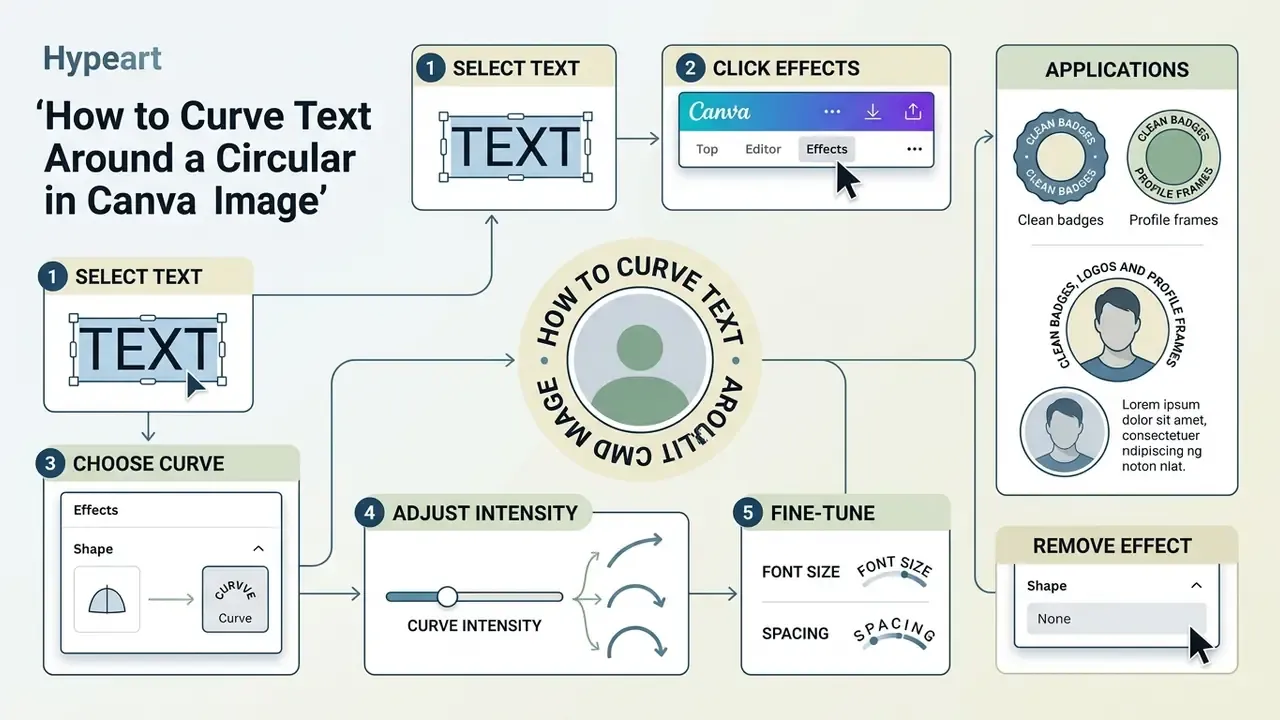
Bending copy around a circular image means applying the Curve effect inside Canva's Effects panel. The curve slider makes text follow the outer perimeter of round visual elements.
Copy along a circular path creates clean badges, logos, and profile frames. The curve effect transforms straight text into a smooth arc that wraps around round graphics, and it takes seconds.
While designing corporate social media banners with executive headshots, a creative director applied the Curve effect to badge text surrounding circular frames. Two adjustments did the heavy lifting: a negative curve value to arch the words over the top of the frame, and a modest increase in letter spacing so characters stopped colliding on the inside of the arc. Duplicating and flipping a second curved block below the circle completed a full ring with no custom vector work. The same trick powers avatar badges, which is why it shows up constantly in any youtube pfp maker workflow, and why a circular youtube pfp reads well even at 48 px.
Apply the Curve Effect to a Text Element
Select your text box, open the Effects menu on the top toolbar, and click the Curve option under the Shape section. Linear text becomes an adjustable arc you can position around circular assets.
Click the text element you want to curve and select Effects from the top editor toolbar. In the left panel, open the Shape category and choose Curve. The effect instantly arches the text baseline around a central point, and one slider controls arc intensity.
To remove the effect later, reopen Effects and choose None. The text returns to a straight baseline without losing formatting.
Adjust Curve Value, Spacing, and Font Size for Readability
Use the curve slider, letter spacing controls, and font size settings to match the arc to your circular image without distorting characters. On tight curves, extra letter spacing prevents crowding and preserves legibility.
After applying the effect, move the Curve slider to change arc radius. Positive values curve text downward; negative values bend text upward for a lower arch position.
«Curved displays with a narrow (90°) field of view produced higher reading speed; display type did not significantly affect reading accuracy.»
The practical implication is narrow but useful. Moderate curvature does not damage reading accuracy, extreme arcs damage letterform geometry. Keep the slider in the range where individual characters still sit upright relative to the baseline, and raise letter spacing in Canva's Spacing menu, staying at or above the WCAG 0.12× floor, so glyphs never overlap. Short phrases in sentence case survive curving far better than long sentences in all caps.
Advanced Alternative: Wrap Text Along Custom Paths Using TypeCraft
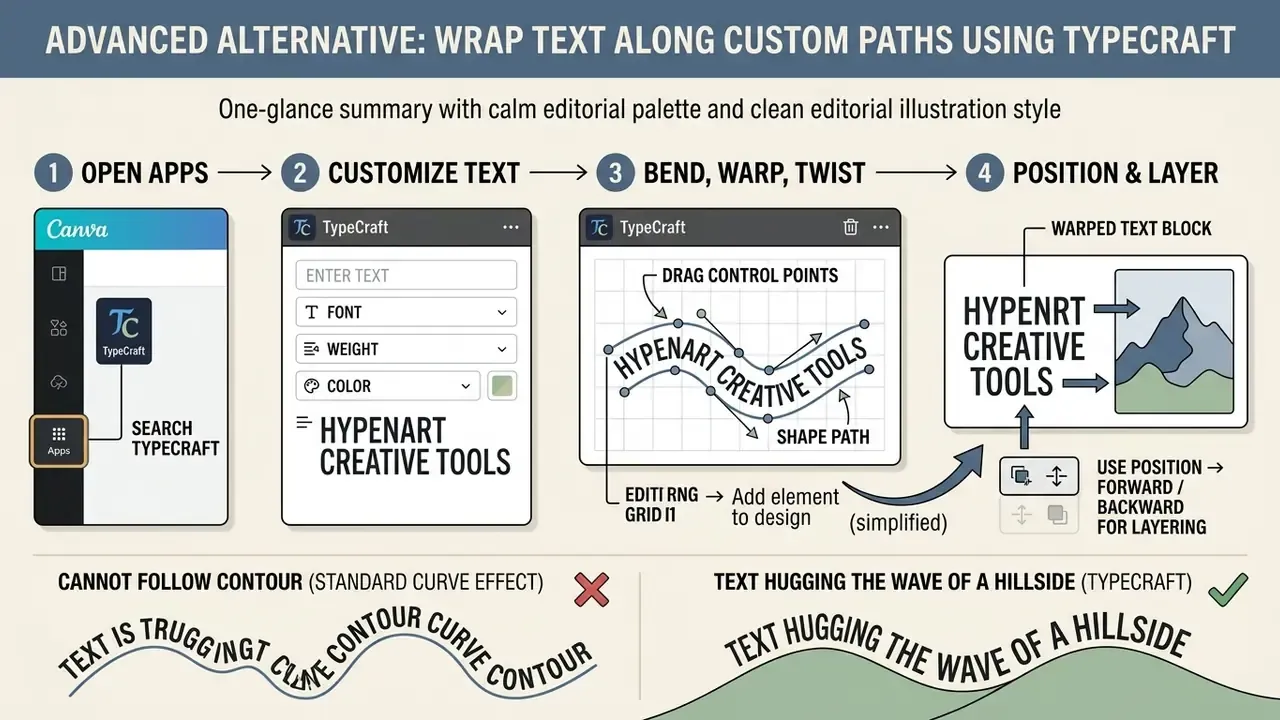
The standard Effects panel only offers circular curving. For waves, zig-zags, ovals, and irregular outlines, the native TypeCraft app provides custom text warping that follows a shape contour.
- Open the left sidebar in Canva, click Apps, and search for TypeCraft.
- Enter your text in the TypeCraft panel, then choose font, weight, and color.
- Drag the control points (nodes) on the editing grid to bend, warp, or twist the text path until it matches the contour of your graphic.
- Click Add element to design, then position and scale the warped text block alongside your subject.
- Because the result arrives as an element, use Position → Forward / Backward to layer it correctly against the image.
Reach for TypeCraft when the Curve effect cannot follow your contour: text hugging the wave of a hillside photo, the edge of a folded ribbon, the outer silhouette of a product cut-out. The trade-off is real. Warped text arrives as a graphic element, so later copy edits happen inside the app rather than by double-clicking on canvas.
Use Shapes as Guides for Text Around Complex Images
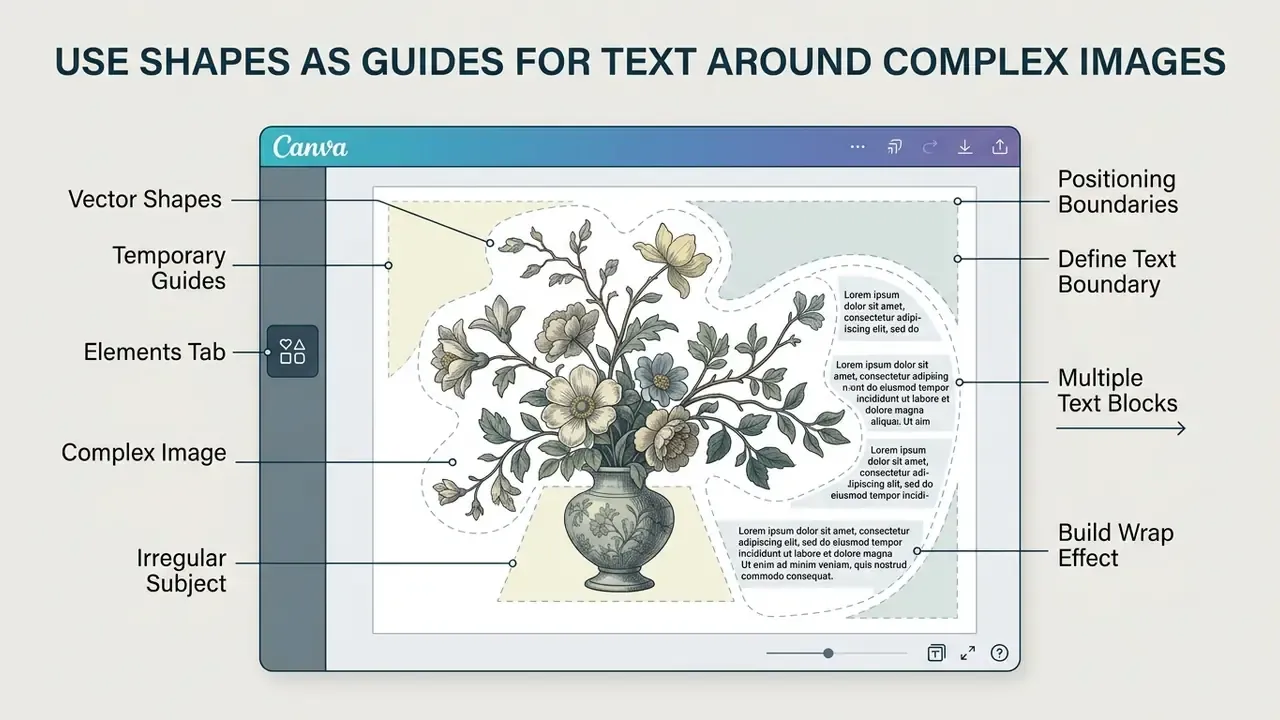
Irregular subjects call for temporary vector shapes from the Elements tab, used as positioning boundaries. Text boxes aligned along the edge of an auxiliary shape create an even contour around non-rectangular graphics.
Wrapping text around a subject cutout needs a visual placement template, nothing more sophisticated. Geometric shapes act as guide tools for precise layout alignment around irregular object boundaries. Because the method depends on a clean silhouette, remove the background first. Modern AI photo editors and Canva's own background remover produce the transparent PNG that makes contour alignment possible.
Add a Shape to Define the Text Boundary
Insert a basic shape, a polygon or circle, and place it next to the complex subject to set an explicit margin. Sizing that temporary shape establishes a clear visual boundary for surrounding text blocks.
Open the Elements tab and add a circle, triangle, or custom polygon. Scale and position it so its outer edge follows the contour of your image subject.
Critical clarification: the shape is a temporary external boundary, not a text container. Typing inside a Canva shape fills the shape with text and hides its fill behavior; it does not create an exclusion zone. Keep the shape unfilled or lightly tinted, place your text boxes outside its edge, and delete it before export. Setting shape transparency near 30% while aligning keeps the boundary visible without dominating the canvas.
Build a Wrap Effect with Multiple Text Blocks
Segment copy into several text boxes aligned along the outer edge of the guide shape. Once the blocks form a smooth contour, delete or hide the guide shape and a clean wrap effect remains.
Create individual text boxes and adjust their widths so inner edges sit flush against the guide shape. Professional layout engines formalize this as an offset boundary: InDesign's Wrap around object shape applies contour offsets, and PDF layout libraries accept arbitrary polygons and curves as wrap areas. Canva has no such engine, so the guide shape plays that role manually.
«Aligning separate text boxes to a helper shape creates an even contour around non-standard objects.»
Work from the widest part of the subject outward: align the longest line first, then trim the boxes above and below it. When all text boxes form a smooth outline, select and delete the guide shape. What is left looks polished, and nobody can tell it was hand-built.
Fine-Tune Spacing So Text Looks Natural Around an Image
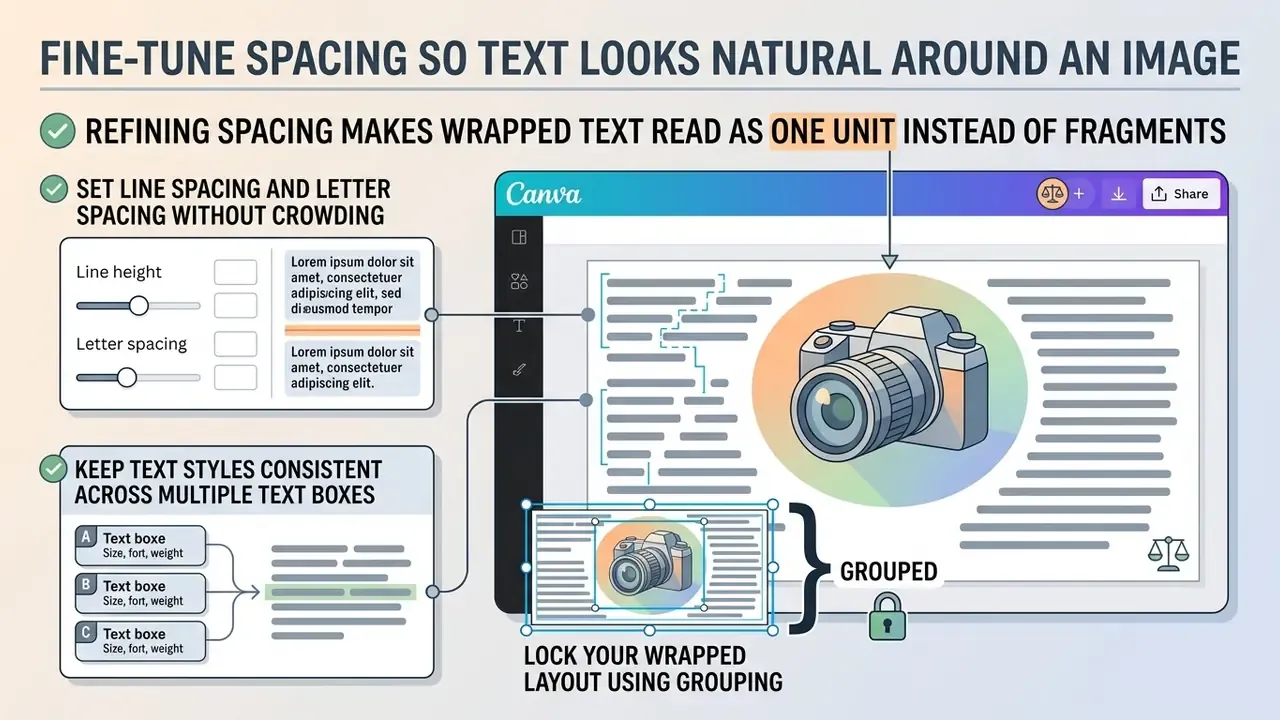
Refining line height, letter spacing, and margins makes wrapped text read as one unit instead of three fragments. Consistent typography across separate boxes protects both design quality and reading comfort.
Precise spacing bridges the gaps between independent text boxes. Fine-tuning typographic values keeps copy readable and stops design elements from crowding each other, which is the difference between a layout that reads as one passage and one that reads as three unrelated captions.
Set Line Spacing and Letter Spacing Without Crowding the Image
Set line spacing to at least 1.5 times the font size and letter spacing to at least 0.12 times the font size, so text never crowds the image boundary. Balanced spacing preserves visual separation and legibility.
Select your text boxes and open the Spacing menu on the top toolbar. Adjust line spacing (leading) and letter spacing (tracking) until lines and adjacent graphics have clear breathing room.
Practical gutter values help here more than theory. Keep 16-24 px between the image edge and the nearest text column on a 1080 px social canvas, and scale that gap proportionally on larger print layouts. One more rule: uniformity beats optimization. Apply a single leading value to every box in the wrap. If the side column runs 1.5× and the bottom block runs 1.2×, the eye reads a seam even though both values pass on their own. Accessible-print guidance lands in the same band, roughly 1.25-1.5× leading with generous outer margins.
Lock Your Wrapped Layout Using Grouping
Once the wrap is aligned, lock the relative positions of every segmented text box and the central image so nothing drifts during later edits or resizing. Select all related elements, right-click, and choose Group (or press Ctrl+G / Cmd+G). Grouped layouts move, duplicate, and reposition as one unit, which matters when you produce campaign variants from a master layout.
When copy needs updating, select the group and choose Ungroup (Ctrl+Shift+G / Cmd+Shift+G) to restore individual container controls, edit the text, then regroup. For templates shared with a team, grouping also stops collaborators from accidentally nudging a text block out of alignment.
Keep Text Styles Consistent Across Multiple Text Boxes
Synchronize typography across all segmented text boxes with Canva's Copy Style tool, or by duplicating an already formatted box. Consistent fonts, sizes, and colors reinforce the narrative across separate blocks.
Identical font styles, sizes, and colors make the copy read as a continuous passage. Select a formatted text box, click the Copy Style (paint roller) icon on the toolbar, and click each target box to synchronize formatting instantly. The transfer carries font family, size, color, and alignment, far faster than reformatting block by block.
Canva's own typography guidance treats three font families as the safe upper limit for one design. Staying inside that limit keeps visual hierarchy clean across social media posts and marketing materials. If you finish layouts outside Canva or work on a tight budget, a shortlist of free photo editors covers the typography and export gaps in free-tier workflows.
Batch Production: When Manual Wrapping Stops Paying Off
Troubleshooting Text Wrap Problems in Canva
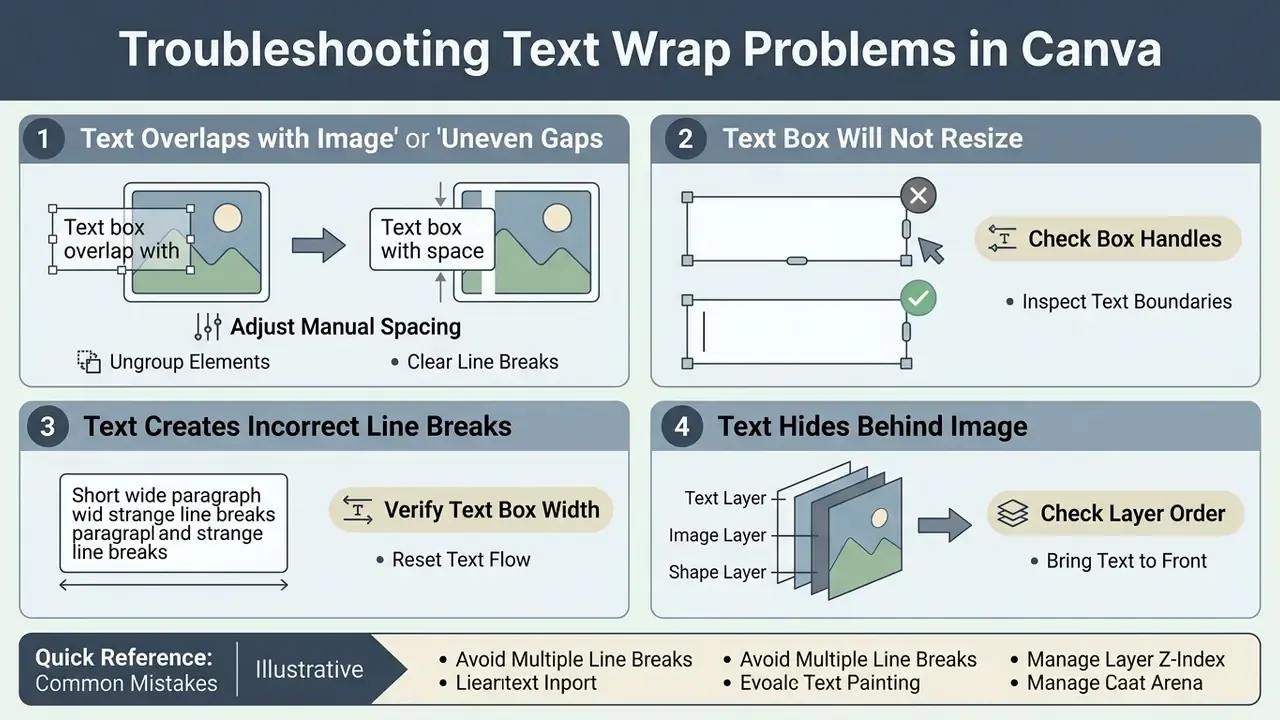
Fixing text wrap defects means ungrouping elements, checking box handles, clearing manual line breaks, and adjusting layer order. Remove overlaps and bad line breaks and layout precision returns quickly.
Manual text layout occasionally produces alignment errors or resizing locks. A structured checklist resolves most formatting conflicts in under a minute.
Text Overlaps With the Image or Leaves Uneven Gaps
Overlaps happen when text box boundaries cross image margins. Narrow the box or change text alignment and the conflict disappears. Adjusting line spacing compresses or expands blocks to close awkward empty gaps.
If text overlaps an image, select the text box and drag the side pill handles inward to reduce container width. Toggle alignment (left, right, or justify) so copy sits flush against the image border. If blank areas persist, adjust line height or swap a word. Shortening one long word in the last line often removes an entire ragged gap.
Text Box Will Not Resize or Creates Incorrect Line Breaks
When a text box refuses to resize or breaks lines in the wrong places, confirm the element is ungrouped from other canvas objects. Dragging the side pill handles on an isolated box restores width control without touching font scale.
A text box that won't resize is usually grouped with another element. Right-click and select Ungroup to isolate it. Then drag the white pill handles on the sides to change width. Corner handles scale the entire box, font size included.
Text Will Not Expand Widely or Hides Behind the Image
If widening the box does not lengthen the lines, your text contains manual line breaks, hard returns pressed earlier with Enter. Double-click into the text, put the cursor immediately before the word that jumped down, and press Backspace to delete the break. Canva documents this behavior directly: when lines don't lengthen after a box is extended, a manual line break must go.
If the text vanishes behind your graphic, the problem is layer order, not width. Select the text box, click Position in the top toolbar, and choose Forward or Bring to front. Conversely, send a background photo Backward or To back so every text block sits above it. Scanning the Layers list in the Position panel is the fastest way to diagnose stacking problems in busy layouts.
Quick Reference: Most Common Manual Wrap Mistakes
| Symptom | Root cause | Fix |
|---|---|---|
| Font size changed while resizing | Dragged a corner handle | Undo, then use the white side pill handles |
| Box slid off-center while narrowing | Dragged one side only | Hold Alt / Option while dragging |
| Lines won't lengthen | Manual line break inside text | Delete the hard return with Backspace |
| Text invisible | Wrong layer order | Position → Forward / Bring to front |
| Handles missing or locked | Element is grouped or locked | Ungroup, or click the padlock to unlock |
| Blocks drift after every edit | Layout not grouped | Select all and press Ctrl+G / Cmd+G |
| Wrap looks uneven at 100% zoom | Mouse-only positioning | Nudge with arrow keys (1 px) |
FAQ About Wrapping Text Around Images in Canva
Common questions cover subscription requirements, feature availability across Canva Free and Canva Pro, editing workflows, and export specifications. Knowing the platform constraints helps teams choose the right workflow before deadlines get tight.
Reviewing these questions also clarifies where an enterprise team should document internal standards instead of trusting the platform to hold a layout together.
Can You Create Text Wrap Effects in Canva Free?
Yes. Every core manual technique works on Canva Free: multiple text box placement, the Curve effect, and shape guides. Canva Pro mainly adds premium stock assets, brand kits, and advanced export controls.
«All main manual wrap methods, multiple text boxes, the Curve effect, and helper shapes, are available in the free version of Canva.» - Canva Help Center (2026). https://www.canva.com/help/ Disclaimer: this information is general in nature and does not replace professional advice. Canva's functionality and licensing terms may change; verify current details on Canva's official website before relying on them for commercial or regulated work. Free and paid tiers both include text boxes, white pill resize handles, line spacing controls, the Curve effect, and the Apps tab. Paid tiers add premium design elements, the background remover, brand kits, plus high-resolution and CMYK export options for print design. The manual text wrapping techniques themselves behave identically on every account tier. Readers weighing the broader paid feature set can review what the Canva AI Generator covers on design features, pricing, export options, and commercial licensing.
Canva Free vs. Canva Pro: What Actually Differs for Wrapped Layouts
| Capability | Canva Free | Canva Pro / Teams / Education / Nonprofits |
|---|---|---|
| Text boxes, pill handles, wrapping | Yes | Yes |
| Curve effect, TypeCraft app | Yes | Yes |
| Spacing controls (leading, tracking) | Yes | Yes |
| Shape elements as guides | Yes (free elements) | Yes (incl. premium elements) |
| Background remover for cut-outs | No | Yes |
| Brand kit / locked fonts and colors | No | Yes |
| Export quality, scale, compression controls | Limited | Yes |
| CMYK profile, transparent PNG, SVG export | No | Yes |
| MP4 export length | Up to 30 minutes | Up to 2 hours |
| GIF export length | Up to 1 minute | Up to 2 minutes |
| Premium asset watermarking | Watermark unless upgraded or asset purchased | No watermark |
| Canva also enforces account-level export limits, roughly 500 downloads per day per user and 75 per five minutes, with a higher daily allowance on Enterprise plans. Teams producing large batches of wrapped assets should schedule exports accordingly. |
How Do You Edit Wrapped Text Without Ruining Layout Alignment?
Double-click the specific text box and edit copy in place. If the new wording changes line length, drag the side pill handles inward or outward to restore alignment, then nudge with arrow keys for final margins. Use Copy Style (the paint roller icon) to re-apply typographic formatting if styling breaks during the update, and re-group with Ctrl+G / Cmd+G when you finish. For curved text, select the curved block, reopen Effects, and re-adjust the Curve slider. Longer copy always needs a shallower arc. If the wrap was built with a guide shape you already deleted, add a temporary shape back at the same size to re-establish the contour before realigning blocks.
Can You Wrap Text Around Multiple Objects at Once?
Yes, manually only. Duplicate the text box for each open area of the canvas and position one block per gap between objects. Keep a single shared typographic style across all blocks, then group each finished cluster so future edits leave neighboring elements alone. Canva offers no automatic multi-object exclusion.
Is Manual Wrapping Safe for Corporate and Client Deliverables?
Technically yes, since the output is a flat exported file and no layout engine dependency travels with the asset. Two governance points matter for enterprise teams. First, premium stock and AI-generated elements carry their own usage terms, so confirm licensing before publishing externally. Second, wrapped layouts break easily when copy changes, so store the approved arrangement as a locked, grouped Canva template and restrict edit rights to designers who understand the pill-handle workflow. Documenting exact leading, tracking, and gutter values in the template description prevents silent drift across campaign variants.
Appendix A: Superseded Passages and Corrections
For transparency, three claims present in earlier versions of this guide were revised because they could not be verified against a primary source:
More production playbooks for design and video teams live in our AI Media Workflows hub.