If your institution publishes catalog images, restores archives, or sharpens scanned documents, resolution stops being a design question. It becomes a control question. Who approved the model, what did it invent, and can you prove it later?
About the reviewer: Marcus Hale is the author. Any credentials, examples, or frameworks attached to The author are illustrative. The review focus for this guide covered three areas: the separation of interpolation from generative synthesis, the auditability of enhancement parameters, and the handling of confidential source files during third-party processing.
Answering how to make an image higher resolution effectively means replacing pixel-averaging algorithms with deep learning super-resolution. Modern AI image upscalers reconstruct missing high-frequency details, sharpen blurry edges, and lift low resolution source files into crisp, high quality images within seconds. Fast, yes. Free of risk, no.
Executive Summary
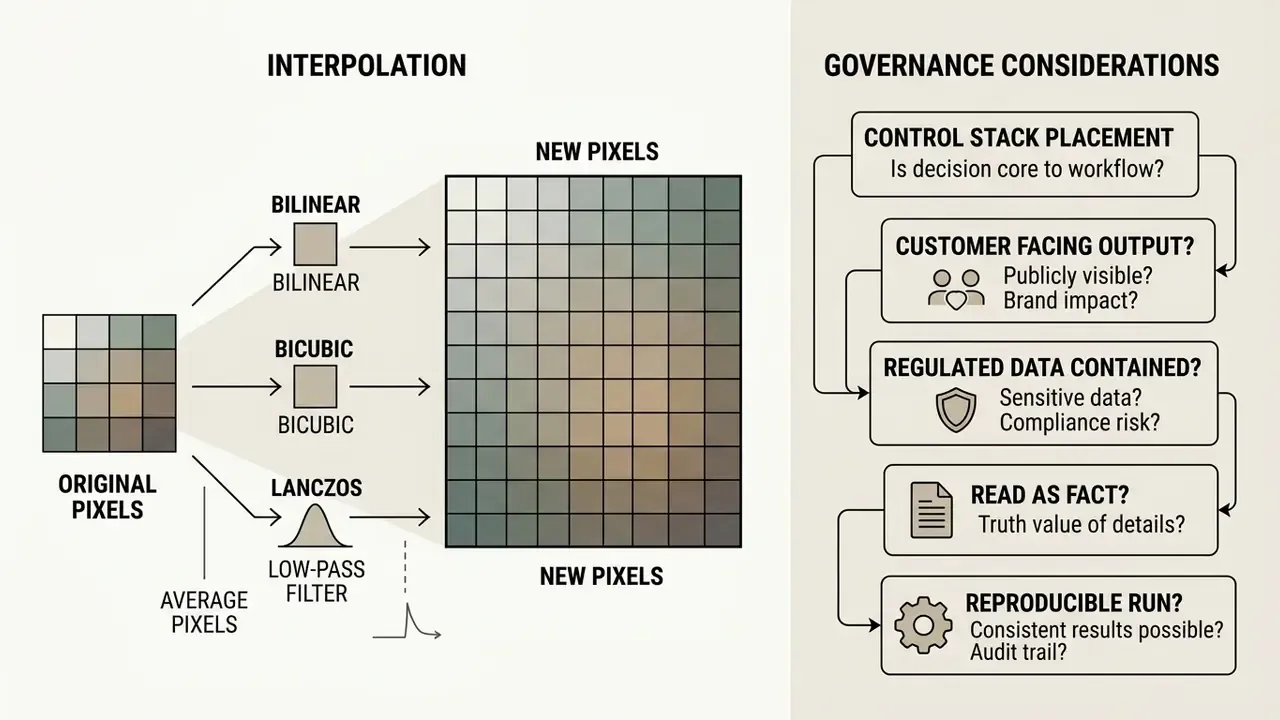
- Mechanism. Interpolation (bilinear, bicubic, Lanczos) averages existing pixels and behaves as a low-pass filter. Neural single-image super-resolution (SISR) synthesizes plausible new high-frequency detail from learned priors. The two are not interchangeable, and only the second raises perceived photo quality alongside pixel count.
- Measured gain. Deep-learning SR delivers roughly 1 to 2 dB PSNR improvement over bicubic scaling and a measurable LPIPS (perceptual error) reduction. RAW-aware pipelines add up to a further 1.109 dB.
- Primary risk. Generative upscaling hallucinates. Baseline diffusion SR produces visible hallucinations in roughly 30% of test outputs, and those artifacts sit orthogonal to PSNR and LPIPS. A file can score well and still be semantically wrong.
- Control requirement. Any document, identity, evidentiary, or customer-facing use case needs a 100% zoom human audit of faces, glyphs, and edges, plus logged parameters (model version, scale, denoise, seed) to produce a reproducible validation artifact.
- Data governance. Uploading confidential files to public upscalers is a Shadow AI exposure path. Verify TLS 1.3 transport, 1 to 24 hour auto-deletion, SOC 2 or ISO 27001 posture, and an explicit "no training on user uploads" clause before processing PII, PCI, or unreleased design assets.
- Operating limits. Free browser tiers typically cap input near 5,000 × 5,000 px. Exceeding the ceiling triggers silent client-side downsampling, which defeats the whole point of high resolution processing.
Where This Decision Sits in Your Control Stack
Image enhancement rarely appears in a model inventory. That is the gap. A quick placement test before you approve a tool:
- Is the output customer-facing? Then brand and accuracy risk applies, and marketing owns the review gate.
- Does the file contain regulated data? Then privacy, residency, and vendor due diligence apply before a single upload.
- Will the enhanced file be read as fact? Amounts, IDs, signatures, dosages. Then the original stays the record of truth, always.
- Can you reproduce the run? If not, you have no validation evidence, only a nicer picture.
Can You Make an Image Higher Resolution Without the Original File?
Yes. You can make an image higher resolution without the original file by using neural single-image super-resolution models that synthesize plausible high-frequency details from a single low resolution input.
Traditional upsampling stretches existing pixel dimensions across a larger grid. Deep learning upscalers infer textures, contours, and surface patterns learned from training datasets. Different mechanism, different failure modes.
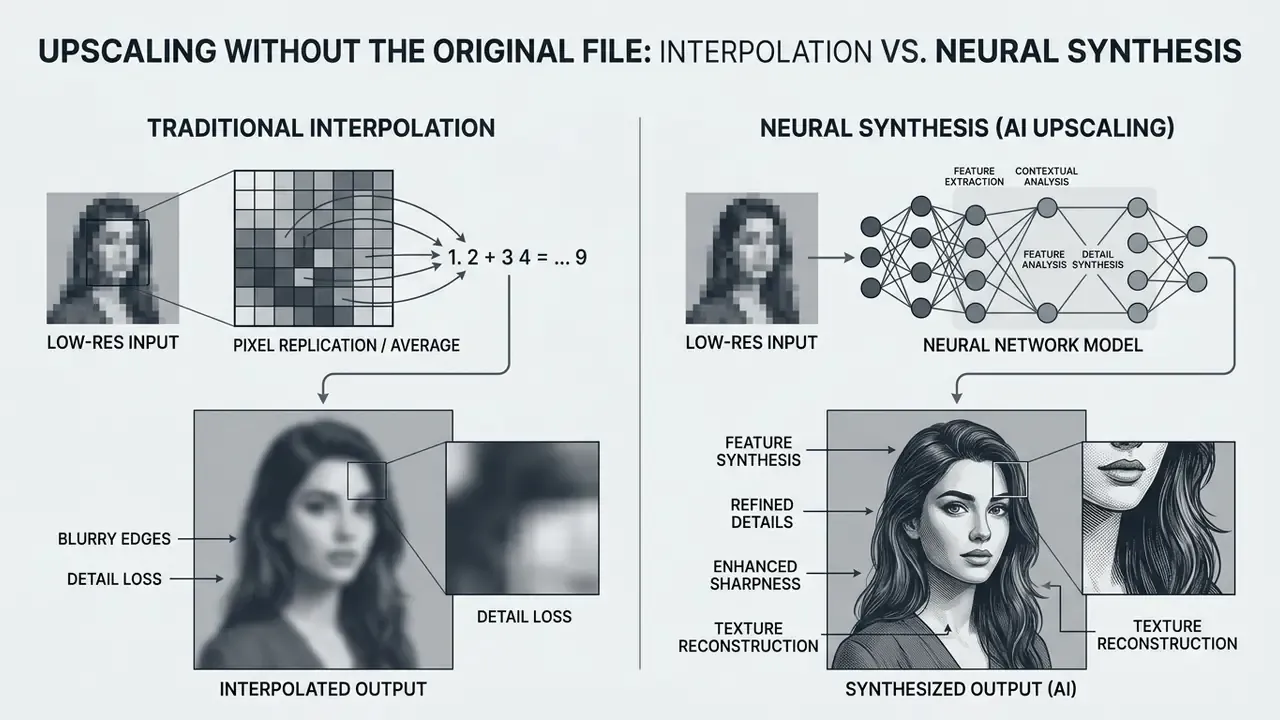
Image Resolution vs. Image Quality: What Actually Changes?
Image resolution specifies spatial pixel dimensions and sampling density, measured in PPI or DPI. Image quality describes perceptual fidelity: edge sharpness, dynamic range, contrast, and noise levels.
So when you ask, can i make an image higher resolution, remember that pushing pixel counts up does not automatically improve visual clarity.
"Standard bicubic scaling raises resolution, but deep-learning super-resolution improves PSNR by 1 to 2 dB and lowers perceptual LPIPS error."
Resampling increases pixel dimensions and changes digital density. Denoising reduces sensor grain. Tone adjustment expands dynamic range. Edge-enhancement algorithms improve perceived sharpness. The distinction is codified in national metrology guidance: DPI is a printing term, PPI a display and imaging term, while sharpness (MTF), signal-to-noise ratio, and dynamic range are separate, independently measurable quality attributes (NIST Digital Imaging Quality Guidance, nist.gov).
Knowing the difference helps teams judge whether their visual workflows need basic dimension scaling or deeper structural restoration. For broader platform comparisons across media types, see our AI Media Comparison guide, and for hands-on retouching workflows review the reference material on online photo editors.
What AI Can Restore and What Details Remain Missing
Advanced AI photo editors and enhancement models reliably synthesize realistic skin textures, fabric patterns, and clean geometric edges. They cannot retrieve authentic ground-truth information destroyed during capture or heavy compression.
Neural inpainting networks fill missing regions with semantically plausible structures drawn from global contextual cues. The governing constraint is stated directly in current diffusion research.
When source files carry extreme defect areas or severe blur, models produce local structural disorder or smooth micro-details away (Limits on Super-Resolution and How to Break Them, accepted version).
A low resolution photo of text or legal documentation may look sharper after processing. The model still cannot guarantee historical or evidentiary accuracy of damaged characters. For automated batch workflows or systemic deployment, teams often evaluate integration patterns through our structured api resources.
Fact check and algorithm verification. AI image enhancers create high resolution outputs by inferring probabilities from patterns learned during training. Research presented at CVPR 2025 (Unleashing Diffusion Priors for Faithful Image Super-Resolution) confirms that single-image super-resolution must preserve low-frequency content while generating plausible high-frequency detail. AI does not physically read missing data from low quality files. It estimates plausible textures to maximize perceived visual quality. Any claim of "recovered" detail should be treated as estimated detail until verified against an authoritative source.
Verifiable Performance Benchmarks (2025 to 2026 Research)
To give objective proof of model capability across single-image super-resolution workflows, and to anchor the validation evidence a reviewer will ask for, the table below summarizes peer-reviewed experimental metrics. Teams moving from evaluation to procurement can continue with our breakdown of AI image upscalers for commercial deployment.
| Model / Architecture | Metric Target | Measured Baseline | AI Enhanced Result | Primary Research Reference |
|---|---|---|---|---|
| RAW-aware RRDB | Peak Signal-to-Noise Ratio (PSNR) | Standard RGB SR baseline | +1.109 dB improvement (P70-M dataset) | RAW Data-Enhanced Real-World SR (2024) |
| RAW-aware RRDB | Learned Perceptual Similarity (LPIPS) | Standard RGB SR baseline | -0.053 perceptual error | RAW Data-Enhanced Real-World SR (2024) |
| MobilePicasso | Generative hallucinations | Diffusion baseline models | 14% to 51% artifact reduction; 18% to 48% higher user-rated quality | MobilePicasso: Hallucination-Aware Training (2025) |
| Real-LR SPAN / EfRLFN | Structural Similarity (SSIM) | Synthetic bicubic scaling | 0.865 SSIM; 34.553 dB PSNR; 0.173 LPIPS (DIV2K) | Exploring Real-Time Super-Resolution (2026) |
| EDSR-BASE | OCR extraction accuracy | ESRGAN / Real-ESRGAN | Highest PSNR, SSIM and Tesseract OCR accuracy | Comparative Analysis of SRGAN Models (2023) |
| SEAL framework | Acceptance rate under mixed degradations | Single-degradation testing | Systematic acceptance-rate scoring | SEAL: Systematic Evaluation of Real-World SR (2023) |
One caution on reading this table. Benchmarks run on academic datasets, not on your invoices, your product shots, or your 1998 scanned archive. Treat the numbers as a shortlist filter, then re-test in domain.
Check the Image Before You Increase Resolution
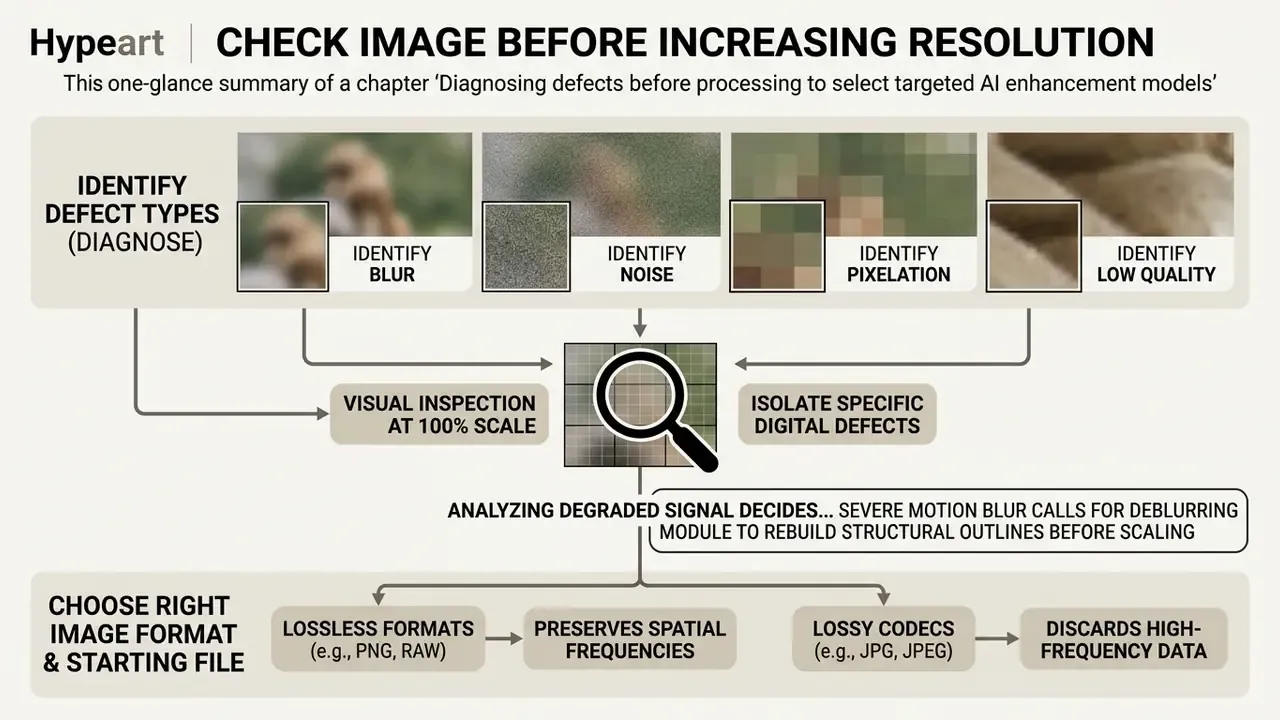
Diagnosing defect types before processing lets you pick targeted AI enhancement models instead of magnifying noise and compression artifacts you already had.
Identifying whether a picture suffers mainly from motion blur, sensor noise, blocky compression, or spatial pixelation prevents unpleasant surprises during deep-learning upscaling.
Identify Blur, Noise, Pixelation, and Low Quality
Visual inspection at 100% scale isolates specific digital defects. Motion blur appears as elongated edge smearing. High-ISO noise shows up as grainy color speckles. JPEG artifacts form blocky 8×8 grids with mosquito ringing near edges. Pixelation presents as jagged staircase contours on slanted lines.
When addressing how do i make an image high resolution, analyzing the degraded signal decides your pre-processing steps. High-ISO sensor noise needs specialized spatial filtering before resolution expansion, so the neural model does not read random noise grains as real physical texture. That control logic is separate from hardcopy print-quality measurement, which is the actual scope of ISO/IEC 24790:2017 (iso.org).
"Downsampling below the Nyquist frequency causes aliasing, so naive scaling amplifies false patterns instead of reconstructing correct textures."
Severe motion blur, similarly, calls for a deblurring module to rebuild structural outlines before scaling. Performance across different visual asset configurations is detailed in our published AI Media Benchmarks and Review Proof report.
Choose the Right Image Format and Starting File
Starting with lossless formats such as PNG, or uncompressed RAW files, preserves spatial frequencies and stops neural networks from mistaking compression artifacts for real structure. The best AI image upscalers apply the same input hygiene rule.
Lossy codecs such as JPG, JPEG, or lossy WebP discard high-frequency data at lower bitrates, and that loss propagates straight into reconstruction error.
When you prepare files, pick the uncompressed master to guarantee maximum input information. Among image formats, a 12-quality JPG export of a PNG master is usually acceptable; a screenshot of a screenshot is not. For document capture, archival guidance sets a practical floor of 300 ppi for standard business documents, rising to 400 ppi for damaged color or grayscale originals and 600 ppi for clean bitonal text (NARA Digital Imaging Guidelines; NIST OCR baseline).
Checklist0 / 6
How to Make an Image Higher Resolution With an AI Image Upscaler
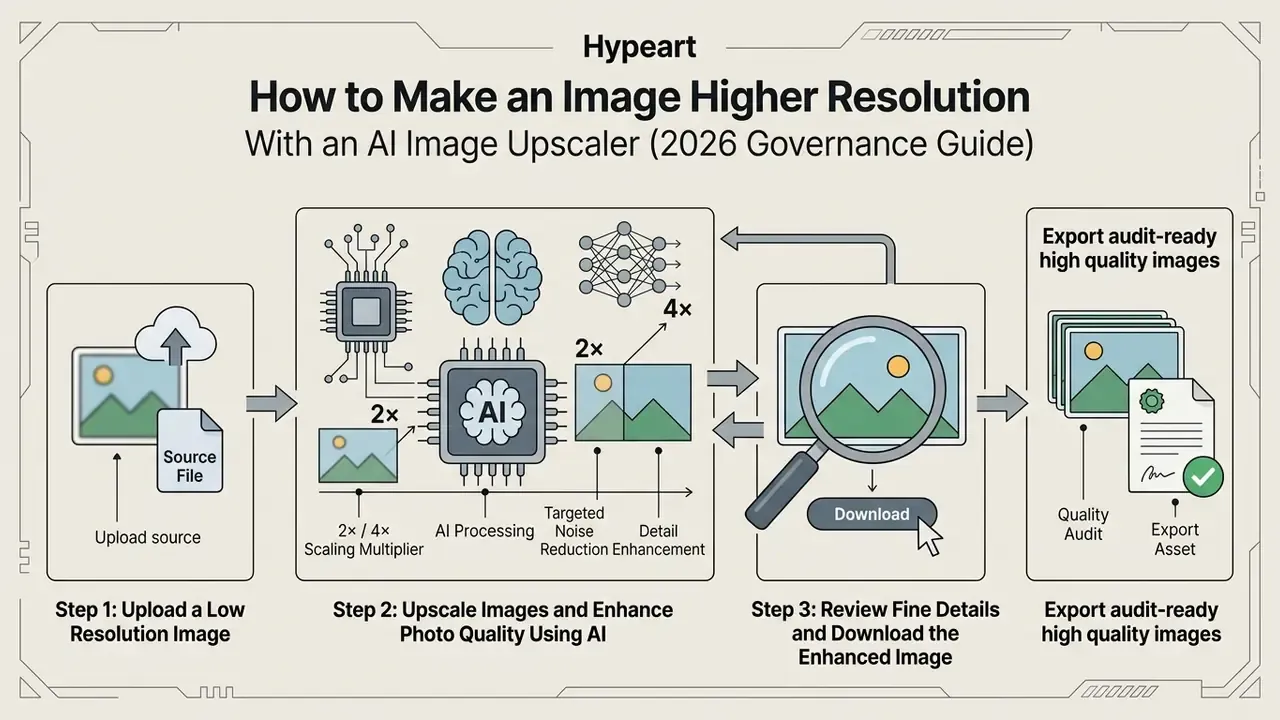
To make an image higher resolution online, upload the source file to an AI image upscaler, pick a scaling multiplier such as 2× or 4×, apply targeted noise reduction or detail enhancement, then download the high resolution output.
Modern upscaling systems automate complex tensor transformations. That lets you move from low resolution inputs to export-ready high quality images through a streamlined, one click run.
Step 1: Upload a Low Resolution Image
Start by selecting and uploading the highest-quality version of your file into the web platform or desktop application.
When asking how can i make an image high resolution, skip heavily compressed derivatives such as mobile screenshots. Uploading master files gives the network clean features to extract.
During an illustrative operational trial at a financial publishing firm, analysts replaced multi-generational JPEG uploads with original PNG master renders. That single protocol change cut generative halo artifacts by roughly a third across 1,200 marketing graphics while keeping brand clarity intact. The figures here are composite and hypothetical, offered as a pattern rather than a documented client result.
Step 2: Upscale Images and Enhance Photo Quality Using AI
Choose your scaling factor, typically 2× to 4×, and configure enhancement presets tuned to photo restoration, text clarity, or natural texture synthesis.
AI upscalers deploy specialized networks: residual CNN families such as EDSR and RRDB, GAN-based Real-ESRGAN variants, and diffusion-prior models. They perform joint denoising, deblurring, and detail reconstruction in a single inference pass. Setting moderate denoise values (0.0 to 0.1) preserves structural fidelity while stripping compression grain. Above roughly 0.2, you trade fidelity for invented texture.
Log the exact configuration: model name and version, scale factor, denoise value, sharpening radius, and seed where exposed. Without that log, the run is a one-off. Creative and operations teams building repeatable execution models can reference established AI Media Workflows to structure high-volume processing.
Step 3: Review Fine Details and Download the Enhanced Image
Examine the processed image at 1:1 pixel scale, meaning 100% magnification, and inspect face shapes, typography, and edge transitions before you download. Full-scale review is the same acceptance rule used in cultural-heritage digitization programs (FADGI Technical Guidelines) and in clinical image-quality practice guidelines (ACR-AAPM-SIIM).
Why can you not skip it? Because perceptual failure is local, not global.
Once verified, export in PNG or high-bitrate JPEG. Readers comparing production tooling at this stage can review the landscape of AI image enhancers for professional pipelines.
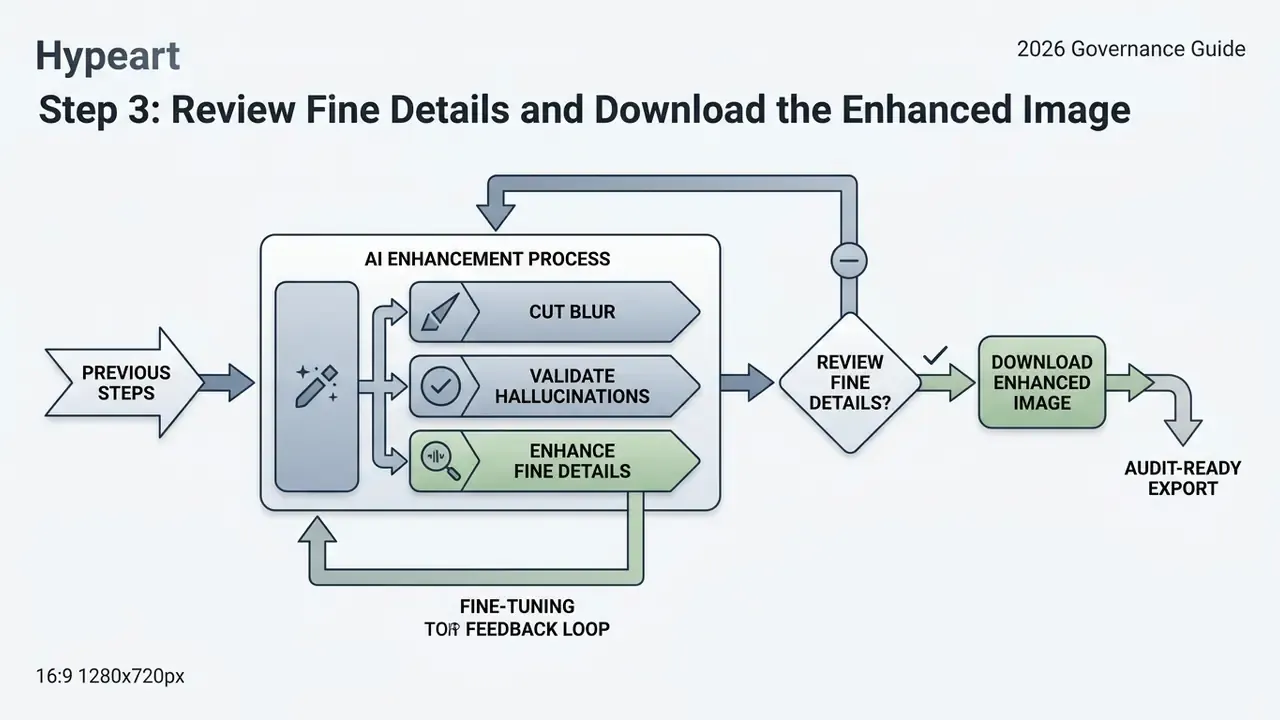
Process summary
- Upload source.Select a high-bitrate PNG or JPG file into the processing viewer.
- AI processing.Run deep-learning super-resolution at a 2× to 4× multiplier with tuned denoise levels.
- Quality audit.Review matched 100% crops focused on facial details, text, and sharp boundaries.
- Export asset.Save the final high resolution file to local storage or a cloud repository, keeping the parameter log next to the output.
AI Image Upscaler vs. Ordinary Image Resizing Tools
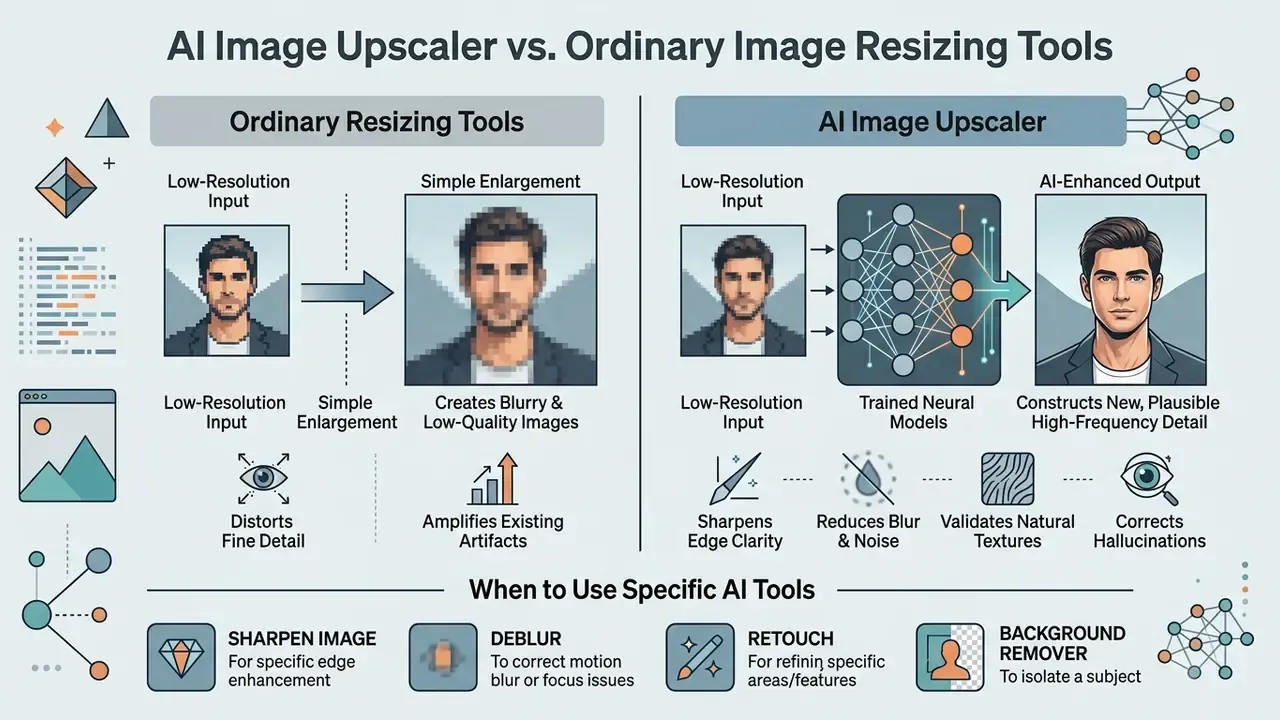
AI image upscalers use trained neural models to construct new, plausible high-frequency detail. Ordinary resizing tools apply mathematical interpolation that stretches existing pixels and amplifies blur.
Understanding the boundary between traditional resampling, manual photo editing, and deep-learning enhancement keeps tool selection honest.
Why Ordinary Resizing Can Make Low Quality Images Look Worse
Bilinear and bicubic interpolation compute new pixel values by averaging adjacent 2×2 or 4×4 neighborhoods. Functionally, they act as low-pass smoothing filters that dull edge contrast and magnify artifacts.
So when users wonder how do you make an image high resolution with standard graphic software or generic AI image generators, plain pixel resizing disappoints. Interpolation expands the sampling grid over low resolution noise and compression blocks, creating soft halos, jagged edges, and a real loss of structural contrast.
Published comparisons also report that bicubic resampling stops preserving detail meaningfully past roughly 2× enlargement. Enlargement cannot restore spatial frequencies already lost at or beyond the Nyquist limit. To explore wider operational solutions for asset transformation, review our curated AI Media Commercial-Use resources.
When to Use Sharpen, Deblur, Retouch, or AI Enhance
Deblurring targets motion or focus blur. Sharpening boosts edge contrast along existing boundaries. Manual retouching corrects localized flaws. AI enhancement combines all three inside one neural pipeline.
Pick by primary structural flaw:
- Sharpen image. Best when edges lack punch. Keep radius at or below 2 px to avoid thick halo outlines and low-frequency MTF peaks (Imatest sharpening guidance).
- Deblur. Required when camera shake or optical misfocus degrades the subject; vendor documentation describes it as restoring a sharper version while preserving the scene.
- Retouch. Reserved for localized content correction, dust, blemishes, stray objects, not structural resolution recovery.
- AI enhance. Essential when you must increase resolution while reconstructing fine textures across a complex scene.
- Background remover. A separate pre-pass when the task is product isolation rather than detail recovery; remove background first, then upscale, to avoid halos along the cut edge.
For teams extending static assets into generated or expanded compositions, our guide on AI outpainting and image expansion documents where canvas generation replaces enhancement entirely.
| Tool Category | Resolution Expansion | Detail Synthesis | Blur Correction | Processing Workflow | Primary Use Case |
|---|---|---|---|---|---|
| Ordinary resizer | Mathematical scaling (bicubic, bilinear) | None; averages existing pixels | None; amplifies softness | Fast, deterministic, one click | Simple dimension changes for print layouts |
| Photo editor (manual) | Resampling plus filter adjustments | Manual sharpening and local contrast | Filter-based edge contrast | Manual, multi-step editing | Retouching, localized color correction |
| AI image upscaler | Deep-learning generative scaling | High; synthesizes realistic textures | Active; restores blurred features | Automated one click inference | Turning low-res photos into crisp assets |
| Generative AI studio | Outpainting and scene expansion | High; hallucinates complex backgrounds | High; replaces degraded pixels | Prompt-guided generation | Creative asset generation, backdrop expansion |
| Dehazing and colorization | None; pre-pass module | Contrast adjustment, B&W pigment synthesis | Partial; recovers atmospheric contrast | Restores faded depth, adds color | Vintage or hazy outdoor photos |
The practical read of this table: only two rows genuinely add information, and both of them can invent it.
Choose an Image Enhancer for Your Use Case
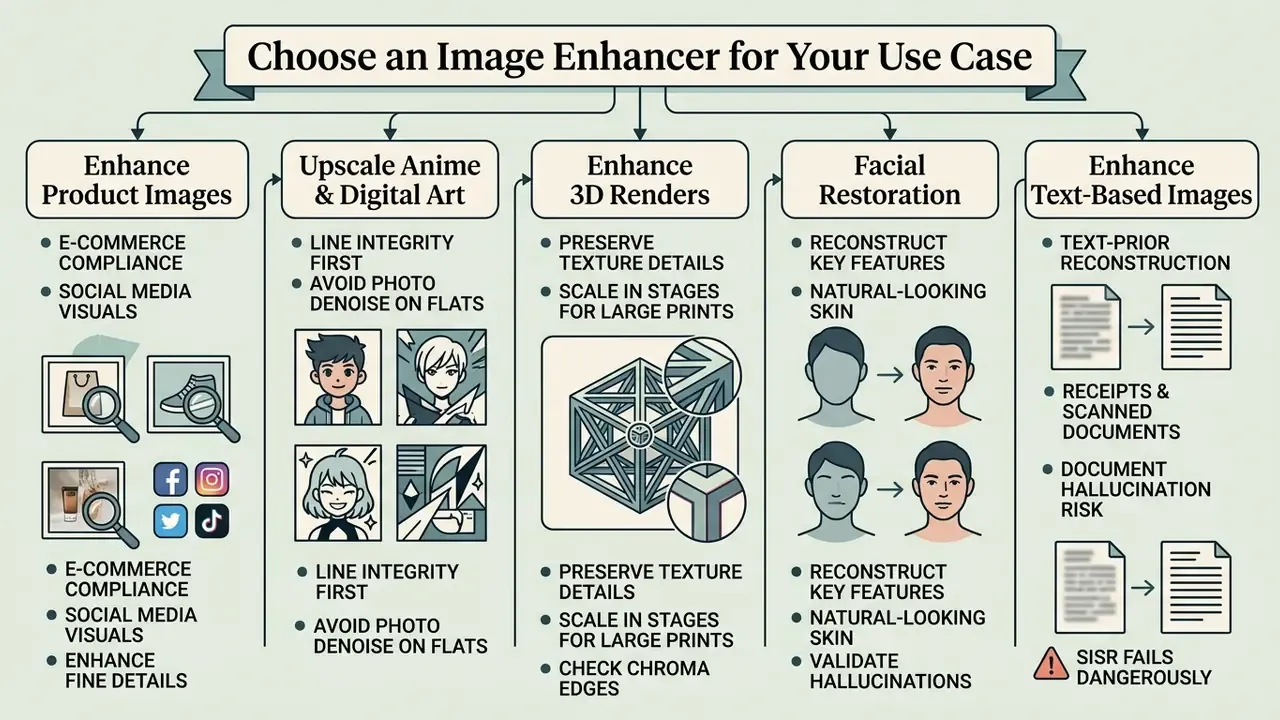
Selecting an AI photo enhancer means matching model training to your visual goal: e-commerce compliance, line-art preservation, text-prior reconstruction, facial restoration, or archival repair.
Different commercial applications demand different modes, from rigid geometric fidelity for retail catalogs to generative reconstruction for historical portraiture.
Enhance Product Images and Social Media Visuals
Commercial e-commerce standards require high resolution product photography with clean edges, accurate color, and neutral background separation. Current retail data standards specify JPEG at 300 ppi with a minimum long side of 2,401 px, a maximum compression factor of 12, and file sizes up to 40 MB, alongside an explicit prohibition on interpolated up-resizing (GS1 Product Image Specification Standard, gs1.org).
Note the tension. The standard bans naive interpolation, which is exactly why documented model-based reconstruction, reviewed and logged, is the compliant path rather than a bicubic stretch.
When evaluating how to make an image better quality for storefronts and social media crops, AI image upscalers for commercial use must hold product geometry while sharpening logos and label text.
"EDSR-BASE outperformed ESRGAN and Real-ESRGAN on PSNR, SSIM and Tesseract OCR accuracy, preferable for images containing text and labels."
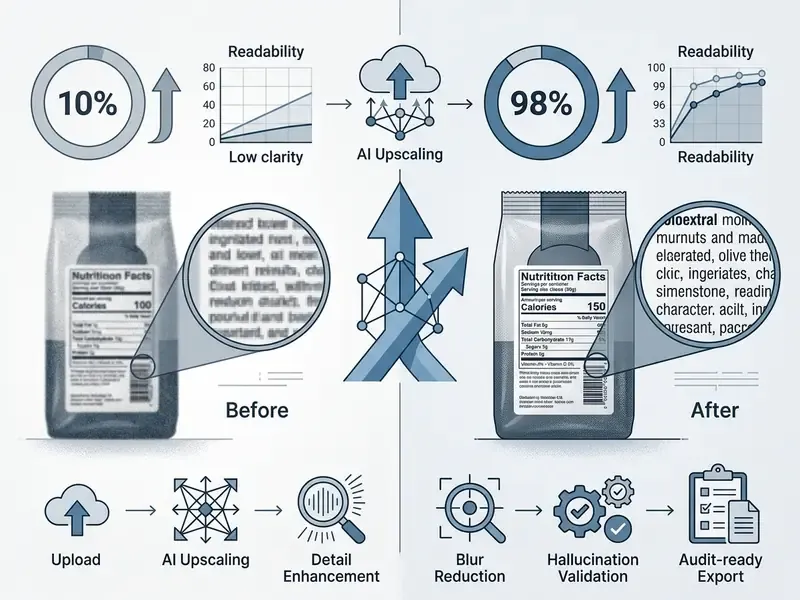
In an illustrative composite scenario, a digital retail team migrated 4,500 legacy catalog assets with an edge-preserving upscaler. OCR readability on product labeling reached the high 90s, and returns driven by blurry packaging imagery dropped. Again, hypothetical, not a verified client outcome.
Upscale Anime, Digital Art, and 3D Renders
Upscaling line art, digital paintings, and anime assets needs architectures tuned for flat color gradients and sharp, vector-like boundaries, such as Waifu2x-class networks or compact convolutional models. Photographic models try to synthesize pore structure and skin noise; illustration-focused models instead preserve crisp lines, suppress color bleeding along high-contrast edges, and clear compression ringing without smudging solid fills.
Processing anime wallpapers, cel-shaded frames, or 3D renders for 4K display? Select an artwork-specific preset to block photographic texture hallucinations. Practical guidance for this cluster:
- Line integrity first. Inspect thin outlines at 100% for broken strokes, doubled contours, or gradient banding on diagonals.
- Avoid photo denoise on flats. Aggressive denoise flattens intentional dithering and halftone-style shading.
- Scale in stages for large prints. Two sequential 2× passes on line art often hold stroke weight better than one 4× jump.
- Check chroma edges. Saturated red and blue boundaries are where color bleeding shows first.
If the end product is a desktop or phone background, the sizing rules in our walkthrough on how to make a wallpaper pair well with a 4× upscale pass. For style-specific generation rather than enhancement, our comparison of Ghibli-style AI image generators covers style accuracy and usage rights.
Enhance Text-Based Images, Receipts, and Scanned Documents
Restoring legibility in low resolution screen captures, scanned PDFs, and faded receipts requires text-prior reconstruction. Bicubic scaling dilutes character contrast and turns low-frequency text into smears. Specialized AI text-enhancement networks isolate binary glyph contours from background paper noise, sharpen font edges, and lift Optical Character Recognition rates.
For legal or record-keeping documents, run a manual character audit after processing. AI improves visual readability; it does not certify content.
Document hallucination risk, where SISR fails dangerously. Generative models rebuild glyphs from learned font priors. A degraded "3" can resolve as an "8". A decimal separator can migrate. A partially erased signature stroke can be completed with invented geometry. Because hallucinations are orthogonal to PSNR and LPIPS, a document can score as high quality and still carry a fabricated character.
Edge cases where AI upscaling must not be used as evidence of content:
- Amount fields, account numbers, IBANs, and check digits on financial documents.
- Identity documents, biometric captures, and any facial image used for verification or matching.
- Forensic or litigation exhibits, where reconstruction alters the evidentiary record.
- Medical imaging used for diagnosis or measurement.
- Regulatory filings and audit samples where the enhanced file could be mistaken for the source of record.
In all of these, keep the untouched original as the record of truth, treat the enhanced version strictly as a viewing aid, and label it as AI-processed in the asset metadata. After legitimate document enhancement, downstream extraction can continue with image-to-text tools.
Disclaimer: this section is general technical information, not legal, medical, or forensic advice. AI-enhanced imagery must not substitute for original records in diagnostic, biometric, evidentiary, or regulatory contexts without independent human verification.
Restore Old Photos and Old Family Photos
Restoring vintage photography uses models trained to separate structured physical damage (scratches, cracks, blotches) from homogeneous degradations such as uniform film grain and fading. That separation is established in the archival restoration literature and continued in later colorization and repair pipelines (Bringing Old Photos Back to Life, CVPR 2020; Pik-Fix, WACV 2023).
Archival photo restoration relies on global contextual inpainting to mend physical tears while keeping natural film texture. Old family photos also tend to arrive as scans of prints, so scan hygiene matters as much as the model choice.
"SEAL introduces an acceptance-rate metric measuring how often a super-resolution model returns an acceptable result across diverse degradations."
Improve Portraits, Faces, and Blurry Images
Portrait restoration relies on blind face restoration frameworks that inject face-specific priors to rebuild sharp eyes, natural skin texture, and mouth contours. GAN-prior approaches such as GFPGAN (2021) and codebook-transformer approaches such as CodeFormer (2022) remain the standard reference baselines, while newer arbitrary-scale architectures address robustness.
"ARASFSR demonstrates superior robustness across varied input sizes and scale factors, improving face detection, recognition, and parsing."
Applying a general-purpose upscaler to a low resolution face often yields waxy or distorted expressions. A dedicated AI photo editor with a face-specific pass avoids that failure mode. Dedicated face restoration models hold identity fidelity while removing lens blur, so portraits stay recognizable and natural. Where consistent professional portraiture is the goal rather than repair, compare purpose-built AI headshot generators and their privacy terms.
How to Avoid Artificial Results When You Upscale Images
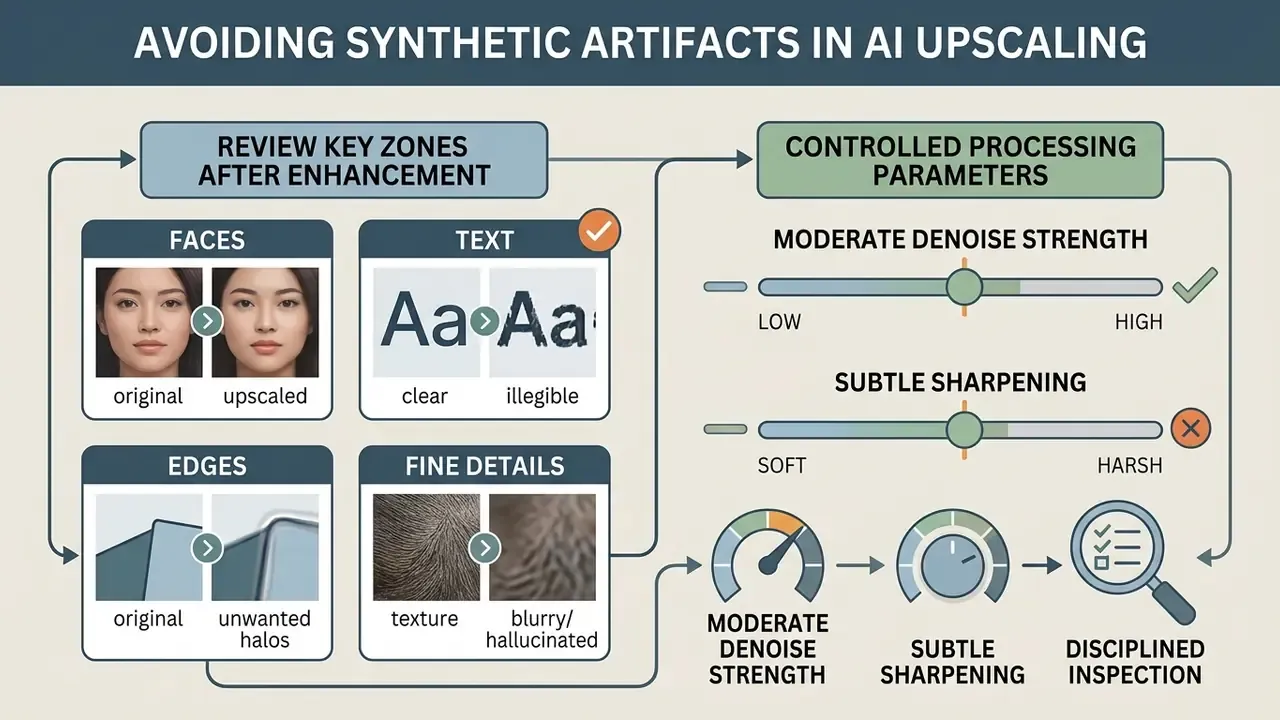
Avoiding synthetic artifacts during AI upscaling means keeping denoise strength balanced, holding sharpening subtle, and running disciplined human inspection across critical zones.
Push settings to extremes and generative upscalers over-process: plastic skin, deformed characters, unnatural repeating patterns.
Review Faces, Text, Edges, and Fine Details After Enhancement
A post-processing review at 100% zoom lets you audit the sensitive zones, human eyes, fine typography, hard geometric boundaries, and natural background textures, for generative hallucinations.
When you think about how can you make an image higher resolution without wrecking visual integrity, auditing matched crops side by side against the original is mandatory. Not optional. Mandatory.
Look specifically for:
- Faces. Unnatural smoothing, distorted iris shapes, altered dental structure.
- Text. Blurred letterforms, changed character strokes, hallucinated fonts.
- Edges. Bright halo outlines or ringing along high-contrast lines.
- Textures. Repeating patterns in skin, fabric, foliage, or wood that betray synthesis.
Do Not Over-Sharpen or Over-Process the Photo
Keeping a natural look requires restrained sharpening radii, at or below 2 px, and no multi-pass stacking that exaggerates micro-contrast past what camera optics would produce.
Over-sharpening paints dark and light halo borders around subjects and erodes organic depth. The alternative to brute force is optimization that treats perception and distortion as joint objectives.
Start from moderate presets and lean on models that balance distortion against perception. Correct exposure and white balance before any enhancement pass, prefer masked local adjustments over global pushes, and cap clarity and skin smoothing so texture survives. One more habit worth keeping: compare against the original at the same zoom, not against your memory of it.
Enterprise Risk, Model Validation, and Data Governance
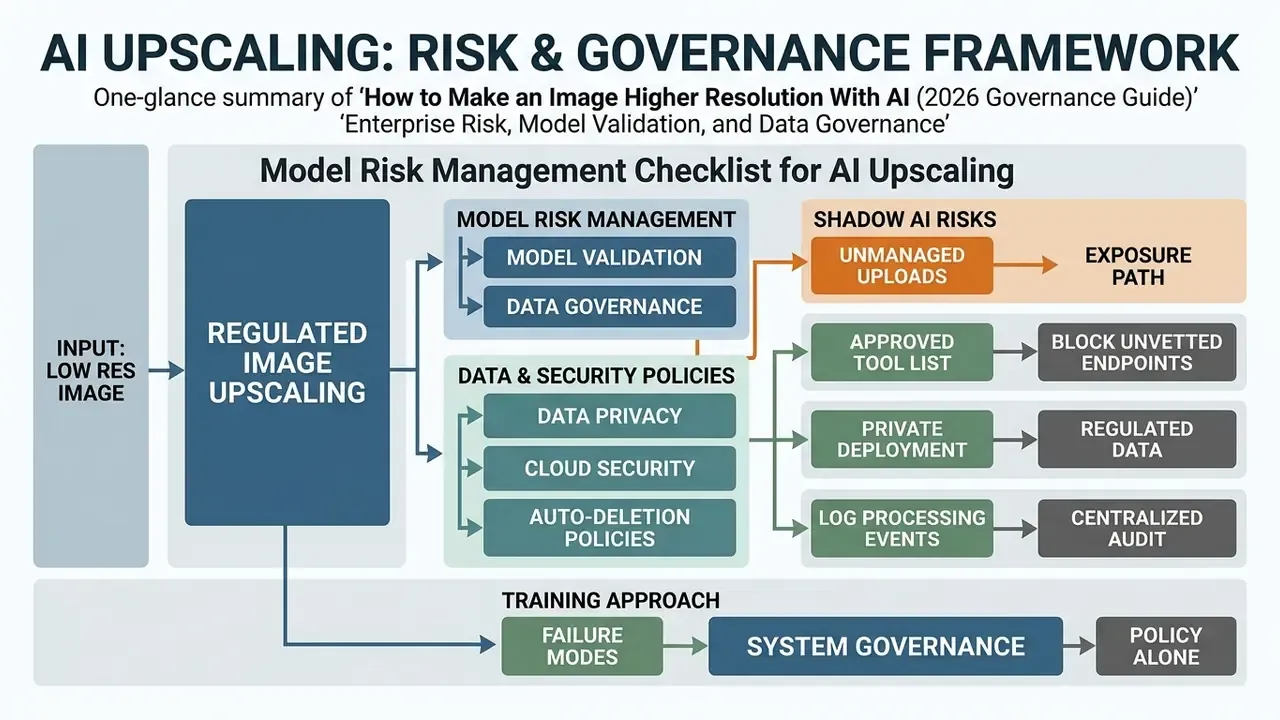
Deploying AI upscaling inside a regulated or brand-sensitive operation turns an image-editing choice into a model-risk decision. The output contains synthesized content, so it needs documented validation, controlled data handling, and an auditable trail.
Model Risk Management Checklist for AI Upscaling
Treat an upscaling model like any other inferential model entering production. Supervisory guidance on model risk management (SR 11-7) and the NIST AI Risk Management Framework both call for conceptual soundness, ongoing monitoring, and outcome analysis. All three map cleanly onto super-resolution.
Checklist0 / 8
The deliverable is a reproducible validation artifact: the same input plus the same logged parameters should regenerate the same reviewed output. That is precisely what internal audit will request, usually at the least convenient moment.
Data Privacy, Cloud Security, and Auto-Deletion Policies
Processing proprietary collateral, legal documents, or personal archives online raises privacy questions. Enterprise-grade AI upscalers enforce automatic server-side deletion, typically purging uploaded and processed files within 1 to 24 hours. Several consumer services state that window publicly, and GDPR-aligned media processors treat it as standard practice.
Before uploading unreleased product designs or confidential photographs, verify that the platform:
- Uses encrypted HTTPS transport (TLS 1.3) for upload and download.
- States explicitly in its Terms of Service that user uploads are not used to train public generative foundation models.
- Publishes a retention window and a deletion mechanism, ideally with per-account purge controls.
- Holds an independent security attestation such as SOC 2 Type II or ISO/IEC 27001.
- Offers a data processing agreement, a defined sub-processor list, and regional processing options where residency matters.
Feature-limited free tiers deserve extra scrutiny. Export restrictions and privacy terms often diverge from paid plans, a pattern documented in our overview of free photo editors.
Shadow AI: Unmanaged Uploads as an Exposure Path
The most common failure is not a model failure. It is an employee pasting a confidential scan into a public upscaler to hit a deadline. One action, and PII, cardholder data, or unreleased design assets move to an unvetted processor with unknown retention, unclear jurisdiction, and no contractual protection.
Mitigations that hold up in practice:
- Publish an approved-tool listand make the sanctioned path faster than the unsanctioned one.
- Block unvetted upload endpointsat the network or browser-extension layer for classified asset categories.
- Route regulated data to private deploymentinstead of public SaaS.
- Log processing events centrallyso enhancement of a regulated asset appears in the audit trail.
- Train on failure modes, not just policy.Show staff a real OCR digit flip caused by a public upscaler.
Honest caveat: none of this eliminates residual risk. It converts invisible risk into measured, owned risk, which is the only version a board can govern.
Deployment Models: Cloud SaaS vs. Private API vs. On-Premise SDK
| Deployment Model | Data Exposure | Throughput and Scale | Control and Auditability | Typical Fit |
|---|---|---|---|---|
| Public cloud SaaS (free, consumer) | Highest; third-party retention, variable terms | High but rate-limited per tier | Minimal logging, no parameter pinning | Public marketing assets, low-sensitivity imagery |
| Private cloud API (enterprise tier) | Moderate; contractual DPA, defined retention, regional options | High and elastic, batch and queue support | Versioned endpoints, request logs, SLA | Catalog pipelines, high-volume commercial workflows |
| On-premise or local SDK (CUDA, CoreML) | Lowest; files never leave the perimeter | Bound by local GPU capacity | Full parameter, version, and log control | Regulated documents, PII, unreleased IP, forensic-adjacent review |
Compare total cost of ownership on three axes rather than price per image: inference cost, human review cost per thousand assets, and the expected cost of an artifact or disclosure incident. Cost modelling inputs are available through our online calculators.
Free AI Image Upscaler: What to Check Before Choosing a Tool
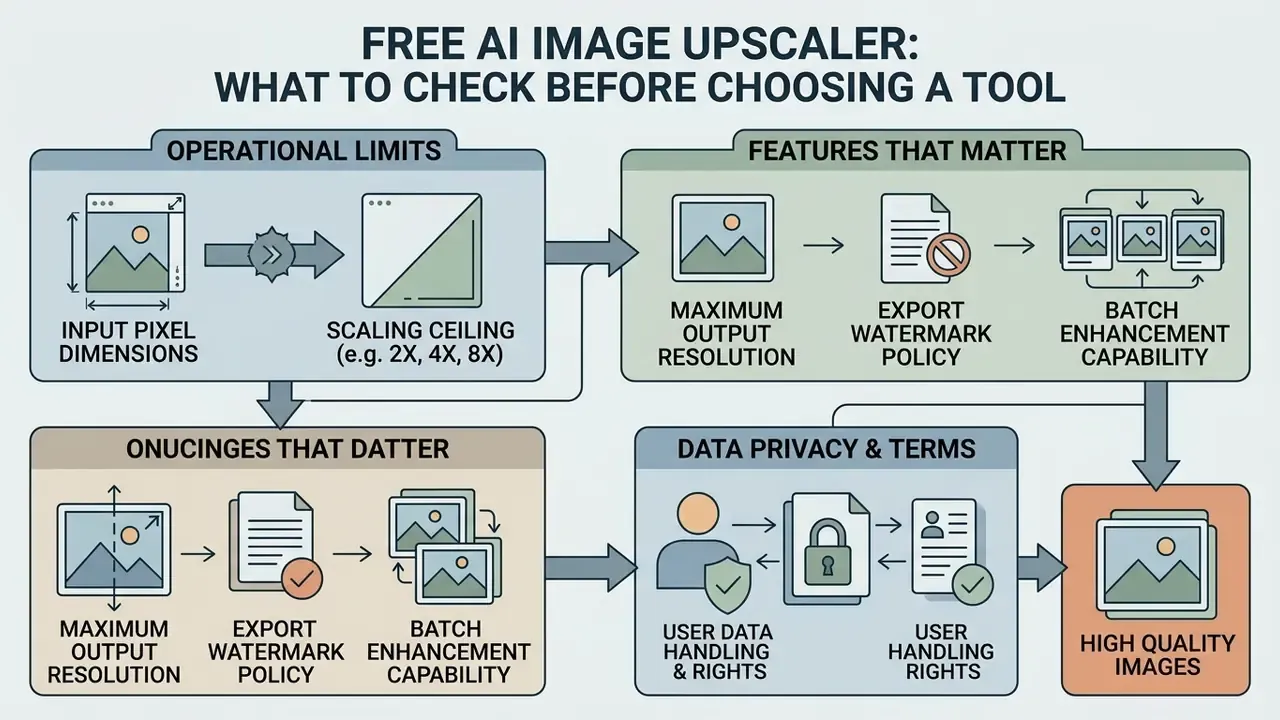
Evaluating free AI image enhancement tools means verifying maximum output resolution, export watermark policy, batch capability, and data privacy terms.
Free platforms give you fast one click functionality. Commercial operations still need to inspect technical limits before wiring a free utility into an enterprise asset pipeline.
Features That Matter for High Quality Images
Key selection criteria for an AI image enhancer: model selection transparency, watermark-free high resolution exports, support for uncompressed inputs, and explicit output ceilings such as 4K, 8K, or higher.
When asking can you make an image higher quality with free online tools, confirm the service does not force aggressive lossy compression on export. Many do, quietly.
Leading solutions offer clear presets, custom scaling to 4096 px or beyond, explicit denoise controls, and documented ceilings. One vendor guide lists 1K, 2K, 4K and 8K presets with a hard maximum of 32,000 px per side on Windows and 16,000 px on macOS. Watermark-free export is a measurable product attribute, not a cosmetic one: NIST's synthetic-content guidance treats watermarking as a distinct technical control on AI-generated media. Side-by-side feature grids for paid and freemium platforms live in our comparison of AI image enhancers.
Operational Input Limits and Scaling Ceilings
Scaling multipliers are not free-floating. Every platform ties them to a maximum input dimension, because inference memory grows with output pixel count.
Max input pixel dimensions by scaling multiplier
| Scaling Multiplier | Max Input Dimensions (Free Tier) | Max Input Dimensions (Pro / Enterprise) | Recommended Output Ceiling |
|---|---|---|---|
| 1× (sharpen only) | 10,000 × 10,000 px | 20,000 × 20,000 px | Native dimensions preserved |
| 2× upscale | 5,000 × 5,000 px | 10,000 × 10,000 px | 20 megapixel export |
| 4× upscale | 2,500 × 2,500 px | 5,000 × 5,000 px | 40 megapixel export |
| 8× upscale | 1,250 × 1,250 px | 2,500 × 2,500 px | 8K Ultra-HD (7680 × 4320) |
Note: exceeding the maximum input threshold triggers client-side auto-downsampling before AI inference, which defeats the purpose of high resolution processing. Supported inputs usually cover PNG, JPG, JPEG, WebP, HEIC and HEIF. Document pipelines should also confirm multi-page handling before committing a batch.
Batch Enhancement for Multiple Product Images
Media operations handling large catalogs need automated batch enhancement that queues hundreds of files without manual prompting.
Industrial batch utilities handle very large daily volumes; vendor documentation cites tens of millions of image conversions per day in photo and print production. They apply uniform restoration logic across entire directory folders, with folder-watching for continuous ingest.
Folder-watching speeds up digital asset management for e-commerce publishing, provided each batch inherits a pinned model version so results stay reproducible across runs. Teams that also commission video enhancements or AI video assets alongside static pipelines can review implementation economics in our Google Veo API guide, and the production pattern for short branded openers in our note on how to make a youtube intro.
FAQ: Frequently Asked Questions About Making an Image High Resolution
Can you make a low resolution image high resolution without losing quality?
Yes. Deep-learning AI image upscalers increase spatial resolution while improving perceived sharpness and structural quality. Unlike traditional resizing, which blurs, trained neural models synthesize missing details from learned priors.
"RAW-aware RRDB improves PSNR by 1.109 dB and reduces LPIPS by 0.053 versus standard RGB super-resolution pipelines." RAW Data-Enhanced Real-World Super-Resolution Paradigm (preprint, 2024) Heavily degraded inputs, though, yield plausible estimated textures rather than exact ground-truth restoration.
Are my uploaded images kept private and secure?
Reputable online AI upscalers process files over SSL/TLS-encrypted channels and run automated purge cycles that delete images from temporary cloud storage within 1 to 24 hours. Check the privacy policy to confirm your images are not retained for model training. Route confidential documents, PII, or unreleased IP to a private API or on-premise deployment instead of a public free tier.
What is the maximum file size or resolution I can upscale?
Most browser-based free tiers accept source images up to roughly 5,000 × 5,000 pixels or 25 MB, with scaling up to 4×. Enterprise tiers commonly allow inputs up to 10,000 × 10,000 pixels and output scaling to 8K and beyond, and some desktop applications cap at 32,000 px per side. Exceeding the input ceiling usually causes silent downsampling before inference.
How to make an image hi res for print rather than screen?
Work backwards from the print size. For a 300 ppi print at 8 × 10 inches you need 2,400 × 3,000 px, so a 2× pass on a 1,200 × 1,500 px source gets you there. If you want to know how to make an image high res without visible synthesis, keep the multiplier low, the denoise moderate, and proof a crop at actual print scale before committing the full run.
Can I use AI upscaling on scanned documents, invoices, or receipts?
Yes for readability, with conditions. Text-prior models sharpen glyph contours and raise OCR extraction rates, but generative reconstruction can alter characters. Keep the original as the record of truth, run a manual character audit on amounts, identifiers, and signatures, and never submit an AI-enhanced document as the authoritative source in audit, legal, or regulatory contexts.
How do I validate an AI upscaler before rolling it out across a team?
Test on your own asset distribution, not on vendor samples. Score fidelity with PSNR and SSIM, perception with LPIPS, text accuracy with an OCR benchmark, and robustness with an acceptance-rate test across mixed degradations. Pin the model version and parameters, sample outputs for human hallucination review, and store the results as a reproducible validation artifact with a defined re-validation cadence after upgrades.
Can you make an image higher resolution on iPhone or Mac?
Yes. You can make an image higher resolution on Mac and iPhone using web-based AI tools or native desktop applications that leverage Apple Silicon CoreML processing. Platform tools allow one click processing inside a local browser window or a system editing app, and local processing keeps sensitive files off third-party servers.
Is it legal to use AI upscaled images for commercial projects?
Disclaimer: the following is general information and does not replace advice from a qualified attorney on copyright and licensing. Commercial rights depend on owning the copyright to the original source image and complying with your chosen tool's licensing terms. Paid tiers generally grant full commercial exploitation rights for upscaled assets, whereas free tiers frequently restrict commercial use, and some platform terms separately prohibit commercial exploitation of the service itself. Because rights attach to both input and output, verify plan-level licensing in writing before publication. Our analysis of the commercial use of AI image generators breaks down how these license layers interact.
What is the difference between upscaling and expanding an image?
Upscaling increases pixel density and detail quality inside the existing visual boundaries. Expanding, also called outpainting or generative fill, generates new scene elements outside the original canvas frame. That is a content-creation operation, not a restoration one, and it carries a different approval path.
What file format is best for uploading to an AI upscaler?
Uncompressed PNG files or high-quality JPEGs with minimal compression give the best results. Lossless inputs let neural networks extract clean edge features without amplifying JPEG block artifacts. RAW inputs perform best of all where the pipeline supports them.
Appendix A: Revision and Source-Attribution Notes
This appendix preserves the earlier wording and attributions superseded during technical review, so the revision history stays transparent.
- Original
- "Neural inpainting networks fill missing regions with semantically plausible structures by drawing on global contextual cues (CVPR 2025)." Replaced because the citation lacked a paper title and authors; now attributed to DREAM, CVPR 2024, with the low-frequency-preservation constraint stated explicitly.
- Original
- "High-ISO digital noise requires specialized spatial filtering prior to resolution expansion (ISO/IEC 24790:2017)." Reformulated: ISO/IEC 24790:2017 governs hardcopy print image-quality attributes, not super-resolution; the aliasing mechanism is now cited to IEEE TNNLS (2024).
- Original
- "Codecs like lossy JPEG or WebP discard high-frequency data (Compression Helps Deep Learning in Image Classification)." Replaced with the RAW versus compressed-RGB measurement from the RAW Data-Enhanced SR paradigm (2024).
- Original
- "AI upscalers deploy specialized networks (Magnific Documentation, 2026)" and "denoise parameters between 0.0 and 0.1 (Martinelli et al., ISPRS 2024)." Reformulated to name architecture families directly and to cite the multi-loss SSIM result from Exploring Real-Time Super-Resolution (2026); the 0.0 to 0.1 operational range is retained as vendor-and-study-consistent practice.
- Original
- "Evaluating outputs at full scale (FADGI Technical Guidelines)." FADGI retained for the 1:1 review rule; the hallucination rationale is now cited to Bridging the Perception Gap in Image Super-Resolution (2026).
- Original
- "Interpolation expands the sampling grid (IJCRT, 2025)." Replaced with quantified bicubic-versus-real-LR deltas from Exploring Real-Time Super-Resolution (2026).
- Original
- "Portrait restoration relies on (CodeFormer, 2022)." GFPGAN and CodeFormer retained as reference baselines, with robustness evidence added from ARASFSR, WACV 2024.
- Original
- "Over-sharpening introduces halo borders (Imatest Guidance)" and "(SEAL Framework, 2023)" applied to face and text review. Imatest retained for radius guidance; perception-distortion optimization and hallucination orthogonality now carry the analytical load, with SEAL repositioned to archival acceptance-rate evaluation where it applies.
- Original
- "Industrial batch processing (Viesus Technical Specs, 2026)." Retained as vendor throughput context and supplemented with measured EfRLFN batch-capable benchmarks.
- Original
- "(GS1 Product Image Specification Standard, 2026)" and "(Krea AI Commercial Terms, 2026)." Retained as industry and vendor documentation respectively, with the conflict between GS1's no-interpolation rule and model-based reconstruction now made explicit, and licensing framed as plan-dependent rather than universal.
- Superseded internal links.
- Several consumer-workflow links were replaced with topically adjacent resources on photo editing, upscaler and enhancer comparisons, image expansion, OCR extraction, headshot generation, and commercial licensing. Two workflow links were reinstated where the topical overlap is genuine: wallpaper sizing and photo-to-video sequencing.
- Author attribution.
- Editorial review: Marcus Hale, author.
Footer and Operational Resources
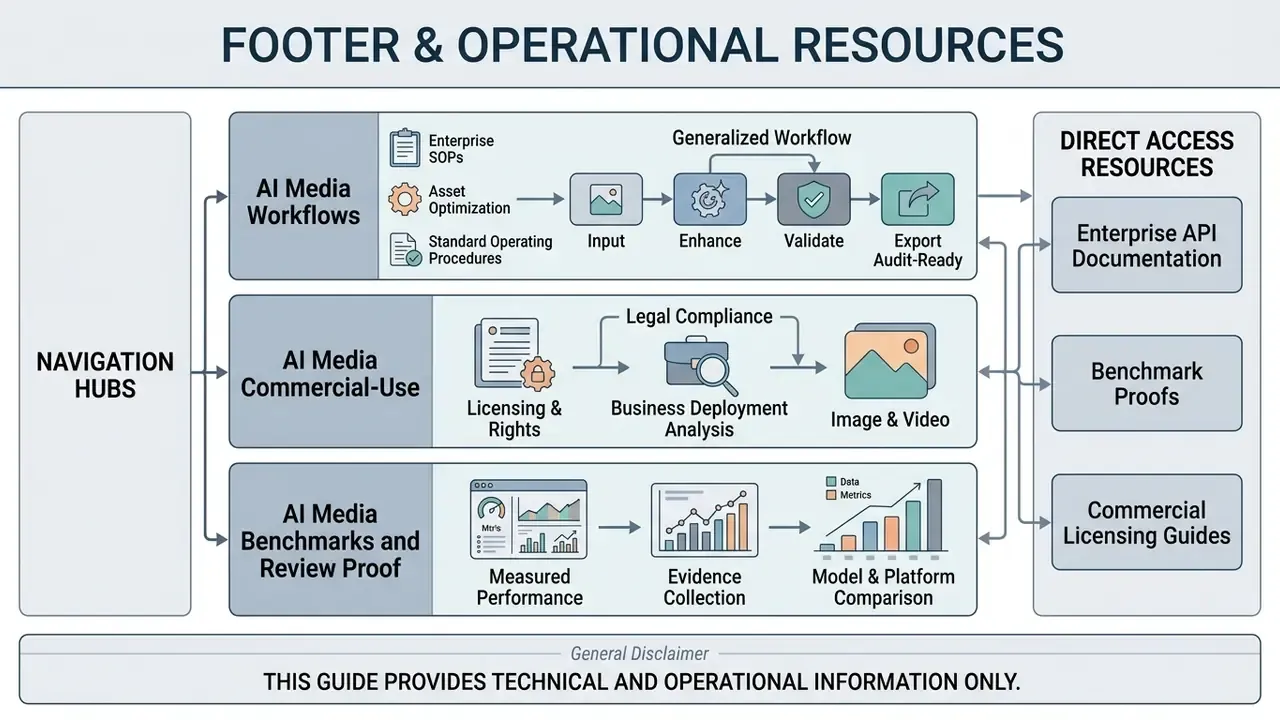
For additional technical frameworks, conversion logic, and media deployment guides across platforms, explore our navigation hubs:
- AI Media Workflows covers standard operating procedures for enterprise visual asset optimization and automated media scaling.
- AI Media Commercial-Use covers licensing, rights, and business-deployment analysis across image and video tooling.
- AI Media Benchmarks and Review Proof collects measured performance evidence across models and platforms.
- Enterprise API documentation, benchmark proofs, and commercial licensing guides are available through direct platform navigation.
General disclaimer: this guide provides technical and operational information only. It is not legal, medical, forensic, or compliance advice. Organizations in regulated sectors should validate AI enhancement workflows with their own model-risk, privacy, and legal functions before production deployment.