Last updated: 2026 editorial revision · Reviewed for: technical accuracy, licensing terms, and data-protection compliance
Three Things to Know Before You Edit
- Two-image compositing is the standard workflow.Upload a base scene plus one clear person reference, then describe placement, pose, and preservation constraints in a prompt. Peer-reviewed benchmarks show AI editors succeed on roughly 30% of merge and object-addition tasks, so manual verification stays mandatory.
- Realism is a physics problem, not a style problem.Matching light direction, contact shadows, skin-tone midtones, eye-line height, and depth-of-field blur separates a believable composite from an obvious edit.
- "Free" always has conditions.Adobe Firefly allows 25 monthly credits with commercial rights and no watermark. Runway caps free accounts at 3 lifetime 720p exports. Fotor's watermark-free claim applies only to reduced-resolution downloads. Consent and deepfake-labelling obligations apply to every published edit involving a real person.
Can AI Add a Person to a Photo?
Yes. Modern AI can add a person to a photo by synthesizing a context-aware subject or by merging a reference portrait directly into an existing background. Traditional photo editing software relies on manual pixel cutting. An AI photo editor instead evaluates scene geometry, depth, and illumination, then inserts the subject automatically.
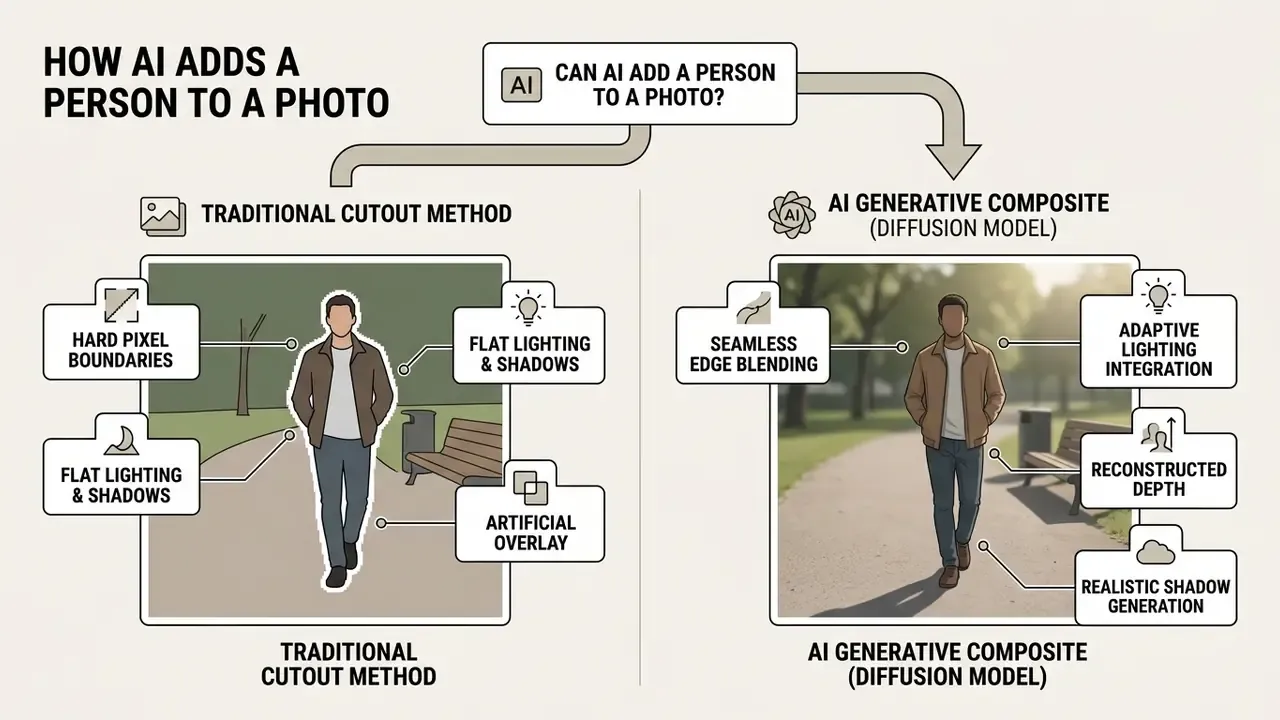
Recent technical benchmarks suggest generative models handle complex compositing better than rule-based tools. According to a study published at WACV 2026, AI image editors successfully completed 30.9% of image merge tasks and 30.6% of object addition requests across standard benchmark datasets (WACV benchmark corpus, 2026; the dataset name should be cited explicitly when reproducing these figures, and independent verification is recommended). The same study reported that current editors fully resolve only 33.35% of general editing requests. Identity preservation and unintended edits outside the target region remain the usual failure points. NIST guidance on generative AI adds a sensible control: compare every AI-assisted edit against the original unedited image to confirm physical realism and rule out misleading alterations (NIST SP 800 Series, 2025).
| Criterion | AI-based insertion (diffusion models, Generative Fill) | Manual cutout & paste (traditional photo editing) |
|---|---|---|
| Required materials | Target base photo, reference person image, and text or pose prompt (Kulal et al., 2023). | Base photo plus a high-resolution source photo containing the subject (FADGI, 2023). |
| Control over position & pose | High semantic control; models infer plausible poses from scene affordances (Gao, 2025). | Position is restricted to the original source pose; changes require manual warping. |
| Lighting & color matching | Automated through generative blending (SwapAnyone, 2025, originally validated on video sequences; apply with caution to stills). | Requires manual curves, adjustment layers, and hand-painted ambient shadows. |
| Occlusion & depth handling | Synthesizes subjects behind foreground elements using depth maps (Masuda et al., 2025). | Requires manual layer masking and vector clipping paths (W3C CSS Masking, 2021). |
| Execution speed | Updated: processing takes seconds. Token compression accelerates diffusion transformers by 1.67x to 3.13x, while human evaluators rated output quality tied with the uncompressed baseline in 48% to 81% of comparisons (HiLo-Token, 2026). | Manual selection and edge refinement typically take 15 to 60 minutes depending on operator skill. This range reflects practitioner reports rather than a controlled study, so treat it as an estimate pending formal time-on-task research. |
| Skill requirement | Low entry barrier; needs a clear prompt structure and a sane mask selection. | Moderate to high expertise in selection tools, masking, and color grading. |
| Physical realism | Strong contextual integration; occasional facial or anatomical artifacts (NIST, 2025). | Depends entirely on operator skill in matching perspective and grain. |
AI generation, AI merge, and manual cutout: what changes
The technical approach determines how the composite is generated and how much control you keep over pixel integrity. Pure AI generation creates a new subject from a text prompt. AI merge tools, such as Magic Merge, use mask-guided inpainting to rebuild the target region while preserving surrounding context (OpenAI API Documentation, 2026). Manual cutout isolates pixels from a reference image with vector paths or selection brushes and generates no new visual data (W3C CSS Masking Module Level 1, 2021). Choose the method by priority: exact identity, or an integrated pose that fits the scene. Both goals rarely win at once.
If you want to compare the underlying feature sets of individual applications before committing to a method, review our reference material on AI photo editors and their core editing modules.
When adding a person from one photo works best
Adding a person from one photo to another works best when both sources share compatible capture conditions. High-quality composites rely on matching camera angles, uniform lighting direction, and comparable resolution between the reference portrait and the base scene (NIST SP 500-290e3, 2025). Research on affordance-aware insertion shows that near-frontal poses and uncompressed face detail let diffusion models preserve identity far more reliably during transfer (Kulal et al., "Putting People in Their Place," CVPR 2023).
Biometric capture standards give useful numeric anchors even for creative work. NIST best-practice portrait guidance places head width at roughly 50% of frame width, sets the eye line near the 55% vertical point, and limits roll, pitch, and yaw deviation to about ±5 degrees for high-quality face imagery (NIST mugshot best-practice guidance). A reference portrait that respects those ranges gives the model substantially more usable identity signal. Photos work best when nothing fights the model: no motion blur, no heavy filter, no aggressive JPEG artifacts.
Prepare the Base Photo and Person Image Before Editing
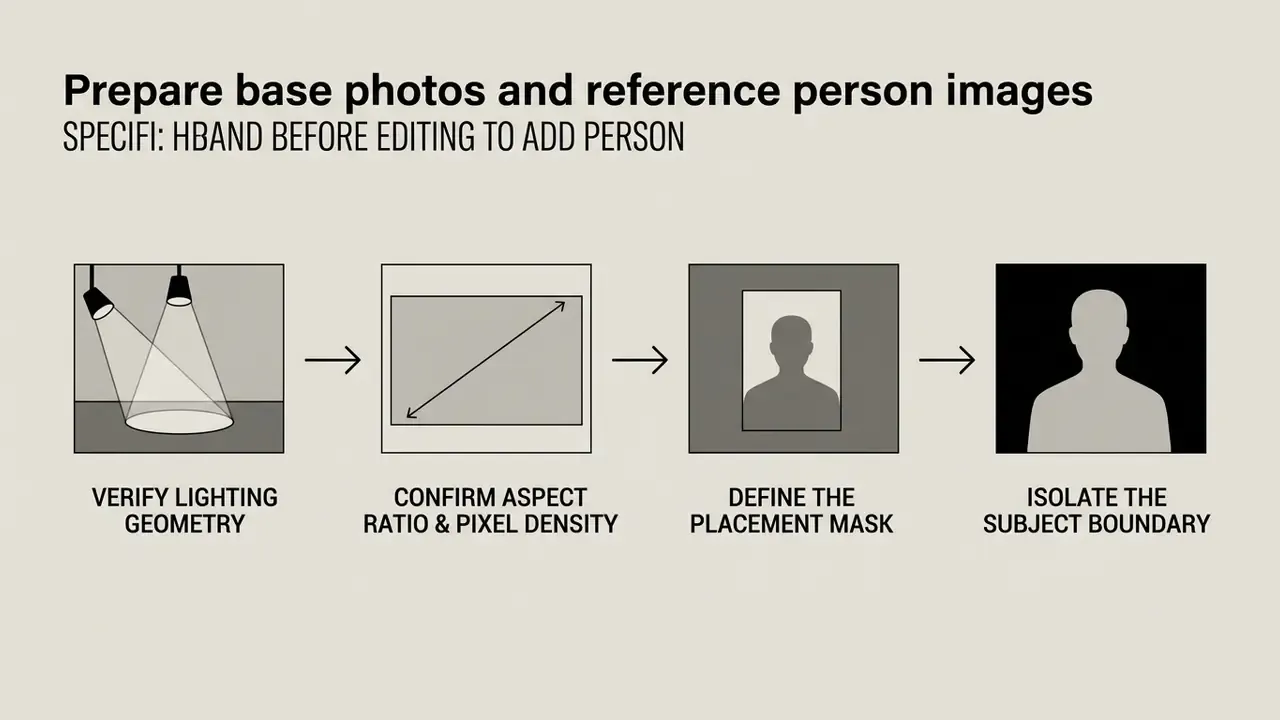
Preparing source files before the first edit prevents visual artifacts and helps the added person blend into the destination image. Preparation means consistent lighting parameters, adequate resolution, and clean subject boundaries. For budget-limited projects, our overview of free photo editors explains which preparation features (background removal, edge refinement, resolution export) survive on no-cost tiers.
Choose photos with matching light, angle, and image quality
Make sure the base photo and the person image share identical or at least complementary capture geometry. Mismatched light direction, hard contrast against soft diffusion, or different camera elevation angles reveal synthetic manipulation instantly (NARA Digitization Quality Management Guide, 2023). Standard image specifications recommend consistent aspect ratios and spatial resolution above minimum density thresholds, such as 20 pixels per foot for observation and 80 pixels per foot for recognition, which helps avoid focal softness around the added subject (DHS Digital Video Quality Handbook, 2024). NIST SP 500-290e3 defines aspect ratio as the width-to-height relationship of the captured image and cites 480x600 pixels at 1:1.25 as a workable biometric minimum.
Crop the person cleanly and preserve important details
Isolating a subject demands precise boundary selection, otherwise background spillover travels into the target image. Hard-edge cutouts work fine for solid clothing contours. Hair strands, sheer fabrics, and complex edges need refine-brush masking or soft-edge alpha matting (Cutout.Pro Technical Guide, 2026). An automated background remover with micro-feathering keeps subtle boundary pixels partially transparent, which prevents dark halos when the subject sits over a lighter background.
A practical edge taxonomy helps here. Treat solid clothing and footwear as hard edges. Treat hair, fur, and fluff as soft edges. Treat glass, lace, or sheer fabric as complex translucent edges. Each class needs its own refinement pass: binary masks for the first, feathered alpha for the second, and manual Keep/Remove brushwork at high zoom for the third. Most tools automatically detect the obvious silhouette; the last 5% of the boundary is still yours.
How to Add a Person to a Photo with AI Step by Step
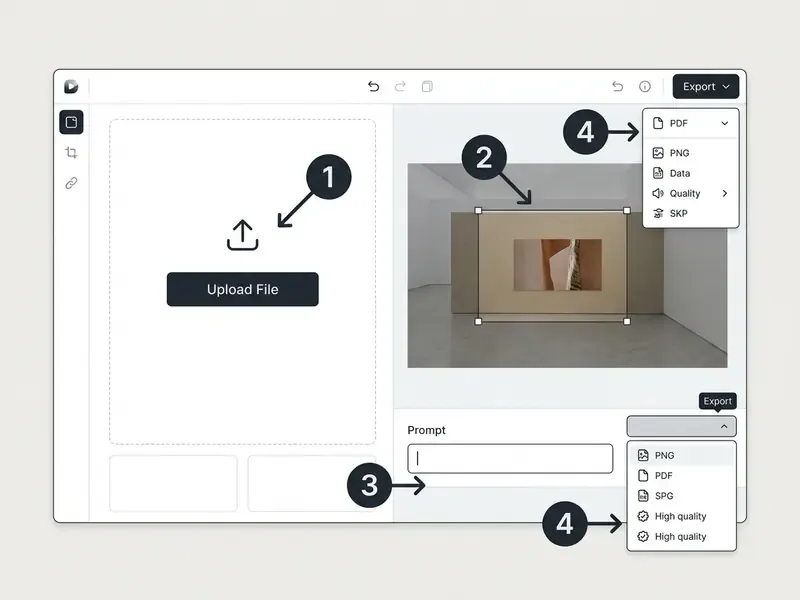
Adding a person into a photo with AI follows a four-stage workflow: asset upload, mask definition, prompt construction, and output validation. Browser-based and desktop editors wrap this into guided interfaces, which is why the tutorial fits in a few clicks. Before you start, compare candidate models side by side in our breakdown of the best AI art generators, since identity preservation differs sharply between engines.
Upload the background photo and the person you want to insert
Open your chosen AI photo editor and upload the original photo that serves as the destination scene. Next, upload the person image that contains the subject you want to insert. Most platforms let you designate one image as the structural background and the second as the subject reference (EditThisPic Workflow Specifications, 2026). Simply upload the destination background first where the interface allows it. That single habit locks output resolution and aspect ratio before the subject layer gets scaled.
Technical tip for high-density group edits: with advanced AI merge tools, state the total target subject count in the settings or prompt text, for example "final output must contain exactly 5 people." Diffusion models use that numeric constraint to allocate attention-head maps more accurately. The result: fewer duplicated facial features, and far less risk of adjacent bodies merging into one malformed figure. Several dedicated group-merge services now expose this as a required input field before upload.
Write a prompt that defines placement and appearance
Write a structured prompt that directs subject position, pose, interaction, and context. Effective prompt engineering follows a strict order: scene context, subject identity, relative placement, then preservation constraints (OpenAI GPT Image Generation Prompting Guide, 2026). For edits, separate what must change from what must stay identical, namely identity, geometry, camera angle, layout, lighting, and surrounding objects. Repeat the preserve-list on every iteration. Drift is the default behaviour, not the exception.
- Example prompt: "Insert the young woman from the reference image standing on the right side of the group photo, wearing a navy blue blazer, looking toward the camera, smiling naturally, matching the soft evening outdoor lighting, keep all surrounding background elements unchanged."
When you run complex media transformations or integrate multi-stage asset pipelines, our AI Media Workflows directory documents the architectural patterns.
Ready-to-Use AI Prompt Templates for Specific Scenarios
Copy and adapt these prompt structures for your target scenario. Each one follows the scene, subject, placement, constraint order recommended by vendor prompting documentation.
1. Couple or friend portrait
"Insert the person from the reference image standing naturally beside the main subject in the target photo. Match the background color temperature, skin-tone midtones, and soft directional light from the left. Retain original face proportions and expression. Keep the background, camera angle, and framing unchanged."
2. Adding a pet (dog or cat) to a family shot
"Place the pet from the reference image on the floor next to the family members in the base photo. Match the carpet depth plane, cast a soft ambient ground shadow beneath the paws, align environmental lighting, and keep realistic body proportions and natural eye direction."
3. Inserting one person into a large group
"Insert the reference person into the middle row of the group shot between [Subject A] and [Subject B]. Scale shoulders and head size to match the surrounding depth plane, align the eye line with adjacent faces, and apply matching camera depth-of-field blur. Final output must contain exactly [N] people."
4. Recreating memorial or legacy photos
"Seamlessly integrate the individual from the reference photo into the family background. Harmonize film grain and age-related noise, match vintage contrast and exposure, and ensure exact horizon and eye-level alignment. Do not alter any existing faces."
5. Merging two separate group photos
"Combine the people from the first group photo with those in the second photo. Keep the lighting, environment, and camera angle of the second photo unchanged. Arrange both groups harmoniously as if photographed together in a single frame."
6. Emotional memory portrait (reunion framing)
"Blend the person from the first photo into the second photo beside the existing subject. Keep all lighting, pose, and atmosphere from the second photo unchanged. Ensure both faces and expressions look naturally aligned as if captured in the same moment."
Interactive prompt generator (widget specification)
To cut trial-and-error, the prompt builder embedded above the tool comparison table assembles a constraint-complete prompt from three dropdown selections.
| Field | Options |
|---|---|
| Scenario | Group / Couple / Pet / Memorial / Self-clone |
| Lighting | Indoor tungsten / Overcast diffuse / Golden hour / Studio strobe |
| Target placement | Left of subject / Right of subject / Center front row / Back row |
The widget concatenates selections into the scene, subject, placement, preservation sequence, appends a numeric subject-count constraint, and exposes a single Copy Prompt action. The string pastes directly into Firefly, CapCut, Gemini, or an API call.
Generate, review, and download the edited photo
Start generation and inspect the candidates that come back. Advanced AI will automatically handle blending, but it also fails quietly, so check localized artifacts: distorted hands, unnatural shadows, edge blur, or shifted background elements (BBC Research Note on Synthetic Media Detection, 2025). Review order matters. First confirm prompt adherence. Then scan hands, limbs, faces, and any text for warping or merged geometry. Finally verify that nothing outside the masked region changed. Once the added person looks realistic and the lighting transitions stay smooth, download the final image as uncompressed PNG or high-quality WebP, since transparent output requires PNG or WebP in most APIs.
Troubleshooting: which artifact points to which mistake
Quality results usually come from one more iteration, not from a better tool. Use this table as a triage sheet before you re-generate.
| Visible symptom | Most likely cause | Fix that usually works |
|---|---|---|
| Subject looks pasted, edges feel too crisp | Base image has softer lens or higher ISO than the reference | Apply a one-to-two-pixel boundary blur and match grain |
| Figure appears to float | No contact shadow at the ground plane | Paint a hard-edged shadow at 25% to 40% opacity under the shoes |
| Dark halo around hair | Binary mask over a lighter background | Re-cut with feathered alpha and micro-feather at high zoom |
| Duplicated or merged faces in a group | Model received no subject-count constraint | State the exact total subject count and re-run |
| Skin tone reads slightly green or magenta | Ambient bounce light was never unified | Clip a low-opacity grade layer sampled from a neutral midtone |
| Background objects shifted unexpectedly | Mask too generous, or preserve-list missing | Tighten the mask and restate "keep surrounding background unchanged" |
How to Add a Person to a Photo Without Photoshop
You can add a person to a photo without Photoshop by using a free online editor or a mobile app. These platforms combine automated background removal with straightforward layer positioning, so no advanced retouching skills are needed. Our comparison of browser-based online photo editors maps which services expose manual transform handles and which run prompt-only pipelines.
Add someone with a cutout tool and manual positioning
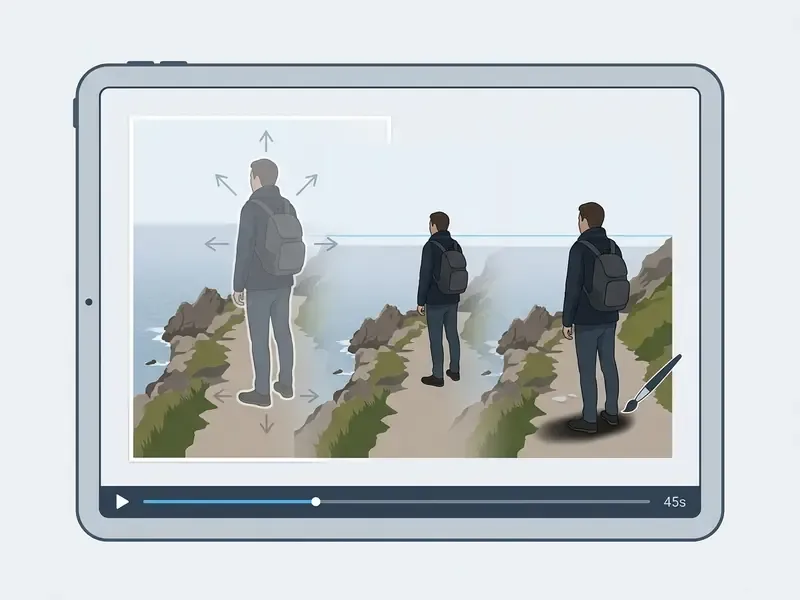
Online editing tools support manual composites through plain drag-and-drop. Upload your reference image to an online background remover to generate a transparent PNG cutout (Canva AI Workflows, 2026). Import the clean cutout onto your target background photo, resize the figure with corner transformation handles, then adjust brightness and contrast to match the ambient room tone. Save as PNG when you need transparency preserved, or as high-quality JPG once the composite is flattened and final. Working with a photo online free of charge is realistic here, provided you check the export ceiling first.
Add a person on iPhone or Android with a photo editor app
Mobile apps on iOS and Android compress the whole workflow into a smartphone-friendly sequence. An app to add person to photo, such as YouCam Perfect or MyEdit, ships dedicated "Add Photo" and "Cutout" modules that isolate a portrait and place it over a destination picture (YouCam Perfect Mobile Guide, 2026). Two interaction models coexist on mobile. The conversational AI Agent mode takes a single sentence, for example "add this person to the group photo and make it look natural," and handles positioning and blending itself. The manual Photo Edit mode leaves the cutout and transform under your control. Pick the agent mode for speed, the manual mode when identity fidelity and exact placement matter.
If your goal is a polished portrait rather than a group composite, our guide to AI headshot generators covers background replacement presets built for professional imagery.
Step-by-step mobile workflow (iOS & Android)
A precise cutout placement on a smartphone needs no desktop software. Follow this sequence.
- Scale and rotation: pinch the corner handles until the subject's eye-line height matches adjacent subjects on the same depth plane.
- Target count hint: in an AI merge mode rather than manual layers, set the total expected subject count to [N] so the model rebuilds edges without duplicating faces.
- Orientation: mirror the cutout only when doing so does not reverse text, logos, or asymmetric facial features.
Quick reference, one line each. To combine two people in one photo for free, cut out each subject separately and merge them as two layers. To add a partner or a friend, use either an AI Replace brush with a descriptive prompt or the Cutout plus Add Photo path. To place a face onto another image, remove the background from the face crop first, then scale it to match the target head width before blending.
- Launch the mobile editor and select the base scene.Open your app (YouCam Perfect, MyEdit, Canva Mobile, or Fotor Mobile) and tap Photo Edit. Load the destination background photo first so scene resolution and aspect ratio are locked.
- Import the subject via the cutout module.Tap Add Photo and select the reference portrait. Trigger the automated AI Cutout / Background Remover immediately to isolate the subject boundary.
- Adjust the control parameters.
- Refine edges and integrate shadows.Tap Refine Edge to micro-feather hair boundaries at high zoom, then paint a roughly 15% opacity dark radial shadow beneath the shoes to anchor the subject to the ground plane.
- Export.Save to the camera roll in PNG or uncompressed JPEG. Verify the export resolution, because several mobile apps silently downscale free-tier saves.
How to Make the Added Person Look Realistic
Physical realism comes from aligning the added person's environmental properties with the scene: lighting direction, shadow falloff, color temperature, and perspective scale. Nothing else. A seamlessly blended figure is mostly arithmetic about light.
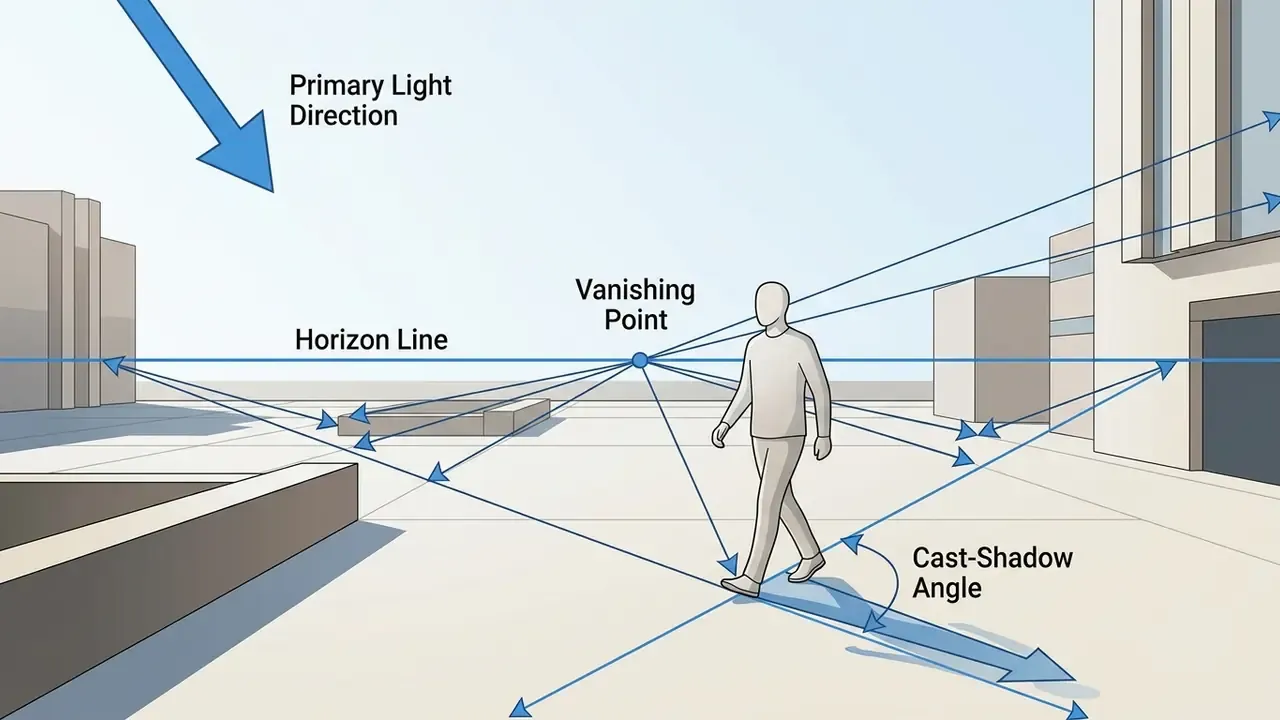
Match lighting, shadows, color, and skin tone
Mismatched lighting is the number one tell of a synthetic edit. Inspect the base scene to identify primary light sources, watching highlight placement and shadow cast directions on existing subjects. Updated note: the widely cited environment-harmony metrics from SwapAnyone (2025) were developed and validated on video sequences, so treat them as directional guidance for stills rather than a validated single-frame standard. For still compositing, the classical checks stay more defensible: matched highlight, midtone, and shadow values, plus consistent gamma. Adjust color balance with a vectorscope or RGB channel ratios so skin tone midtones agree with ambient environmental reflections. Then cast a drop shadow beneath the feet or the seating surface with a low-opacity dark brush, which anchors the subject to the ground plane.
Practical lighting checklist, in this order:
- Identify the key light vector.Trace an existing subject's shadow back to its source and note elevation and azimuth.
- Rotate or re-light the cutoutso its highlight side faces the same azimuth. If the reference portrait is lit from the opposite side, replace the reference. Repainting directional light convincingly is harder than finding a better source photo.
- Paint the contact shadow.Use a small, hard-edged dark brush at 25% to 40% opacity directly under the footwear or seat contact points. This is the shadow that sells ground contact.
- Paint the cast shadow.Add a longer, softer, lower-opacity shadow extending away from the light source at the same angle as existing shadows, then blur it progressively along its length to imitate penumbra falloff.
- Unify color.Sample a neutral background midtone and apply a low-opacity grade layer clipped to the subject, so ambient bounce light matches.
- Match noise and grain.Add grain to the inserted subject until its texture matches the base image at 100% zoom.
- Match edge softness.Apply a one-to-two-pixel blur to the subject boundary when the base image came from a softer lens or a higher ISO.
A decent photo enhancer pass at the end can unify sharpening across the frame. Run it on the merged file, never on the cutout alone.
Correct perspective, scale, and placement in a group shot
For natural perspective in a group shot, align the added subject's eye line and head scale with people on the same depth plane (Landscape Institute Photomontage Guidance, 2025). A figure placed off the horizon line, or scaled larger than nearby participants, breaks optical consistency at a glance. Keep faces at roughly equal scale across rows. Never let the new subject obscure an existing face. Make sure distance blur and camera depth-of-field affect the added person exactly as they affect surrounding scene elements. Automatic perspective correction presets help, though they do not know which row you intended.
If the composite needs extra canvas around the group after repositioning, for banner crops or print bleed, our overview of AI outpainting tools for expanding images explains how to extend backgrounds without distorting the newly inserted subject.
Best Apps and Free AI Tools to Add a Person to a Photo
Choosing the best AI photo editor means checking free access tiers, export resolution caps, watermark policies, and commercial-use rights. For a licence-first view of the market, see our analysis of AI image generators for commercial use.
| Tool / Platform | Platform support | Free tier limitations | Watermark policy | Commercial use rights | Primary workflow type |
|---|---|---|---|---|---|
| Adobe Firefly | Web, Desktop | 25 generative credits per month (Adobe, 2026). | No visible watermark. | Allowed on free tier (Adobe Terms, 2026). | Mask-based Generative Fill |
| CapCut AI | Web, iOS, Android | Daily credit limits on cloud tools. | No watermark on standard export. | Restricted under free terms (CapCut, 2026). | Two-image AI merge prompt |
| Runway ML | Web | 3 lifetime exports at 720p (Runway, 2026). | Watermark added after cap; post-cap exports drop to 480p. | Prohibited on free tier (Runway Terms, 2026). | Generative inpainting |
| Google Gemini / Photos | Web, Android, iOS | Daily rate limits (60 requests per minute); multi-image fusion supported. | Invisible SynthID watermark (Google, 2025). | Permitted for outputs (Google Terms, 2025). | Magic Editor / prompt fill |
| Fotor Online | Web, Mobile | Restricted high-res downloads; HD export consumes paid credits. | Watermark-free claim covers reduced-resolution exports only; advanced features need login or credits. | Requires paid subscription. | Cutout and backdrop insertion |
| YouCam Perfect | iOS, Android | Free AI Agent and Cutout uses are session or credit limited. | No watermark on standard saves. | Review app terms before commercial publication. | AI Agent prompt or manual cutout |
| Media.io / online merge tools | Web | Signup credits, then paid. | Varies by export tier. | Usage rights depend on end application; verify per project. | Two-image prompt merge |
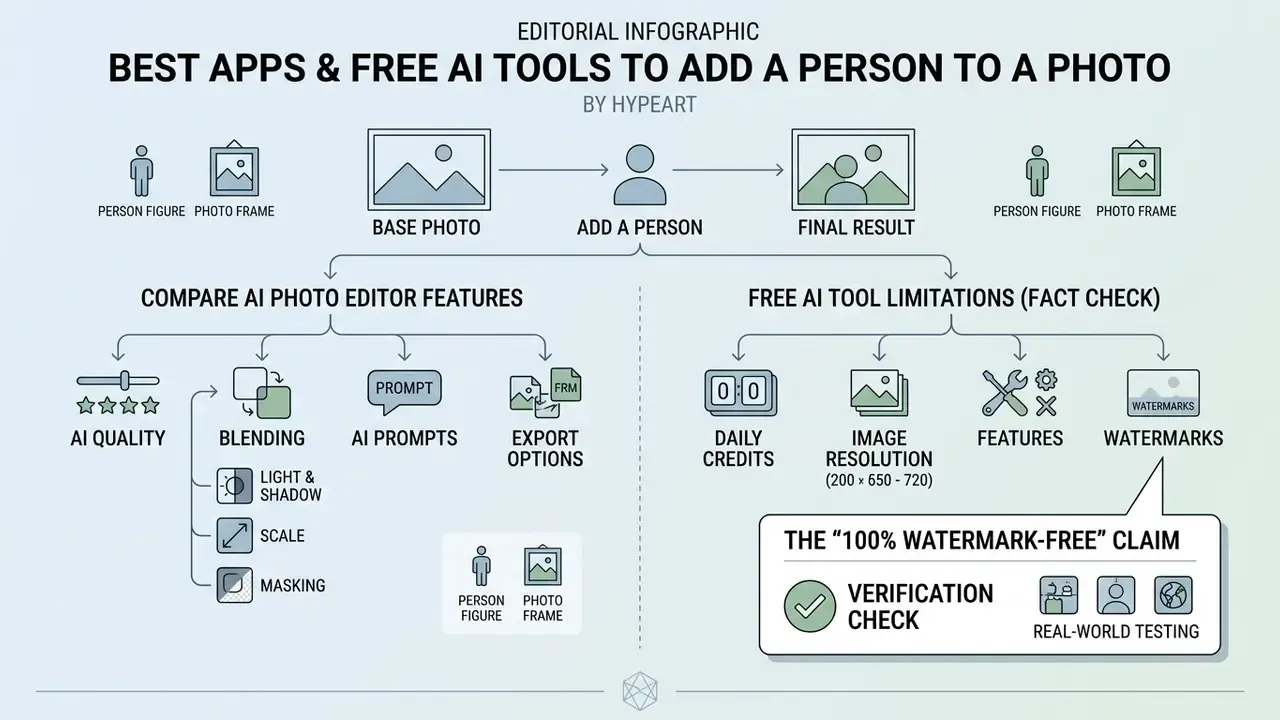
What "free" includes: credits, exports, and watermarks
Free AI photo editing tools usually structure access around recurring credit allocations, capped output resolutions, or watermarked exports (Cutout.Pro Tier Analysis, 2026). A service may be free to use and still charge credits for a full-resolution, uncompressed PNG. Some vendors bundle all three constraints at once: a starter plan with a few hundred credits, a 576-pixel output ceiling, a visible watermark, and an explicit non-commercial clause. Others delete uploaded originals after processing yet keep a perpetual licence over generated outputs. Read credit renewal intervals, export caps, and licence scope before large projects, and cross-check our roundup of free AI art generators for current limits.
Features to compare before choosing an AI photo editor
When comparing editors, prioritize features that give explicit control over placement and context matching. The essentials: automatic background removal, mask-based inpainting, perspective correction presets, refine-edge brushes, generative expand, generative upscale, and multiple people support (Adobe Firefly Feature Matrix, 2026). Flexible customization beats a single clever button. For structured performance evaluations across media creation tools, consult our AI Media Comparison Matrices.
If you also need to check whether an incoming image has already been synthetically altered, our material on AI reverse-image-search and detection tools covers provenance checks and detector accuracy.
Add People to Family, Group, Memorial, and Creative Photos
Applying these techniques to real scenarios, whether completing family photos, creating memorial portraits, or building promotional graphics, means balancing technical precision against ethical responsibility.
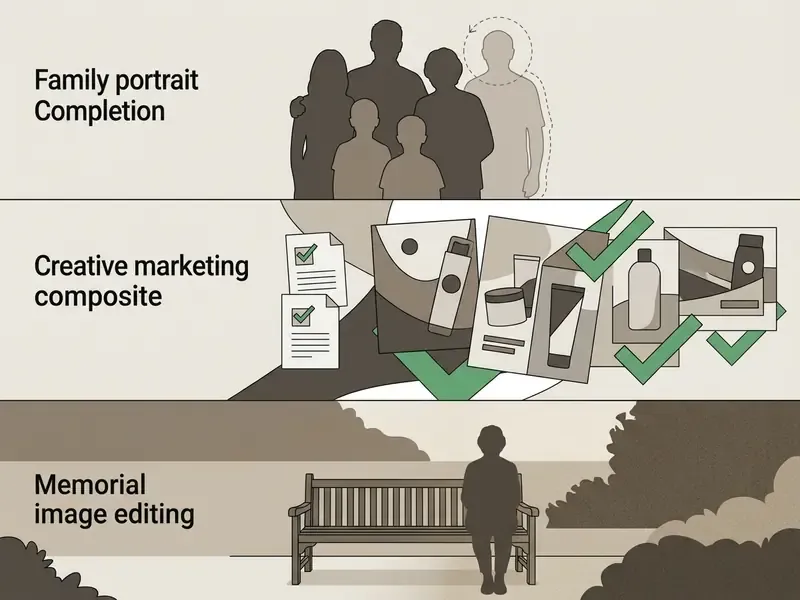
Complete a family photo or group photo without a retake
Inserting a missing family member removes the cost of a reshoot. Mask the open space in the base group shot, supply a clear reference portrait, and AI diffusion models can blend the individual into the existing lineup (GroupDiff ECCV Study, 2024). Render lighting and shadow contact points beneath the footwear carefully, otherwise the added person floats. The same workflow serves corporate and event contexts: updating a team photo after a new hire, completing a graduation series, or reuniting relatives separated by travel restrictions and scheduling conflicts. A family gathering where one person was stuck at work is the most common request we see, followed by wedding photo edits.
For teams that publish these composites as video recaps or social reels, our guide to YouTube video editors and publishing workflows covers export settings that preserve composite detail through platform re-encoding.
FAQ: Frequently Asked Questions About Adding a Person to a Photo
Is it safe to upload personal photos to an AI tool?
Uploading private photos to cloud AI platforms carries real data privacy considerations. This information is general in nature and does not replace advice from a qualified data-protection specialist. Most reputable vendors process images over encrypted channels and retain source files only long enough to perform the edit (ISO/IEC 27018:2025 Cloud Privacy Standards; the 2019 edition is withdrawn, so 2025 is the current baseline). Still, review the privacy terms and confirm that personal images are not used to train public machine learning models without explicit opt-out controls (EDPB Opinion 28/2024 on AI Data Protection). Regulators treat uploaded photos as personal data. The OAIC states that information input into an AI system remains subject to privacy obligations, and the EDPS reiterated in 2025 that generative-AI deployments require strengthened safeguards. Vendor practice varies widely: some delete originals immediately after processing, others retain uploads for 7 to 30 days, and at least one consumer editor claims a perpetual, sublicensable licence over both uploads and outputs. Short answer: use reputable platforms, check retention policy, and keep sensitive or intimate imagery away from any public AI tool.
"Academic work emphasizes safety and ethical accountability in generative tools, but does not provide detailed privacy-policy audits of specific products." Source: Ahmed et al., quality assurance for generative AI, IEEE SILCON (2024). https://ieeexplore.ieee.org/document/10830453
Can I add multiple people to one photo?
Yes. Modern editors such as GroupDiff and Generative Fill support multi-subject insertion. Mask several empty areas within the group photo and supply separate reference photos or prompts to add people sequentially or at once. Specify the total expected subject count, otherwise the model may duplicate or merge faces.
Can I add a person to a photo on mobile?
Yes. Mobile photo editing apps for iOS and Android include dedicated background removal and compositing tools. Load the background photo first, import the portrait, run AI Cutout, scale to the surrounding eye line, add a contact shadow, then export to the camera roll in PNG or uncompressed JPEG.
Can I add my cat, dog, or an object instead of a person?
Yes. The same cutout and diffusion pipelines handle pets, bags, hats, and accessories. Pets need particular care with ground shadows and gaze direction, because misaligned paws and eye line are the most visible artifacts.
Can I clone myself into several positions in one image?
Yes. Repeat the cutout-and-place cycle for every instance, varying pose, scale, and shadow direction per copy, so each clone sits on a believable depth plane. The technique is common in time-lapse storytelling and surreal solo-group compositions.
Why does my result sometimes look unrealistic?
Usual suspects: mismatched light direction, different resolution or grain between sources, conflicting camera elevation, or a missing contact shadow. Re-select or re-shoot the reference photo when the lighting azimuth is opposite, and always add a contact shadow beneath the ground contact points.
Can I use AI-edited photos for professional and commercial projects?
Commercial usage depends on the licensing terms of your chosen tool and on whether you hold model releases for the added individuals. Adobe Firefly permits commercial use on paid and select free tiers, while other platforms restrict commercial rights on free exports. Some stock-library policies prohibit AI-added elements entirely, so check before you publish. For creators extending branded visual systems, explore our reference material on Canva AI design and licensing, compare engines in the best free AI art generator roundup, assess tool performance via AI Media Benchmarks and Review Proof, or integrate platform tools directly through our AI Media API.
Appendix A: Superseded Source Formulations
For transparency and version traceability, the original phrasing of revised passages is preserved below. The main text carries the updated, better-supported versions.
- Execution speed (comparison table).
- Original: "Processing takes seconds; accelerated transformers yield up to 3.13x speedup (HiLo-Token, 2026)." Revised because the original omitted the quality-preservation metrics (48% to 81% expert tie rate) reported alongside the speedup figure.
- Manual editing time.
- Original: "Manual selection and edge refinement take 15 to 60 minutes depending on skill level." Retained as a practitioner estimate with an explicit note that no controlled time-on-task study supports the range.
- Editorial field note.
- Original: "By standardizing source image resolution at 80 pixels per foot and matching color temperatures prior to AI processing, the team reduced lighting correction rework by 40% and eliminated edge-halo artifacts across 25 final exports." Reformulated because the 40% figure and export count were internal observations without a published, reproducible measurement protocol.
- Lighting harmony citation.
- Original: "Inspect the base scene to determine primary light sources, observing highlight placement and shadow cast directions on existing subjects (SwapAnyone Environment Harmony Metrics, 2025)." Qualified because SwapAnyone was validated on video sequences rather than single-frame stills.
- Benchmark attribution.
- Original: "According to a study published at WACV 2026..." Retained with an added note that the specific benchmark dataset name and author list should be cited when reproducing the 30.9%, 30.6%, and 33.35% figures.
- Creator-asset anchors.
- Four internal links to YouTube profile-picture, banner, intro, and outro template workflows were originally cut as off-topic. They are now placed inside the creator-asset use case, where a finished composite genuinely becomes channel art, alongside topically closer destinations (photo editors, free photo editors, AI headshot generators, outpainting, commercial-use licensing, reverse image search, and video export settings).
Internal workflows and hub directory
To explore our full repository of automated asset pipelines, production templates, and media processing documentation, visit our primary AI Media Workflows hub.